Location: UK, homebased with some UK travel for monthly team meetings
Hours: Full-time, part-time, flexible
Salary: £25k – 45k, negotiable, dependant on experience
About UpdraftPlus
At UpdraftPlus we make plugins for WordPress that help our customers to backup, restore, clone, secure and optimize their WordPress websites.
Our growth has largely been down to the strength of our products. Our plugins are some of the most highly rated plugins on WordPress.
We have amazing product development teams. Now it’s time to build leading business and operational teams to match. As a result, we’re recruiting for a number of roles.
About the role
They say that ‘Content is King’ and we agree.
Your role would be to oversee and plan content across our range of WordPress plugins. From short-form blog writing to video content to long-form technical documentation.
We want to hear from you if:
You’re a strategic thinker. You know what the content overseen by you needs to achieve, from helping existing customers in using our products, to engaging new ones.
You can translate strategic thinking into action, in this case into a content calendar of ideas.
You’re a natural organiser. You’d enjoy and excel at organising and planning content from ideas to inception and reporting.
Your high attention to detail means that content owned by you will be of a high quality. You have a penchant for well-written copy. You can spot a typo from a mile away.
You’re analytical. You’re able to survey the market to see what’s topical and then analyse the performance of content once it’s ‘out there’.
You’re a confident communicator, and a team player. You’ll take the lead in approaching colleagues based all over the world for content ideas.
You enjoy writing. Over time you’ll find other writers and freelancers you’ll want to work with, but you enjoy producing your own written content too.
We know we’re asking a lot, so if you tick most of the boxes (but not all) we still want to hear from you. Knowledge and experience of WordPress is a massive bonus.
Company Benefits
Flexible hours We’re available for each other when it counts, but outside of that your work hours are yours to own and manage.
Remote working – Work remotely from home, your local café, whatever works for you. Our team is 100% remote.
Part-time considered – we’re flexible, for the right candidate.
Monthly meet-ups – We aim to meet once a month for face-to-face time and so occasional travel is required.
It’s an exciting time to join UpdraftPlus, we’re an evolving business with tonnes of opportunity for growth.
To apply, send a CV and a cover letter explaining why you’re right for the role to [email protected]
AIOS 5.0 is the first major release of ‘All-in-One Security’, since the popular WordPress Plugin was acquired by UpdraftPlus in August 2021.
Joe Miles, Director at UpdraftPlus said:
“We’re thrilled to build on the good work already done with All-In-One Security (AIOS), the only five-star rated WordPress security plugin with more than 1 million active installs. Release 5.0 brings significant new features, tweaks and fixes to our loyal customer base.”
AIOS 5.0 includes the launch of a new PHP firewall.
Previous versions used .htaccess files to provide firewall rules. This new release extends AIOS server compatibility beyond apache based servers.
AIOS also includes the addition of Two-Factor Authentication (TFA). TFA supports TOTP + HOTP protocols and so supports Google Authenticator, Authy and various other authentication tools.
The UpdraftPlus team is also working on an AIOS Premium product which will bring active scanning for downtime and malware as well as response time monitoring, advanced two factor authentication, country blocking, smart 404 blocking and premium support at a competitive price point.
The full change log for AIOS 5.0 log is included below
FEATURE: Two-Factor Authentication (TFA) functionality & related settings.
FEATURE: Set up a mechanism to load the firewall PHP file early.
FEATURE: PHP firewall rule engine.
FEATURE: Add WHOIS lookup functionality.
FEATURE: Implement 6G firewall rules in the new PHP-based firewall.
FEATURE: Disable WordPress application passwords.
FEATURE: Remove the plugin’s tables and options when uninstalling the plugin according to configuration settings.
FEATURE: Trash spam comments after n number of days as per configuration set in Admin Dashboard > WP Security > SPAM Prevention > the “Comment SPAM” tab > the “Comment Processing” section > the “Trash Comments After” settings.
FEATURE: Brute force Cookie-based Firewall Protection based on the PHP code instead of htaccess rules so that it also works with Nginx, IIS etc servers.
FEATURE: Allow multiple email addresses for the User Login > Notify By Email setting.
FEATURE: IPv6 range support in CIDR Format enabled.
FIX: The WooCommerce customer was redirected to the wp-login page after payment with an external payment gateway if forced logout configured after a specific number of minutes.
FIX: If the WordPress language was set to something other than English, then auto-update core, plugin, and theme emails sent in English instead of the configured language.
FIX: Database error for multisite when creating a new site solved.
FIX: Captcha options should not be autoloaded.
FIX: Database error for multisite cronjob column name.
FIX: The plugin clogs up the database with lots of rows. Delete old data after 90 days.
FIX: Rename Login issue with wp plugin list command solved.
FIX: Rename Login breaks logout functionality if WP_HOME is set to a different URL than the WordPress core files URL.
FIX: PHP Fatal error: Uncaught Error: Class ‘AIOWPSecurity_Admin_Init’ not found in html/wp-content/plugins/all-in-one-wp-security-and-firewall/wp-security-core.php:366.
FIX: The Spam comment blocked IP address remains blocked even after spammed comments are approved.
FIX: The “Time Length of 404 Lockout” option doesn’t do anything.
FIX: Search did not work for the 404 Event Logs list table.
FIX: Search did not work for Failed Logins list table.
FIX: Search did not work for the Account Activity list table.
FIX: Bulk deletions did not work for the Account Activity list table.
FIX: Warning when bots make malformed requests.
FIX: When the user had pressed the bottom bulk action button of the list table, the bulk action was confirmed by two confirm alerts.
FIX: Unblock link in 404 Event Logs list table redirected to wrong tab.
FIX: Temp Block, Blacklist IP and Delete links in 404 Event Logs list table didn’t work.
FIX: Rename login page and Cookie based brute force login prevention configurations didn’t work simultaneously.
FIX: Fatal error when activating using older PHP versions
FIX: If auto_prepend_file is already pointed to the firewall bootstrap file from php.ini manually, the bootstrap file try to include itself.
FIX: The custom logo wasn’t displayed on the login lockdown unlock request form.
TWEAK: Allow taking database backups via the UpdraftPlus backup plugin.
TWEAK: Make lockout reasons more specific.
TWEAK: Update notice class.
TWEAK: If the user has not performed the cookie test, the brute force attack prevention configuration fields remain disabled in the Admin Dashboard > WP Security > Brute Force > Cookie Based Brute Force Prevention.
TWEAK: Display locked IP addresses lockout date and release date in WordPress settings format.
TWEAK: Improve success or messages when performing bulk actions on the table list.
TWEAK: 404 events date is displayed in WordPress settings format.
TWEAK: Account activity login date and logout date are displayed in WordPress settings format.
TWEAK: Add a label for each setting field.
TWEAK: JQMIGRATE: jQuery.fn.click() event shorthand is deprecated.
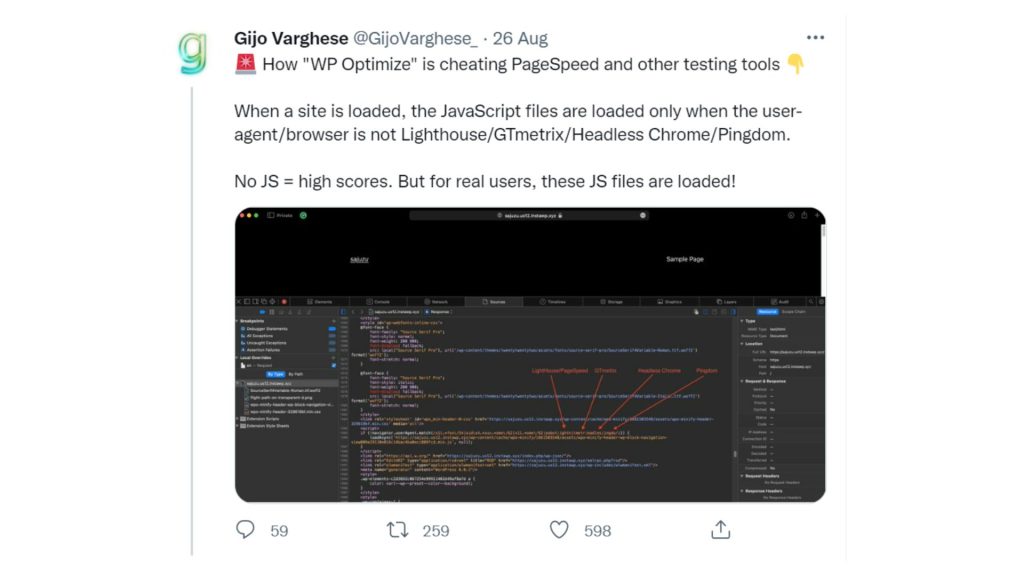
On Friday 26 August, Gilo Varghese, founder of Flying Proxy, a CDN, tweeted the following allegation about WP Optimize: https://twitter.com/GijoVarghese_/status/1563097754322501632 . We were not contacted directly but learned of it a few days later when we were asked by a WordPress news site to comment.
In short, the allegation is that WP-Optimize are deliberately deceiving its users by appearing to use page speed tools like GTMetrix to be faster than sites actually are, and are doing this secretly for the purpose of making WP-Optimize look better.
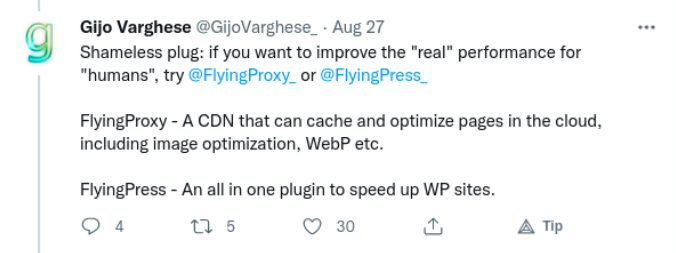
Varghese then proceeded to respond to users who responded to his Tweet to ‘plug’ his company, Flying Press, which is a competitor to WP-Optimize, with a competing plugin product:
The tweet was widely circulated, and resulted in a WP Tavern article yesterday on the allegations. This was a UK public holiday, when many of our team were away and we didn’t have time to fully investigate the allegations. We were given a few hours before publication to respond, but at that time our main WP Optimize developer was already, in his time zone, asleep.
The team at UpdraftPlus (owners of WP-Optimize) investigated today and found the allegations to be completely false. The truth is actually the reverse – it is the allegations which have been presented deceptively, missing out obvious and key facts.
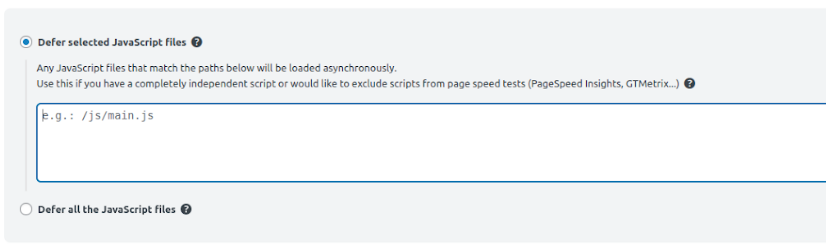
The most fundamental is that feature used to construct the claim clearly says in the user interface “…if you would like to exclude scripts from page speed tests”. The allegation by contrast implies this is hidden only in the code.
Secondly, the advanced setting used in the allegation is a valid feature, useful to find out whether the essential JS/CSS files are actually slowing down the web page or not. i.e. It has a proper use. This feature is by default, turned ‘off’ and only enabled by advanced users who know what they’re doing.
Joe Miles, a manager at UpdraftPlus said “the claim is the plugin is being deceptive, but it’s actually an explained setting in advanced settings which a site owner would have to decide to use, which have been used to falsely claim that WP-Optimize is manipulating things. The setting is a valid tool for testing. So UpdraftPlus will not be removing it and we’ve asked for the false accusations to be deleted.”
Peter Wilkinson from Divi Engine who developed Divi Nitro, (a speed performance plugin which is not affiliated with WP-Optimize, but actually a competitor), investigated the claims and said “Initially I was shocked at the news and as a competitor, thought it was bad practice to be deceiving customers.”
“Upon further investigation, I found out that it was actually far from the truth. In reality (from my research) WP-Optimize do not “cheat” pagespeed tools when you install or minify your Javascript.
“To “cheat” the tools, you need to manually add the JS files you want to asynchronous load to a setting that clearly has the label “Use this if you have a completely independent script or would like to exclude scripts from page speed tests (PageSpeed Insights, GTMetrix…)”
Wilkinson made this very clear video to show how the untrue allegations have been unfairly presented in a way that misleads people:
“It just goes to show that you should not believe everything you read or hear. Test everything to make sure it is the truth.” Wilkinson added.
“In my view, Gijo Varghese has used deception to promote Flying Pages and Flying Press.”
Adam Lowe, President of PeakPerformanceDigital.com who was initially quoted in WP-Tavern as asking UpdraftPlus “how are we supposed to continue trusting your company with my clients’ backups when you use these deceptive and fraudulent practices?” replied today in support of WP-Optimize. He said:
Meanwhile, Andrew Palmer of WP Plugins Plus, tweeted that he believed the original claims to be false:
Summary: Gijo achieved the result that he did by using a clearly labelled expert feature with explained possible use cases to do something else. He then presented this as the normal but dishonestly hidden result of using WP-Optimize. This should never have been made a news story. We do not encourage anyone to try to “game” PageSpeed scores, and Gijo’s allegations that this is our secret intention that people would do so is unworthy, and we hope he will do the honourable thing and retract it. If any other users are puzzled by anything else in WP-Optimize, we hope that instead of stirring outrage on Twitter, they will ask us about it in a support channel.
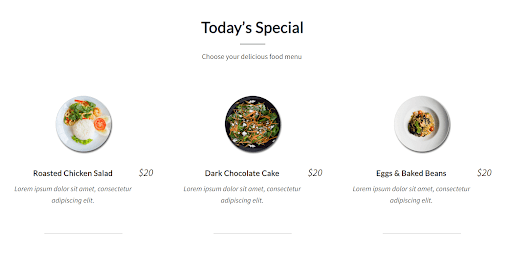
Having engaging, clear and fast loading images on your WordPress site is one of the most effective ways to draw a user/customer in. There is a reason that car dealerships spend so much time making sure that the new models are spotless and sparkling. The visual impact of a product can often be the make or break decision between success and failure. Online showrooms are no different, plus there is the added complication of how an image can impact your loading speed. It is a well used and famous metric, that a user will leave a website if it takes more than 3 seconds to load. If a website does take more than 3 seconds to load, then there is a good chance that the images you have on your site are part of that reason.
So as a WordPress site owner, what can you do to ensure that the images you have on your site are both appealing to users and allow your site to load quickly. Your initial instinct might just be to shrink the image down from a 1800×1400 size image to 300×200 size image. This would be the wrong course of action to take, as while your image file size might now be a lot smaller, the quality of the image and user experience has suffered as a result. If you have a car showroom sales website for example, customers will want to get a really good look at the car and be able to see all the features and detail. By making the image so much smaller, any detailed inspection of the car is now impossible – leaving the potential customer frustrated and looking elsewhere.
So what are your options? Thankfully, there are dozens of different image file options you can choose from, ranging from the high quality, but large file size BMP, the tried and tested JPEG, to the new and widely unknown WebP format. Along with choosing the right format, it is important to remember that regardless of what format you choose, you can additionally reduce the image file size by employing a process via WP-Optimize known as “compression”.
Site speed is one of the top 10 most important factors Google bots crawling your website observe when they are ranking your site in the search results. Having poor loading speed can badly impact on the ranking of your site and can easily take your site from the first page, to failing to be indexed by Google. Google is very strict on how they rank sites in their search algorithm and if they find that the site offers a poor user experience due to slow loading times, they might not even go through the trouble of even crawling it and making it discoverable via Google search.
Which image format should you choose?
As high quality images are so important for any modern WordPress website, you need to know which format to use, how they affect the performance of your site and how to get the best out of your file selection.
The two most popular image file formats for websites are PNG and JPEG/JPG. According to w3techs, more than 70% of all websites use these file types. Around 30% of sites use SVG and 22% use GIF.
This is where image file types would come into play as the type of file you use to upload your images play an important role. As there are so many different file types, we will go through the most popular ones and their pros and cons down below:
Before we jump into the type of file we need to understand some concepts before, like what a raster and a bitmap image are? What is compression? What is the difference between a lossy and lossless compression?
Compression – Lossy Vs Lossless
Both of the compression types are aimed at reducing the file size, but it’s what they remove that really matters. In Lossy compression; important data that is relevant to the quality of the image is removed. This can be reflected in the image being pixelated in some cases as your computer can have trouble reconstructing the image.
In lossless compression, irrelevant data that is present in the image (such as metadata) is reduced, which helps reduce the file size. The image quality is not affected at all in this process.
Raster Vs Vector
The most commonly used image file types are typically raster-based. This means that they have a fixed RGB color value associated with every pixel and all of those pixels are combined and used to create a whole image.
Examples of such file formats include jpg, png, and gif.
Alternatively, a vector image is created using shapes and lines that can be scaled infinitely without them ever being pixelated. The vectors are created using mathematical formulas that allow users to change the values, while not affecting the quality of the image.
Now that we have gone over the basics of the images, we can now look at the details of the different file types.
JPEG:
This is a digital image format that contains compressed image data. With a 10:1 compression ratio, JPEG images are used as they are very compact. JPEG format contains important image details and is the most popular image format for sharing photos and other images on the internet. The small file size of JPEG images can also let users store thousands of images (for example on an art site) without the need for extra storage space on your site.
JPEG is a lossy compression file type that works well for photos, but it is recommended that you use another format when working graphics, such as PNG.
A JPEG image file example. You can see that the detail and quality has been maintained when uploading.
PNG:
PNG is a popular bitmap image format and is short for “Portable Graphics Format”. This format was created as an alternative to Graphics Interchange Format (GIF). PNG has some great features like containing 24-bit RGB color palettes, greyscale images and displaying transparent backgrounds. A lossless data compression method is also used in PNG images when working on high quality images or graphics. PNG images are also frequently used in Image editing as they can give the user more control and options on the image over traditional JPEG format.
PNG also uses a lossless compression algorithm, which means this format can retain more data than JPG. When using a PNG image file, users can also save these images with a transparent background. By using this format, users have the option of working with layered images that can show a clear background (for example – just the flowers in the image below and not the background wall), enabling users to add the image to other images without the need to cut it out and remove the existing background – as you would have to with a JPEG image. This is one of the main reasons why it is the preferred choice for graphics like diagrams and illustrations. PNGs are known to be more popular for users working with graphics, rather than uploading standard photos.
A PNG image maintains high quality, while also allowing you to have more control over the image
GIF:
You probably know the term “GIF” best from the countless short clips you are sent on messaging apps. GIF stands for “Graphics Interchange Format” and is mostly used to support animation without audio
Unlike JPEG and PNG, GIFs are used in a more niche case and are not typically used for static images (although this is possible). If you use a GIF on your WordPress site, it is most likely in order to show you visitors a simple animation or process. GIFs have a limited color range and are best used for simple graphics. They use lossless compression and tend to be smaller than JPGs. It is generally recommended that you only use GIFs sparingly in your site, as they can increase loading times (given the file size) and are limited to 256 colours.
An example of a GIF image. The quality of the original image has been greatly reduced in order to produce the animation.
SVG:
Scalable Vector Graphics (SVG) is a web-friendly vector file format. As opposed to pixel-based raster image files like JPEGs, vector files store images via mathematical formulas based on points and lines on a grid. This means that vector files like SVG can be significantly resized without losing any of their quality, which makes them ideal for logos and complex online graphics.
Vectors are best only for simple graphics, shapes, and illustrations. SVGs are a good choice for logos, especially if you need your logo to be responsive and are supported by most browsers including Chrome, Firefox, Edge and Opera.
An example of the sunflowers in a SVG format that you would use for a logo.
BMP:
BITMAP is now considered an outdated image format. BMP loads the images in a lossless image format which can result in huge file sizes due to the lack of compression. Considering the importance of loading speed and how site creators want to keep the image sizes to a minimum (not to mention the popularity of SVG and JPEG formats), this format has become largely unused for online images.
The original quality of the image is maintained when uploading in the BMP format, but the file size will badly slow down your site and is not recommended.
WebP:
This image format was created by Google in 2010 and is starting to prove popular with people who upload lots of images to their site as it has several advantages over JPEG and PNG, such as having better lossy and lossless compression performance.
WebP also typically uploads in smaller file sizes than JPEG or PNG formats given its improved compression performance and will take up less space on your site – allowing it to load faster. While it isn’t supported by all browsers, it is supported by all the most popular browsers – including Chrome, Firefox, Edge and Opera.
Though not as well known as JPEG and PNG, WebP could prove to be the image format of choice in the future.
Conclusion:
There are many types of image formats that can be used on your WordPress site, but it is important to evaluate the purpose of the image. If your site is for a wedding photographer for example, you will want to maintain high quality images that still load quickly and are user friendly (JPEG). However, if you are selling images in an online poster store, then you will want to maintain as much detail and image information as possible (PNG).
As a general rule of thumb, if you are just uploading standard images for your online store, blog, portfolio, social media or social media site – then it is recommended that you upload you images in a standard JPEG format and then use WP-Optimize to further compress your images
However, should you wish to future-proof your images and improve your loading speed as much as possible, then WebP can offer superior lossy and lossless compression, while still maintaining high levels of details. Whatever you decide, remember to always compress your images using WP-Optimize for the market leading compression.
Now that you have contributed so much of your time and money to your shiny new WordPress website and have showcased your talents to the world, it is important to ask the questions; “Did you pay close attention to perfecting the WordPress user experience?”
Today’s tech-literate consumers have high expectations, which is why a website that feels clunky and awkward, just isn’t good enough. Providing the best user experience for your WordPress site should be paramount. No matter how professional or high quality your products or services are, if your site showcase doesn’t give a high standard of customer user experience, you will be doomed to failure.
In this blog, we have put together a guide on how to greatly improve user experience in your WordPress site with 7 strategies to succeed.
Why is the user experience so important?
In a world filled with so many digital options and distractions, providing a good user experience can be one of the main keys to success. Take Uber for example. Uber revolutionized the taxi industry with a new way to order and track cabs by using an intuitive and simple-to-use app on your mobile phone. Uber is now a world-wide multibillion-dollar company with services in most cities – largely thanks to its innovation and consideration of the end-user.
The same theory applies when creating your WordPress site. Whether it’s a blog, an online store, a marketing hub, or a portfolio for your services; your chances of success are intrinsically tied to the positive level of user experience you provide.
Here are some of the most obvious and measurable benefits of a good user experience:
Set a good first impression of your brand
Setting a good first impression is important for showing potential customers you’re the real deal. It doesn’t matter how good your products, services, or content are, if your WordPress website isn’t aesthetically coherent and functional, no one will want to use it. Users must be able to navigate your pages with ease so that they get an immediate sense of direction and understanding on how your site operates.
Increased sales
Any website that makes the purchasing process straightforward and easy to follow iis more likely to see an increase in sales and revenue. To put it simply, the easier it is to browse and take action, the quicker users will be able to act on impulse and purchase products and services from you. Simple features like search filters and recommendations can enhance the user experience by giving them multiple options to begin the buying journey.
It’s a win-win. A positive experience for the customer and more sales for your business.
Increase user retention rates
Offering the best user experience keeps customers coming back for more. Satisfied customers will not feel the need to look elsewhere if you’re meeting their expectations. Existing customers are also likely to recommend your site to others and become brand advocates if you offer a professional and friendly UX.
Improve search engine optimization (SEO)
Take a look at the top-ranked sites on a search engine like Google and you’ll find they all have a professional high end user experience design. The days of cramming as many keywords as possible into your content to rank via SEO are long gone. Google has expanded how it ranks websites and how it views SEO requirements by including such elements as UX design. It is important to remember this when it comes to setting and designing your site using WordPress.
How to improve user experience in your WordPress site: 7 strategies to succeed
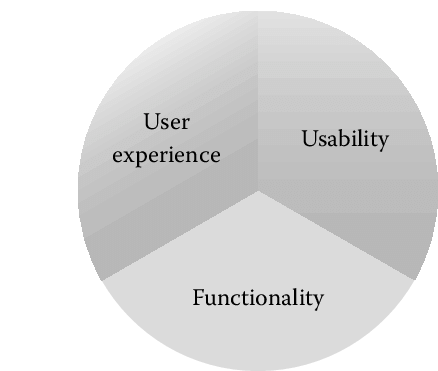
Creating a popular and (potentially) profitable website means putting the user experience first. Try putting yourself in the shoes of a new customer, and design your site around their experience, rather than how ‘amazing’ your product is. The user experience goes hand-in-hand with usability and functionality.
It is important to remember that sometimes less, really is more. Don’t sacrifice functionality for an overly pretty and complex design. Ask yourself, ‘Would I find this website easy to follow if I came here for the first time?’ Users value usability and useful features over crowded visuals. For example, always put buttons where you would expect to find a button. Make your potential customers’ life as easy as possible, as they will quickly abandon your site if they struggle to perform a simple task or have to go looking for the ‘buy button’.
A conventional blog format is suitable in many instances, that is, a header, followed by the main body and a sidebar, completed with a footer. From here, you can make subtle tweaks to enhance the overall design. Be sure to give it a quick mobile friendly test to ensure it’s appearing correctly on mobile devices.
It’s all about getting that balance between form and function.
A navigation bar (this is a must-have) Naming key pages for your navigation bar is simple with WordPress. Simply click (Appearance > Menus) in your sidebar to customize your menu’s order and page names.
A list of categories in your sidebar Having an easily viewable list of categories will allow users to quickly navigate to their general area of interest. For example, if they are in the market for a new TV, they can browse all TVs available on your site, without having to also view Laptops.
A search tool Imagine a customer has come to you specifically for a bluetooth headset, give them a search bar to find them fast. WordPress has several search bar plugins for you to try. Some are free while others are paid for.
An archives page For an Archive page, let users search previous content by date, category, and keyword. This will help users find content fast while also helping your WordPress SEO strategy
Breadcrumbs Breadcrumbs are the navigational links found at the top of a page to tell you where you are on the site. For example, (Home > Blog > January 2022 > How to nail your WordPress website.)
Utilizing these common design features on your WordPress page is a great way to create a familiar experience for users.
3. Make sure your homepage is useful and informative
Your homepage is almost certainly going to be the most viewed page on your website. Think of it as your personal shop window for what goods and services you have to offer. Feature boxes can be a useful addition to the homepage. A feature box pops up on the homepage and can include content of your choice. A popular strategy is to use an ‘Opt-in’ box to introduce yourselves and encourage users to sign up for deals, information and discounts.
The best alternatives out there for your favorite tools.
The best tools for collecting and analyzing key data…’, etc.
A well-placed feature box involves the visitor right away and tells them what to expect and how to get more from your site. This can add to a better user experience. However, it is important to make sure your feature box contains legitimate and valuable information and doesn’t just present as an ad attempting to get the visitors email address.
4. Is your content easy-on-the-eye?
Content that looks visually appealing is more likely to attract visitors and keep them engaged. Remember to take inspiration and design cues from other popular websites in your niche area to get an idea of how their visual layout enhances the user experience.
When designing your site, also be sure to pay attention to design elements, typography choices and formatting. Have a look at other popular websites to see what they look like and what choices they made. Once you’ve found inspiration, you can use a pre-existing layout template to start from, or design your own layout from scratch.
In terms of formatting, consider the following:
Keep sentences and paragraphs short and sweet.
Use sub-headers to break sections up and make navigation easier.
Use bold to highlight keywords and phrases.
Italics are useful for emphasis and speech.
Images are useful for adding variety and color to a piece.
Other visual elements such as tables, lists and quotes help break up the site and provide extra information.
Creating a good user experience means nailing a design that’s easy-on-the-eye, while also being practical.
Today’s website users expect fast page speeds and sites that load in a second or two at most. In fact, having a slow loading site is the top reason visitors will leave.
Ways to increase page speed include:
Using only necessary plugins Running multiple plugins is one of the leading sources of slowing your site down.
Watch your image sizes Image compression plugins like WP-Optimize reduce the file size of images to boost loading speeds.
Use a Content Delivery Network service (CDN) This adds a level of protection against WordPress security issues too.
Enable caching Saves user data to reduce future loading times. WP-Optimize is also one of the leading caching plugins available for WordPress
6. Include plenty of negative space
Also known as white space, negative space refers to the parts of your page that have no content.
Somewhat ironically, negative space usually leads to a positive experience. Utilizing negative space lets users focus on the important aspects of your content without being distracted. 84.6% of web designers believe crowded web design is the most common mistake by small businesses.
Today’s consumers visit dozens of web pages a day. It’s likely they’re going to scan through your website anyway. A clever use of negative space lets them do this at their leisure without becoming bored.
7. Have a clear call-to-action
What use is your website if you don’t tell users what to do next? Far too often, visitors will leave a website without taking action simply because there was no clear CTA. A well-placed and well-worded CTA is key for boosting your WordPress conversion rates. Modern users want fast results, so placing your call-to-action button immediately after or halfway through your written content is a good way to go.
Effectively, you want to make it easy for the user to take the desired action without them having to search around for what’s next. WordPress has some useful plugins for managing CTA’s, have a look and see what works for you.
Final thoughts
Now that you have reviewed all the potential ways you can help improve the user experience for your WordPress site, these tips have got you thinking about the ways you can employ them to help boost your performance and SEO score.
The strategies above are commonly used across successful business websites all over the world on both WordPress and non-WordPress sites. Failing to have your own strategy could see you fall behind the rest and struggle to gain a foothold in your particular niche.
Start building your next WordPress website today, and remember to keep the user experience in mind in everything that you do.
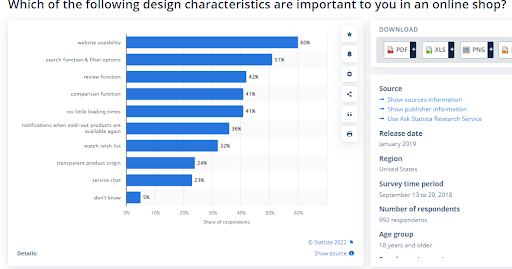
Whether your business is purely based online, or in the real world, building an online presence for your business, no matter how small, has become a necessity. In this blog, we will look at how to build a WordPress business website using Gutenberg. Thanks to the consistent rise of eCommerce, a record 2.14 billion people shopped online in 2021, compared to just 1.24 billion digital buyers in 2020. With the increase in the popularity of online shopping and the mass adoption of smartphones all over the world, it is clear that online shopping is here to stay.
If you’re looking for one of the easiest and fastest ways to build a business website, WordPress is definitely an option to consider. While in the past, the platform required third-party page builders to create elegant designs, with the advent of the new Gutenberg block editor, WordPress now allows you to quickly build almost any type of website out of the box. With the new Gutenberg building options, you can use ‘blocks’ to put together a professional and stunning looking business site in just a few hours. In this blog, we’ll walk you through the entire process of building a small WordPress business site from scratch using Gutenberg. We will also endeavor to answer some of the most important questions you might have about the default WordPress editor.
Let’s get to it!
Why you should build a WordPress site for your small business
A good website can significantly impact the success of your business. While your business may already be performing well without a website, offering your customers products and services online can help you achieve even more sales, improve customer engagement and increase brand awareness.
A few stats
Let’s look at some of the numbers that show the power and importance of owning a business site:
84% of consumers think businesses with websites are more credible. In fact, 56% of people asked said they won’t trust a business without one. (Source: Verisign)
81% of shoppers worldwide make a purchase decision only after researching the business, product, or service online. (Source: Adweek)
88% of people who search for a particular type of business on their mobile phones visit or call a related store within a week. (Source: Google Mobile Movement Study)
79% of users believe the reviews they read online. (Source: Salesforce)
Considering these numbers, establishing an online presence and conducting your business through a website is definitely a step in the right direction. Here are some of the biggest ways your small business can benefit from a dedicated WordPress site:
Attract more new customers and generate sales at a fraction of the cost Getting leads through organic and inorganic traffic is one of the major benefits of owning a website. At just a fraction of the cost of traditional marketing, an SEO-optimized site can get you a lot of traffic through Google.
Help people find out all the information they need easily Your site allows you to showcase all the products and services your business offers. You can also include contact information, opening times, product guarantee details and directions to your physical store via Google Maps.
Conduct business at any time of the day Even if you finish work at 5pm, your customers can still make purchases and interact with your business 24/7.
Add more credibility to your business Potential customers will expect your business to have a dedicated website in 2022. A good website design creates a solid first impression and can set you apart from the competition.
Set the narrative for your brand You can showcase your best testimonials and reviews on your site’s homepage and promote your brand by putting your best foot forward.
What Is Gutenberg and why should you use it?
As WordPress continues to grow from its humble blog beginnings, third-party developers have added plugins that made it possible to add more dynamic content. Gutenberg was added to keep WordPress relevant and to deliver on user expectations.
Gutenberg relies on content blocks and allows users to add almost any type of content to their site. It has a clean interface and that allows users to add new content to a site by selecting a corresponding block.
Gutenberg isn’t just a text editor with limited formatting buttons however. With this block-based system, you can easily add buttons, videos, shortcodes or contact form anywhere on your site.
Since December 2018, when Automattic made Gutenberg the default editor in WordPress 5.0, the platform has continually improved the features of the block editor. Other WordPress developers have also integrated some of their plugin features into Gutenberg, making it possible for you to add other custom content types to your site directly within the block editor.
What do you need to build your business WordPress site
Depending on the nature of your business, websites often vary in terms of design and features. Your small business site may be focused on brand awareness, eCommerce or content publishing. Regardless of what industry you are in, any business site built with WordPress requires these common resources:
Domain name – average cost $10/yr (depending on the extension) A domain name is the address users type in their browser’s URL bar when they visit your site. A catchy and memorable domain can help boost your chances of generating more traffic.
Website hosting – starting from $0.99/month Web hosts help you store website files and resources on servers that make it possible for site visitors to access them. There are different types of web hosts and choosing the best provider for you depends on a number of factors.
SSL certificate An SSL certificate can help keep your site files and your users’ information secure. Most popular WordPress hosting providers include a free SSL certificate in their plans. Once you have one, your site will show the ‘https://’ prefix in the URL bar.
Themes and plugins One of the advantages of using WordPress is that you can add specific features and set up your site’s design in minutes with free and premium WordPress themes and plugins.
How to build your WordPress business site using Gutenberg
Step 1: Get web hosting and install the WordPress software
Choosing WordPress hosting means you can easily install the software in one click. Your server resources are also optimized for website performance. You can buy WordPress hosting from many different sources, with shared hosting plans starting from as low as $2.95/month.
Once you’ve selected your plan, you can either register a new domain name or enter an existing one you have already setup. If you want to register a new domain name, you need to first confirm that it’s available. Next, fill in your account information and all the required payment information. Once your purchase is complete, you can now install WordPress in just one click.
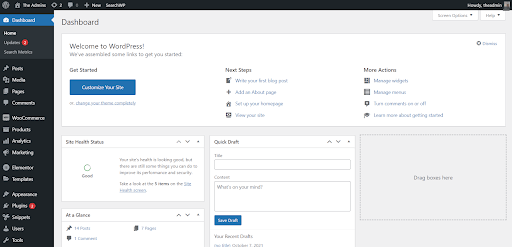
You’ll immediately be redirected to your WordPress admin dashboard after setting up your account login details.
Your WordPress site is now ready for use. It’s time to set it up and design it specifically for your business.
Step 2: Customize your site with a WordPress Theme
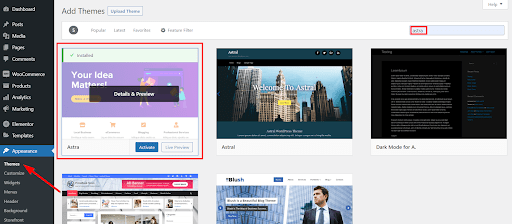
When working on how to build a WordPress business website using Gutenberg, the next step is to customize your site’s design. The fastest way to do this is to use a WordPress theme that includes professional design templates. We recommend using the Astra theme as it is the fastest WordPress theme and includes a number of templates tailored for Gutenberg. To get Astra, navigate to Appearance > Themes > Add New in your WordPress dashboard and search for ‘Astra’.
Select the theme, then click Install followed by Activate.
To setup and use the ready made design templates, go to Astra Options under the Appearance tab.
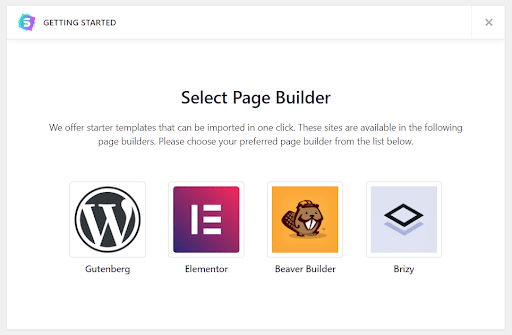
Next, click Install Importer Plugin.
After installing the importer plugin, select Gutenberg as your page builder.
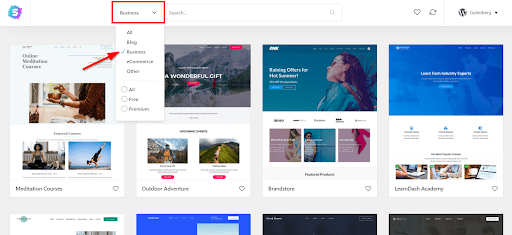
You can streamline the template options you’ll see by selecting the type of site you want to build.
As we are showing you how to build a business website, we will select Business.
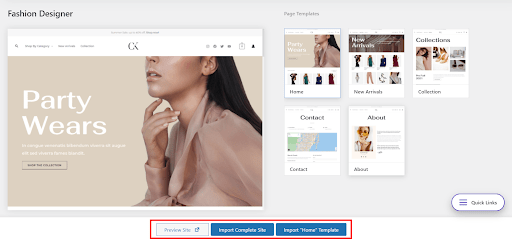
With Guttenberg, you can even preview each template in a new tab to make sure it suits your needs and that you like the style before you commit.
Click Import Complete Site when you find the design you like.
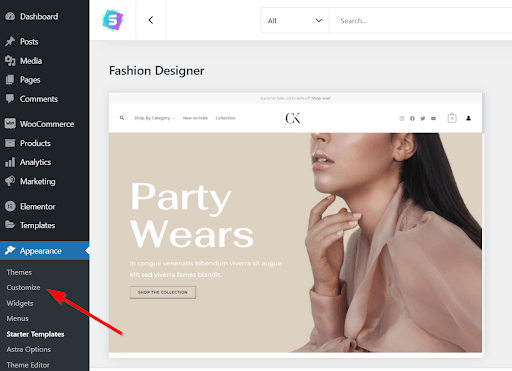
WordPress will then apply this template and change your site’s design. To further tweak your design, you can use the default WordPress Customizer. Navigate to Appearance > Customize to do this.
Pages are, of course, one of the major components of any business website’s design. Let’s see how to design important web pages using Gutenberg.
Step 3: Build important pages using Gutenberg blocks
For maximum SEO score, customer confidence and professionalism, some of the most important pages every business website needs must include the following: Home, About, Contact and Privacy Policy pages.The starter template we added should have already created these pages by default.
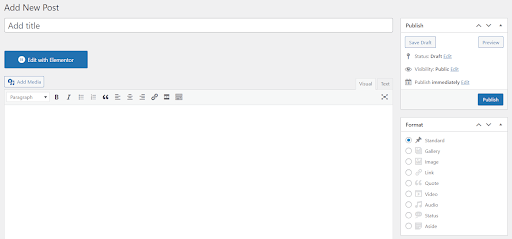
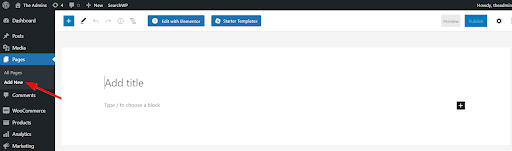
If you wish to create a new page that will show different information, such as a page dedicated to your opening times, you can create a new page by going to Pages > Add New.
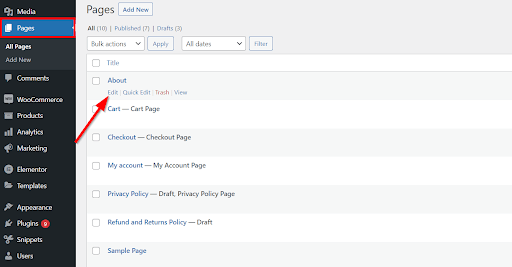
To edit any of your existing pages, go to Pages. Then click Edit after hovering over the page you want to edit.
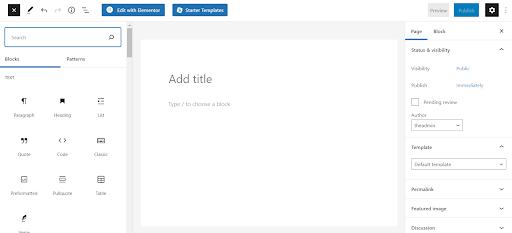
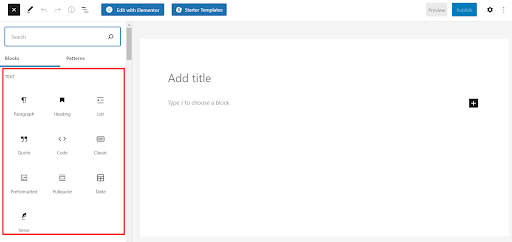
You can add any type of content like paragraphs, shortcodes and media such as images, documents, and videos to your web pages using Gutenberg blocks. To do this, click the + icon on the page editor.
To help build pages faster, it can help if you install a WordPress block plugin. We recommend Ultimate Addons for Gutenberg. Apart from adding creative blocks to your site, the plugin also comes with lots more starter templates. Some of the interesting blocks to check out that could be of particular benefit to you include the Price List, Team and Testimonial blocks.
With these ready-made blocks ready to go, you’ll find that you will be able to build as many pages as you need in very little time.
Step 4: Extend website features with WordPress plugins
You can improve the speed, performance, functionality and features on your site by using WordPress plugins. Below are some popular options that you may want to incorporate to your site.
WPForms
WPForms is an excellent forms plugin that enables you to build attractive forms and implement them anywhere on your website. While most websites use forms that only allow visitors to get in touch, a business website should make extra use of the features available by offering a customer the opportunity to reach out, ask questions or engage with your business.
UpdraftPlus is the world’s leading and highest rated WordPress backup plugin that helps keep your website safe by backing it up. After spending all this time and effort setting up your WordPress site, protecting it and creating a secure backup is one of the most important tasks you can carry out. So, should the worst happen, you can rest easy knowing that you will always have a recent backup copy of your site to restore from.
WP-Optimize
Speed is a hugely important factor for a business site, both in terms of SEO score and customer retention. WP-Optimize is a WordPress optimization plugin that can be used to calibrate and format your site, so it loads as quickly as possible. The importance of how quickly your site loads cannot be overstated. Faster loading websites perform significantly better than sites that take longer to load. So remember, anything you can do to boost performance is a good thing.
All in One WP Security and Firewall
As well as backing up and optimizing your site, you should also remember to protect your site with a security plugin, such as All in One WP Security and Firewall. You use a firewall on a website for the same reason you use anti-virus software on your computer and browser – To keep bad guys out. All in One WP Security and Firewall provides a wide ranging and comprehensive list of security tools to help keep your site safe and is simple to set up and use.
Presto Player
Video is a hugely important communication and marketing tool that every business should use on their site to help promote their products and services. Presto Player can help with that. This plugin helps you control how video looks, how it plays and even lets you monetize videos or add calls to action. Ideal if you use video in your business in any way.
Building your Gutenberg-powered business WordPress site
A well put together and professional business website is an integral part of any successful marketing strategy. The great thing is, that when trying to figure out how to build a WordPress business website using Gutenbergwith, you don’t need to be a coding expert or break the bank to build one for your small business. We hope the tips and processes outlined in this blog go a long way in setting up your business for success. If you have any questions, please let us know in the comments section below.
Author’s Name : Sujay Pawar
Sujay is the CEO and Co-Founder of Brainstorm Force, the company behind Astra. You can connect with him on Twitter @sujaypawar
UpdraftPlus is happy to celebrate World Backup Day with everyone today! With millions of users of UpdraftPlus all over the world, we are continually supporting and developing our WordPress backup plugin to help keep your WordPress site safe and secure.
With hacking becoming a bigger threat every day, the importance of having a secure and safe backup of your site available with UpdraftPlus (should the worst happen) cannot be overstated. From opportunistic amateurs to state sponsored cyber-attack units, the security of your site has never been under as much threat as it is now.
World Backup day is a yearly reminder that everything you’ve worked for and built can be lost in just a few seconds. As well as hacking threats, site owners have to also be wary of crashes, viruses, malicious actors and issues with plugins and themes.
Here at UpdraftPlus, we hear stories from users all over the world every day who have had these problems; and were only saved by their UpdraftPlus backup. As the world’s most popular and highest rated WordPress backup plugin, we have made it our mission in life to ensure that should your site ever get hit by any of these problems, you can always restore it to its previous state using your downloaded backup and our plugin.
Installed by over 3 million users all over the world, our easy-to-use interface allows you to backup and restore your website with a single click. You can also set the schedule to backup automatically as often as you like, so you don’t have to worry about forgetting to backup your site manually and will always have a recent upload of your site ready to go.
As it is World Backup Day, get 20% off UpdraftPlus Premium for today only using the discount code: WBUD22 at the checkout.
Now that you have your WordPress site in excellent shape and filled with engaging content and compelling designs, you can start to evaluate if it is enough to retain new visitors and keep them coming back again and again.
With so many online options to choose from, it can be hugely difficult to compete for people’s already fleeting attention. To have a successful site these days, you have to do a lot more than just the bare minimum if you hope to increase the traffic on your page. While colourful designs, well-made content and excellent marketing may bring visitors to your WordPress site initially, it is the efficiency, speed and quality that will get them to stay.
Given how important speed is to a user that visits your site, one of the most important questions you need to ask is, how long does your website take to load a page?Studies show that more than half of the people who visit a site will leave if it takes over three seconds to load a page. Ideally you should aim to have your site load in around two seconds or less.
Abandonment of your site is not the only damage slow loading speeds can cause. Google confirmed that the speed of your website can even affect a percentage of search queries – and by extension, your SEO ranking. A very large part of your website’s success reflects on how fast it responds to visitor interaction.
With this knowledge, it is important that you do everything you can to make sure your WordPress site loads as quickly as possible. A great way to help achieve this is by installing the WP-Optimize WordPress plugin. In this blog, we will take a look at the many features and advantages of WP-Optimize, why it should be your WordPress optimization plugin of choice, and why you should upgrade to the premium version.
What can performance-boosting plugins do for your WordPress site?
No matter how well you may think your site is set-up, you should always have a dedicated tool that will help with your site’s performance. Performance-boosting plugins like
help optimize your WordPress site to perform at the best possible level. It can help to speed things up for visitors interacting with your pages for the first time, as well as improve the general efficiency of the website.
As an all-in-one performance-boosting plugin, WP-Optimize consists of everything you need to keep your website fast and thoroughly optimized. With thousands of 5-star reviews and more than one million active installations, WP-Optimize ranks at the very top of the list of the best performance-boosting plugins in the world.
Why should you use WP-Optimize?
As mentioned earlier, both the free and Premium versions of WP-Optimize expertly optimizes your WordPress site in the following ways:
Cleans the database.
Compress images.
Caching.
1. Clean database
Your database stores all the data you require for your website to function properly. Some things you don’t need are also stored in the process. The clean database feature removes all the useless data and even reclaims the space lost due to data fragmentation. Database cleaning is the number one, most basic function of a performance-boosting plugin.
The database feature is easy to use and especially comes in handy for cleaning out the following:
Drafts. Gets rid of auto-draft posts and creates space in your database for new and useful drafts.
Comments. Removes Askimets and other such redundant metadata from comments.
Trash. Deletes old post revisions and trash.
Spam. Zero spam tolerance. Automatically removes all spam, unapproved and trashed comments.
Trackbacks and pingbacks. Deletes automatic acknowledgments, references, and notifications ensuring a clutter-free website.
2. Compress images
In addition to cleaning databases, WP-Optimize features a tool for image optimization and compression. Large images that would have otherwise reduced your site’s load speed are compressed and saved to your image library, where they are uploaded instantly. WP-Optimize covers a wide range of image formats including PNG, GIF, JPG, BM, and TIF. This feature frees up space, saves server resources for more important tasks, and helps your website load faster.
3. Caching
Every website has a reserved storage space, which is referred to as the cache system.
The purpose of this cache system is to store temporary data like the static versions of your website. This way, your WordPress site won’t have to run heavy PHP scripts whenever someone loads your site. Instead, your cache will collect texts, images, and other required data from first-time visitors. This improves the load speed and general efficiency of the site during subsequent visits.
Every cache system requires adequate RAM and CPU performance. With time, growing page traffic will overwhelm your RAM and CPU causing your site to render slowly. But that won’t happen with performance-boosting plugins like WP-Optimize. With the WP-Optimize cache
Why you should upgrade to WP-Optimize Premium
As mentioned at the beginning of this blog, WP-Optimize has both a free and a premium version. The basic features of WP-Optimize are free and can be downloaded here. The Premium version comes with the following additional features:
Premium packages
The premium version is available in three packages at competitive prices:
Package
Coverage
1.
Starter
1 to 2 websites
2.
Business
5 websites
3.
Unlimited
No limit
Additional benefits of WP-Optimize Premium
Multisite support
While the free version can cater to ONLY one site at a time, the Premium version offers multisite functions. Optimize all your sites on your WordPress network.
More options
WP-Optimize Premium offers flexibility and a range of advanced options. For instance, you can optimize individual database tables should you wish to do so.
Remove unwanted images
This newly-added Premium optimization process helps to eliminate orphaned images from your WordPress sites. Images that exceed specific size limits are also removed to minimize server footprint – and by extension cost.
Lazy load
Not all components are needed to load your page. The lazy load feature helps to prioritize the necessary components while delaying the rest until they are required. This optimization process significantly improves website performance for large sites.
Scheduling
Optimization might be automatic, but with Premium you can schedule when it occurs. This Premium scheduling feature allows you to set up routine optimizations.
Logging
Every process can now be documented. Log messages are sent to three additional destinations – including Simple History, Syslog, and Slack.
Versatility
WP-Optimize Premium is available in multiple languages and subscriptions can also be paid for with multiple currencies.
Geolocation and WooCommerce compatible
Your international WooCommerce store requires an effective geolocation feature to offer country-specific content, determine appropriate VAT and pricing. WP-Optimize Premium can even help with this.
Run from WP-CLI
You can run optimization commands straight on the command line and receive detailed results on screen.
Power tweaks
This is an advanced option for experienced users. Power tweaks improve your site’s performance by aiming at certain weak points in your website or other plugins.
Purge pages
This lets you delete HTML copies of your page(s). With the Premium version, you can purge pages when needed – For example, when you update a media file or create a new post.
Prevent individual page caching
You can use Premium to prevent selected pages on your website from being cached. An example of such a page is the admin page. This feature can also help improve security.
Premium support
Upgrading to Premium automatically gives you Premium support. Your queries will be promptly addressed by WP-Optimize experts.
Conclusion
If you are serious about getting the best performance out of your site and giving your visitors the best user experience possible, then the short and simple answer is yes – upgrading to WP-Premium is totally worth it. With so many extra Premium features available, the added benefits will remove all doubts once you realize how important factors such as removing unwanted images, lazy loading, power tweaks and premium support are to the success and speed of your site.
The free version of UpdraftPlus is fully functional and a great option for a lot of WordPress users. However, we’ve developed a brilliant range of features to make it even better. UpdraftPlus Premium will unlock all the extra features, including a Migrate/Clone tool, multiple online storage options, detailed scheduling, reporting, encryption and much more.
UpdraftPlus Premium also gives you free upgrades and support for a year and plus 1 Gigabyte of UpdraftVault storage, which means you can back up the site without needing to pay for space with a separate remote storage location like Dropbox.
Why go Premium?
No platform offers you the kind of tools to make a highly functional website quite like WordPress. As the platform currently hosts over 40% of the world’s websites, it is a natural target for malicious attacks by bad actors looking to exploit any vulnerabilities.
As well as the threat of hacks, your website could also fall victim to other issues, such as a server crash due to simple use errors, or the installation of badly coded plugins or themes. In just a few seconds, everything you’ve worked so hard to build could be taken away – leaving you to start again from scratch.
To avoid such a catastrophic loss happening to you, your first task when setting up a WordPress site should be installing the WordPress backup plugin UpdraftPlus – The world’s number 1, most trusted backup and restore plugin.
You might think you have every security box checked and have your website running perfectly, with no indication that there are any problems on the horizon. While that may be the case, it doesn’t mean a problem isn’t waiting just around the corner. Think of UpdraftPlus premium as website insurance. If your website never suffers a problem, then great. If it does however, you can rest easy knowing you are in safe hands and UpdraftPlus will be there to help you get all your hard work back.
The benefits of UpdraftPlus Premium: Backup, restore and clone
As the world’s most popular and highest rated WordPress backup plugin, UpdraftPlus Premium comes loaded with features and tools:
Backup UpdraftPlus can perform total manual or/and scheduled backups of all your site’s databases, files, themes, and plugins.
Restore Just having a backup can be pretty useless if it doesn’t you are not able to perform a prompt and secure restoration. With UpdraftPlus Premium, you can restore your backup file directly from the control panel of your site.
Schedule With most backup plugins, you are left to manually backup your website whenever you remember. With UpdraftPlus Premium, you can set your site up to automatically backup every 2, 4, 8, or 12 hours, daily, weekly, bi-weekly or monthly.
Trusted UpdraftPlus Premium has earned the trust of its considerable user base as it has provided a trusted service to the WordPress community for around a decade. Little wonder why it is the most installed and highest rated backup plugin on the market.
Easy to use UpdraftPlus Premium comes with an engaging, easy-to-use interface that lets you backup and restore data with just a click of a button.
What additional benefits does UpdraftPlus Premium have? If you use the free version of the UpdraftPlus plugin, you will be familiar with many of the basic features available. If you upgrade to the Premium version, you get the following features in addition to those being available on the free version:
Incremental backups
Incremental backups (as the name implies) only backups changes that have occurred in your WordPress website since your last full backup. If your last backup was 12 hours ago, the new incremental backup will backup only what has changed in those last twelve hours (e.g. a new photo was uploaded) and add it to the main backup file. By making incremental backups, you use less resources and have quicker backup times.
Other backup plugins will typically backup the whole website every time you make a backup. As you can imagine, this is a huge waste of your time and resources which UpdraftPlus Premium prevents by employing the incremental backup process.
Cloning and migration UpdraftPlus Premium has features that can clone your whole website and/or migrate it to a new domain of your choice in minutes. With UpdraftPlus Premium, you are also given free UpdraftClone tokens, so you are no longer required to buy tokens when you want to clone your site.
The UpdraftClone and Updraft Migrator features are a way for you to effectively and seamlessly “copy and paste” your website to any URL with no hosting difficulties.
Prompt customer support UpdraftPlus Premium also comes with quick access to expert help and support from our product developers whenever you require it. You can reach us through a web forum and ticket.
Pre-update backups Other backup plugins typically stand idle when you update a plugin, theme or core updates, putting your site at considerable risk. But UpdraftPlus Premium will ask you if you would like to first back up your site before any update begins. This way, you will have the most recent version of your WordPress site before you make any changes.
Non-WP files and databases Besides the obvious WordPress website core data that will be secured, an UpdraftPlus Premium backup will also cover non-WordPress files and databases such as third party themes. Total security is guaranteed.
Network/multisite UpdraftPlus Premium works with WordPress Network and Multisite to back them up securely. The backup and restore control panel can be found in the dashboard of the network. You can even restore individual websites within the network.
Advanced scheduling The premium version also allows you to set a specific time for your website’s backup to be created, retained, or deleted.
More database options A typical backup plugin saves all your data somewhere safe for when a problem hits your site. Should this happen, you are left with your backup copy to restore your website to its previous state.
But there are times when the hacker doesn’t just attack your site, but also attempts to steal or delete your backup files. With UpdraftPlus Premium and its enhanced security and industry-standard AES (Advanced Encryption Standard) encryptor, your WordPress site’s database (including files, passwords, and list of users) is encrypted and secured in the backup location of your choice.
Thorough logging and reporting UpdraftPlus Premium keeps you updated on what’s going on with your website in real time. All backup activities are carefully recorded and the backup status is displayed in the WordPress admin panel – together with warnings and error messages. You will also receive a report for when a backup completes, as well as file checksums for backup integrity verification. UpdraftPlus Premium also allows users to send reports to Slack if desired.
Importer feature This is easily one of the coolest features of UpdraftPlus Premium. Some backup plugins are just that – they backup your website without any capacity to restore it at a later point. Besides restoring its own backup files, UpdraftPlus Premium also allows you to restore backups from other WordPress backup plugins with our importer feature.
Lock settings Much like your smartphones, the Premium version locks access to UpdraftPlus using a password. This gives you the ability to control which site users can access the backup dashboard and files.
WP-CLI WP-CLI stands for WordPress Command Line Interface. CLI functions by relaying commands to a program using a line of text. So, instead of the cumbersome drag-and-drop plugins, you simply backup files using typed lines of text.
While it may require some technical know-how, this can be a very handy feature for those that require it.
Zero ads No one enjoys random ads popping up, disrupting your workflow and taking up your valuable time. The Premium version of UpdraftPlus removes all adverts and lets you get to work away without any distractions
UpdraftPlus Premium packages
If you decide to upgrade to UpdraftPlus Premium, you can choose between five packages with an annual subscription. Automatic renewal gives you 40% off on renewal. What’s more? You can cancel at any time.
Personal Supports up to 2 websites.
All UpdraftPlus add-ons. Free updates. Free support. Free storage of 1GB UpdraftVault. UpdraftClone tokens.
Business Supports up to 10 websites.
All UpdraftPlus add-ons. Free updates. Free support. Free storage of 1GB UpdraftVault. UpdraftClone tokens.
Agency Supports up to 35 websites. All UpdraftPlus add-ons. Free updates. Free support. Free storage of 1GB UpdraftVault. UpdraftClone tokens.
Enterprise Supports an unlimited number of websites.
All UpdraftPlus add-ons. Free updates. Free support. Free storage of 1GB UpdraftVault. UpdraftClone tokens.
Gold All of the same features as Enterprise, but with unlimited annual UpdraftCentral Cloud subscription and an additional 50GB UpdraftVault storage
Why would you need to upgrade?
Premium can be particularly useful if you run a bigger or more complex website (or multiple websites), have a history of being targeted by malicious hackers, make a lot of changes daily to your site, or feel the limited “backup and restore” options of the UpdraftPlus free plugin no longer meet your needs.
If you fall within the above categories, then UpdraftPlus Premium is for you.
Benefit from UpdraftVault with UpdraftPlus Premium
This is a built-in storage option for your UpdraftPlus backups that gives you 1GB – 50GB of free storage tailored specifically for the UpdraftPlus platform. This can save you the headache of setting up and calibrating third-party storage systems like Google Drive.
More remote storage options
With the free version of UpdraftPlus, you can backup your website directly toUpdraftVault, Dropbox, Google Drive, Amazon S3 (or compatible), Rackspace Cloud, FTP, DreamObjects, Openstack Swift and email.
The Premium version expands your options and allows you to backup directly to Microsoft OneDrive, Microsoft Azure, Google Cloud Storage, Backblaze B2, SFTP, SCP, and WebDAV.
Free and premium versions of UpdraftPlus plugin compared
WebDAV, Microsoft OneDrive, Google Cloud, Microsoft Azure, SFTP/SCP, encrypted FTP, BackBlaze
Backup extra files and databases
Migrate / clone (i.e. copy) websites
Basic email reporting
Advanced reporting features
Automatic backup when updating WP/plugins/themes
Send backups to multiple remote destinations
Database encryption
Restore backups from other plugins
No advertising links on UpdraftPlus settings page
Scheduled backups
Fix backup time
Network/Multisite support
Lock settings access
Browse backup contents in WordPress
Download individual files from backup in WordPress
Personal support
Run from WP-CLI
Restore a backup from other plugins
Is UpdraftPlus Premium worth it?
For all the additional benefits and perks that it brings, we feel that UpdraftPlus Premium is more than worth it if you truly value the safety and security of your WordPress site. With Premium you can exercise full control over your backups by unlocking enhanced security features and free updates. From accessing the latest UpdraftPlus Add-Ons for a year, to free support via our forum and email for a year, extra remote storage options, incremental backups and free tokens for UpdraftClone.
UpdraftPlus Premium is what total security and peace of mind looks like!
The world of online course creation can seem daunting to a new instructor. Creating courses might be your forte, but making a website to sell them might seem like a difficult and daunting task. Fear not, as this blog will help you set up an create an eLearning course site with WordPress.
We understand that most people might not be adept at coding or do not have the resources to create a full-fledged website by themselves. That is where WordPress comes in. Little needs to be said about the popularity of WordPress, as it is one of the most popular CMS platforms in the world. WordPress lets users have a large number of nifty plugins and themes and can assist in setting up a site by simply dragging and dropping elements, without much need for coding.
For this blog, we are going to go through a comprehensive view of tools that will let us set up an LMS site with ease.
Why have an LMS site?
eLearning has seen a huge increase in popularity recently due to Covid and the rise of remote working/teaching. Business analytics forums state that 1.2 billion students were affected by the closure of educational institutions worldwide during the pandemic. Filling the gap with a fast and well-designed solution for students is the right way to make an impact in this massive market.
What do you need to start off? We are going to talk about two main elements in this article:
Robust LMS plugin
Innovative design pack
This may seem like a small list of tools to start with, but trust us they will be more than enough.
Making the right plugin choice
To build our LMS site on WordPress we need to be careful about the plugins that we use. While some plugins are paid versions only, they also usually offer free counterparts under the “freemium” model. We are only going to focus on an LMS plugin that offers us enough functionality without having to spend any money. But how do you determine if a plugin is right for you? An LMS plugin should offer some basic features that we need to start with:
Functional course building
Easy to use quiz building
Student interaction with email
Easy payment integration
Certificates
Theme starter pack integrations
Taking into consideration these features, we suggest using Tutor LMS. Tutor LMS offers these features on its free version for users. Although there are more features on the paid version, we will only look at the free features of plugins in this blog.
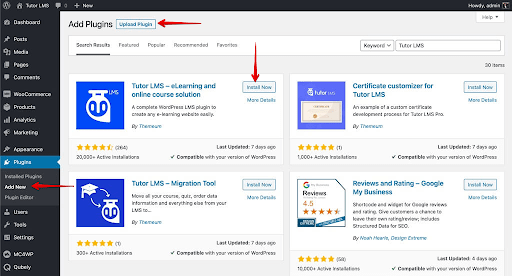
Installing the required plugin
Now that you have decided on the choice of plugin, lets go ahead and start setting it up. To install Tutor LMS navigate first to your WordPress admin panel. From the admin panel go to Plugins > Add new, search for Tutor LMS then install and activate the plugin. In a few seconds, it should be ready to be used.
Beautifying with a theme
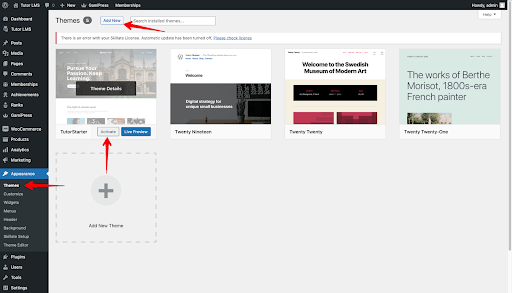
Before heading on to configure our LMS plugin, you must first decide on a theme for your site. The Tutor Starter theme not only is free, but it also was made to be integrated with the LMS plugin – Tutor LMS. This makes life a whole lot easier. To install Tutor Starter from the WordPress admin panel we find the Appearance tab. From there we click on Add new and search for “Tutor Starter”. Go ahead and hit install and activate.
You need to add one more plugin before you can start utilizing Tutor Starter properly. In the same way you installed the other plugins, you need to navigate to ‘Add a new plugin’ and search for TutorMate. TutorMate is acompanion demo importer plugin for the Tutor Starter theme. After finding it from Plugins > Add new, click to install and activate it.
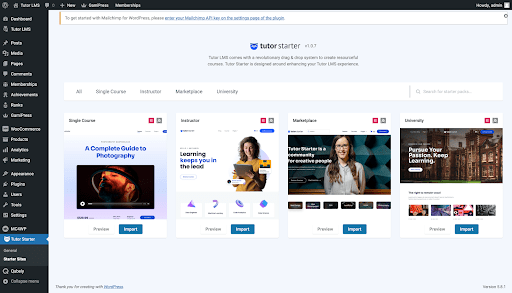
You are now geared up and ready to go. Next, ass a starter pack from Tutor Starter to your WordPress site. From the WordPress admin panel, go to Tutor Starter > Starter sites. Here you can find 4 unique demo starter sites for different types of sites according to what you want to create.
You can preview the site before you choose to import it. When you have decided which site to import simply click the Import button. This will bring up the following popup.
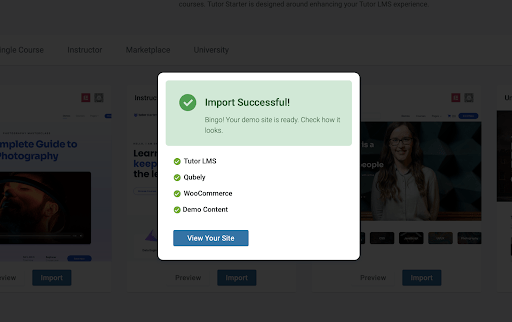
From here you can choose to launch with either the Elementor or Gutenberg page builder. For this blog, we are going to go ahead and run it with Gutenberg. Tutor Starter shows us if we are missing any plugin/add-ons when we try to make this installation. So if you are missing Qubely and WooCommerce, they will be automatically installed and activated.
Once the import is complete you can see the site by clicking “View your site”.
To edit the page, go to the WordPress admin dashboard and select Customize your site. This takes us to the customization page where you can access all the background changes, widgets, and much more.
Configuring the back-end
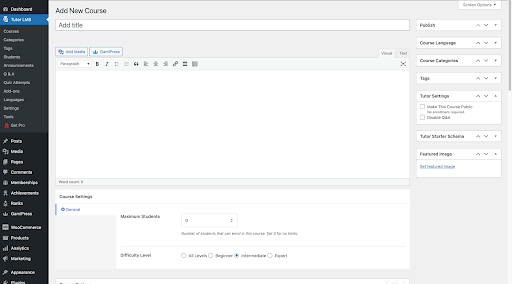
Next you need to add some content to the site. Here starts your main journey to create content for your LMS site. To set up our courses, navigate to WpAdmin > Tutor LMS > Courses. From the courses menu, we select Add new to add a new course to the site. You are then taken to the main course menu. Here input the course name, add a course description, add a video if needed and any other information. There is also a featured image section that can utilized to let students know what the course is about.
Now comes the most important task to setting up your course – adding topics and quizzes. To add a quiz first you need to create a topic. Scroll down on the course menu to the course builder section where you can find a button that adds a new topic. Once you have added a new topic, you can now add a lesson and/or a quiz to that topic.
Adding a lesson
Clicking the lesson button brings up the pop up that lets you configure the lesson. Add the lesson title, the actual lesson text and the lesson video, should it be required. We can even add attachments to the lesson.
Create the quiz
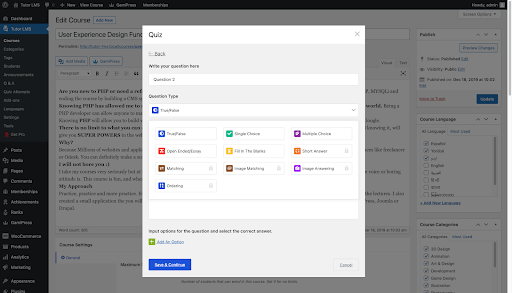
After you have created a lesson, for evaluation you will also need to add a quiz. Right beside the lesson button, click the Quiz button to show the quiz pop up menu.
First, add a quiz name and hit Save & Next. The next tab gives the quiz question option where you can configure what type of questions you want to set for students. Next, select the name of the question and access the drop-down Question Type menu that shows all the different types of questions that can be set.
The options on this pop up are easy to navigate and self-explanatory, so setting it up is a breeze regardless of what type of question selected.
How do you monetize your course?
Once you are done with the basic setup of the course, what then comes next? The basic setup is followed by adding payments options to the course in order to generate revenue. To achieve that, you will need to integrate WooCommerce as it is one of the most popular eCommerce solutions. It is very easy to use and integrate and also FREE.
WooCommerce integration and sales
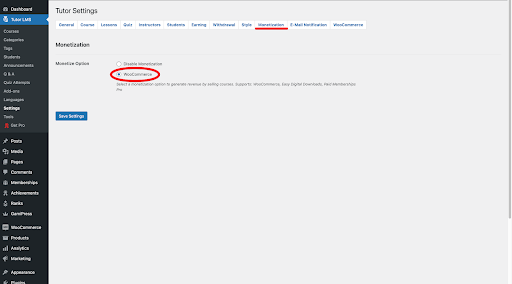
For selling your courses as a product on your LMS site, you need to have a payment system such as WooCommerce added. As previously stated, WooCommerce is automatically installed, so you do not need to separately go through the installation process. To activate WooCommerce on Tutor LMS head to Dashboard > Tutor LMS > Settings >Monetization (Tab) > WooCommerce (Enable).
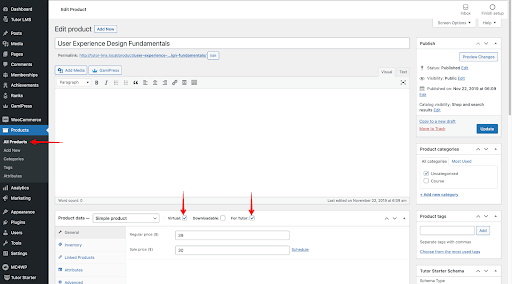
You have now activated WooCommerce for your LMS site. But how do you link the course to WooCommerce so that it can be paid for? You need to first create a Product to sell through WooCommerce. Go to the WordPress admin panel where you will see a new Product tab. From there, you can add a new product. You can set the name, price and even sale price of the said product.
To finalize the monetization process, you must link this product to the course we want to sell. In order to do this, you need to edit the course and scroll down to the Add Product section, where you can find a drop-down menu of the product you created and link it to your course. Make sure to select the paid option and you are all set!
For any other course you want to monetize, just follow these steps and you should have no problems..
Market your courses
The next task is to market your course to potential students, making sure that your product reaches its desired customer.
Identify your target students
Advertise your courses efficiently for maximum outreach
Promote your course as industry-standard material
Offer sales to increase student
Get affiliate personnel to promote your material elsewhere
While this is definitely not a comprehensive list, these tips could help you get on track with marketing your course.
Backing up your site
Now you have set up your eLearning site, it is important to remember to back it up using UpdraftPlus. As the world’s leading and most trusted backup plugin, UpdraftPlus can be trusted to keep your site and all the hard work you put into creating it, safe and secure.
Just download the free plugin, or upgrade to UpdraftPlus Premium, for total peace of mind.
Best of luck with your site and if you have any queries, feel free to comment below.


