We keep your WordPress site up to date and bug free
Easy Updates Manager currently helps more than 300,000 users automatically keep their sites up to date and bug-free.
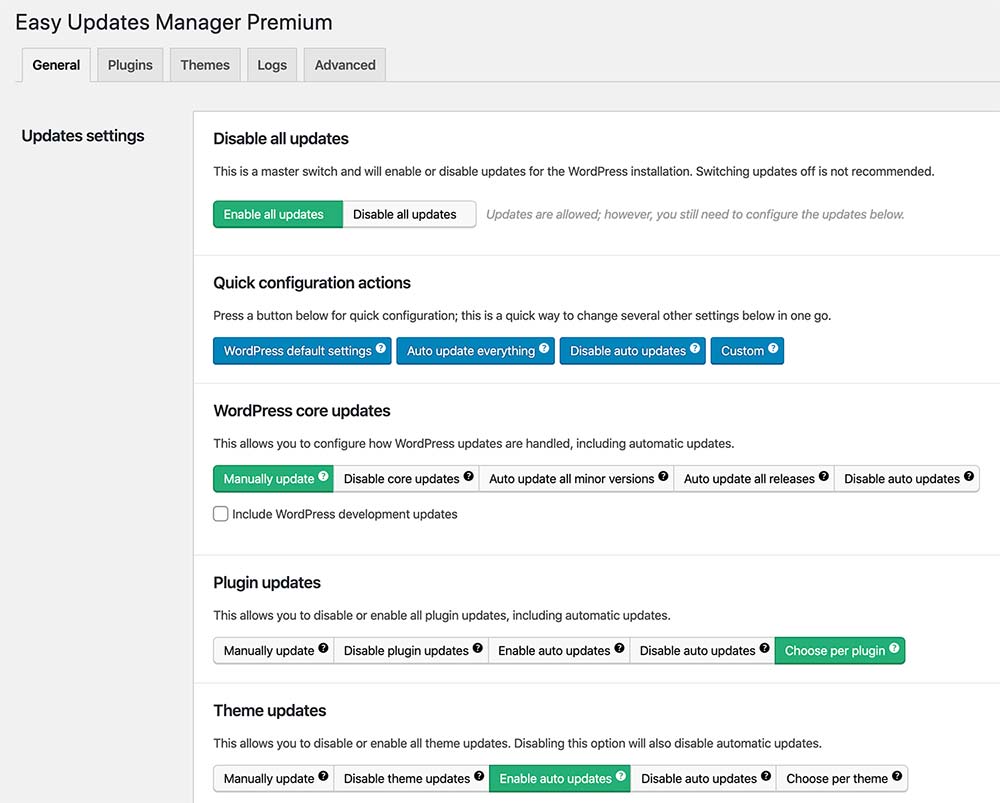
It’s also highly customizable to give you real control over what updates to run.
No need to login and check for updates. Auto Updates saves tons of time.
Choose and turn on/off individual core, plugins, and theme updates.
View logs of updates that have occurred. Useful for debugging and rolling back your site to an older working version.
What are the additional benefits of Premium?
Safer and more flexible:
Take full control of your plugins and updates
Safe Updates
Updates only if a plugin is compatible with your current version of WordPress and server’s PHP
Schedule Updates
Customize your update schedule to minimize any downtime
Anonymize Update Request
With anonymous update requests, your data is kept safe and prevents nonessential data being sent to the WordPress API
Delayed Updates
If you want to gain confidence in a new plugin release bug fix following a major update, you can delay your automatic updates for a specified number of days
UpdraftPlus Compatible
Compatible with the UpdraftPlus plugin automatic backup feature
Import Export Settings
Export and import your settings so you can transfer your settings to another install
Webhook
Create a webhook that can integrate with third-party services
Auto-update Protection
If something goes wrong during an auto-update, we will alert you via email and then try to fix it automatically
White Label
White-label Easy Updates Manager. Especially useful if you’re on a client site
Access to premium information and support
(Buy the premium version)
External Logging
Login to external channels such as Slack or email and receive update notifications, allowing you to review your site if necessary
Log Management
Search logs by a user, theme or plugin name and keep your database lean by setting up a scheduled log clearance
Export Logs
Generate an update report for your clients. Export logs for a specified date range and print, or export logs as a CSV or JSON file
Premium Support
Get a personal reply to your question within one business day
Email Notification of Updates
You can receive a weekly or monthly report of available updates. Especially useful if you have disabled updates
Check Plugins
Check plugins against the WordPress plugin directory to see if they are removed or not
Version Control Protection
Version Control Protection skips updates for plugins and themes under version control
Check For Unmaintained Plugins
The Unmaintained Plugins feature shows you which plugins have disappeared from the Plugin Directory and ones that are out-of-date.
Is your site up to date and secure?
Or is it outdated and buggy?
Easy Updates Manager is a powerful WordPress tool that enables you to fully manage updates for all of your plugins, themes, core, and translations. This plugin makes managing your WordPress update settings quick and easy – and because it offers endless possibilities for configuration, it puts you in complete control of how, when, and what to update and what not to.
Easy Updates Manager is also multisite compatible and includes built-in logs for your convenience that lets you take a look at updates that have occurred. Logs include the version it was updated from, so this helps in case you need to rollback a dodgy update.
Reliable, intuitive and very highly-rated, Easy Updates Manager makes quick and easy work of your updates; a task that that would otherwise be a complicated, and time-consuming process.
How to get the most from your site
To get the most from your website! it is important to have the latest release of WordPress installed and have updated versions of any themes and plugins you’re using. Staying on top of updates ensures that your website is free from security vulnerabilities, protected from bugs, and enhanced by the very latest features of your plugins, themes, and WordPress.
Automatic update function
Reliable, intuitive and very highly-rated, Easy Updates Manager makes quick and easy work of your updates; a task that would otherwise be a complicated, time-consuming process.
Easy Updates Manager’s automatic update function allows you to simply “set and forget” with multiple settings options to personally customize updates on each individual aspect of WordPress core. These updates can include major, minor and development updates, as well as your themes, plugins, and translations.
Disable automatic updates
As many developers use their own themes and plugins, we have found that a particular feature of Easy Updates Manager that has become hugely popular with our users is the ability to disable automatic updates. This option can assist in preventing code from being overwritten and help protect and maintain security and functionality.
Features
- Highly configurable
- Allows users to disable / enable automatic updates for major and minor WordPress core releases, themes, plugins and translations
- Automates specific updates (‘set and forget’)
- Offers user access control
- Clear and intuitive interface
- Easy-to-use, fast and efficient
- Multisite compatible
- Mobile friendly
- Compatible with non WordPress hosted third party themes and plugins if it follows WordPresss’ way of receiving updates (depending on source)
Settings
AUTOMATED UPDATES SETTINGS:
- Major WordPress releases – On / Off
- Minor WordPress releases – On /Off
- WordPress development updates- On / Off
- Updates for All / Selected plugins
- Updates for All / Selected themes
- Translation updates
DISABLE SETTING:
- All automatic updates
- All plugin updates
- All theme updates
- Core update Email notification
OTHER SETTINGS:
- Remove browser nag
- Remove WordPress version in footer
- Restrict user access to configuring settings and performing / viewing updates
- Logs history of both manual and automatic updates
If you want to help contribute to the translation, please go to https://translate.wordpress.org/, select your language and search for the Easy Updates Manager plugin. We appreciate all the translation help we can get.
What people say:
Comparison of Versions
- Site Licences
- Precise control over updatesCustomize every aspect of our updates, including automatic and manual updates for individual plugins, core, and themes.
- Force UpdatesForce Updates checks that automatic updates are working and is useful for debugging.
- UpdraftCentral IntegrationIntegrate with UpdraftCentral and manage all your sites from one place.
- Multisite SupportEasy Updates Manager natively support Multisite.
- UpdraftPlus IntegrationIntegrate with UpdraftPlus and make sure your site is always backed up before an update occurs.
- Scheduled UpdatesSchedule automatic updates to your schedule to avoid any downtime.
- Safe mode updatesEnsure your plugin is compatible with WordPress nad your server's PHP version.
- Schedule Log ClearanceSchedule when logs are cleared so they don't bloat your database.
- Logging in external channelLog your updates to external channels such as email, Slack, and more.
- Premium SupportHaving a problem? We'll address it within one business day should you have any issues.
- Email Notification of Available UpdatesReceive weekly or monthly reports of what needs to be updated.
- White Label the PluginDisable notices and customize how the plugin appears to clients.
- Check Plugin HealthCheck to see of any WordPress plugins have been removed potentially posing a security risk.
- Webhook for IntegrationIntegrate with third-party service to perform your automatic updates whenever you want.
- Search LogsSearch logs by username or by theme or plugin name.
- Export Logs for Print, CSV, and JSONGenerate a report for your clients on what's been updated.
- Alert when a plugin breaks your siteReceive alerts via email that your site went down due to an automatic update.
- Alert when a plugin is deactivatedReceive alerts via email if a previous active plugin is deactivated
- Version Control ProtectionPrevent updates to WordPress themes and plugins under version control
- Umaintained Plugin ChecksCheck the WordPress Plugin Directory for unmaintained plugins
Free
- Licence


- $0
Basic
- 2 Licences
- $29
Plus
- 5 Licences
- $49
Professional
- 20 Licences
- $69
Unlimited
- Unlimited
- $89
Free
- Site Licences
- Precise control over updates
- Force Updates
- UpdraftPlus Integration
- UpdraftCentral Integration
- Multisite Support
- Scheduled Updates
- Safe mode updates
- Schedule Log Clearance
- Logging in external channel
- Premium Support
- Email Notification of Available Updates
- White Label the Plugin
- Check Plugin Health
- Webhook for Integration
- Search Logs
- Export Logs for Print, CSV, and JSON
- Alert when a plugin breaks your site
- Alert when a plugin is deactivated
- Version Control protection
Basic
- 2 Licences + Precise control over updates + Force Updates + UpdraftPlus Integration + UpdraftCentral Integration + Multisite Support + Scheduled Updates + Safe mode updates + Schedule Log Clearance + Logging in external channel + Premium Support + Email Notification of Available Updates + White Label the Plugin + Check Plugin Health + Webhook for Integration + Search Logs + Export Logs for Print, CSV, and JSON + Alert when a plugin breaks your site due to an automatic update + Alert when a plugin is deactivated due to an automatic update + Version Control protection
Plus
- 5 Licences + Precise control over updates + Force Updates + UpdraftPlus Integration + UpdraftCentral Integration + Multisite Support + Scheduled Updates + Safe mode updates + Schedule Log Clearance + Logging in external channel + Premium Support + Email Notification of Available Updates + White Label the Plugin + Check Plugin Health + Webhook for Integration + Search Logs + Export Logs for Print, CSV, and JSON + Alert when a plugin breaks your site due to an automatic update + Alert when a plugin is deactivated due to an automatic update + Version Control protection
Professional
- 20 Site Licences + Precise control over updates + Force Updates + UpdraftPlus Integration + UpdraftCentral Integration + Multisite Support + Scheduled Updates + Safe mode updates + Schedule Log Clearance + Logging in external channel + Premium Support + Email Notification of Available Updates + White Label the Plugin + Check Plugin Health + Webhook for Integration + Search Logs + Export Logs for Print, CSV, and JSON + Alert when a plugin breaks your site due to an automatic update + Alert when a plugin is deactivated due to an automatic update + Version Control protection
Unlimited
- Unlimited Licences + Precise control over updates + Force Updates + UpdraftPlus Integration + UpdraftCentral Integration + Multisite Support + Scheduled Updates + Safe mode updates + Schedule Log Clearance + Logging in external channel + Premium Support + Email Notification of Available Updates + White Label the Plugin + Check Plugin Health + Webhook for Integration + Search Logs + Export Logs for Print, CSV, and JSON + Alert when a plugin breaks your site due to an automatic update + Alert when a plugin is deactivated due to an automatic update + Version Control protection
*Currencies accepted: United States Dollar, Euro, Pound Sterling