How to delete unused images in WordPress using WP-Optimize


How it works

WordPress stores images in two parts:

  • The image files are stored on the server, typically in the ‘wp-content/uploads’ directory of the site.
  • A record of the image is then stored in the database, in the Media Library. This record also includes other data related to the image, such as the image tile, description or alt-text.

When removing an image, both the image files and Media Library record will be deleted.

Removing Unused Images

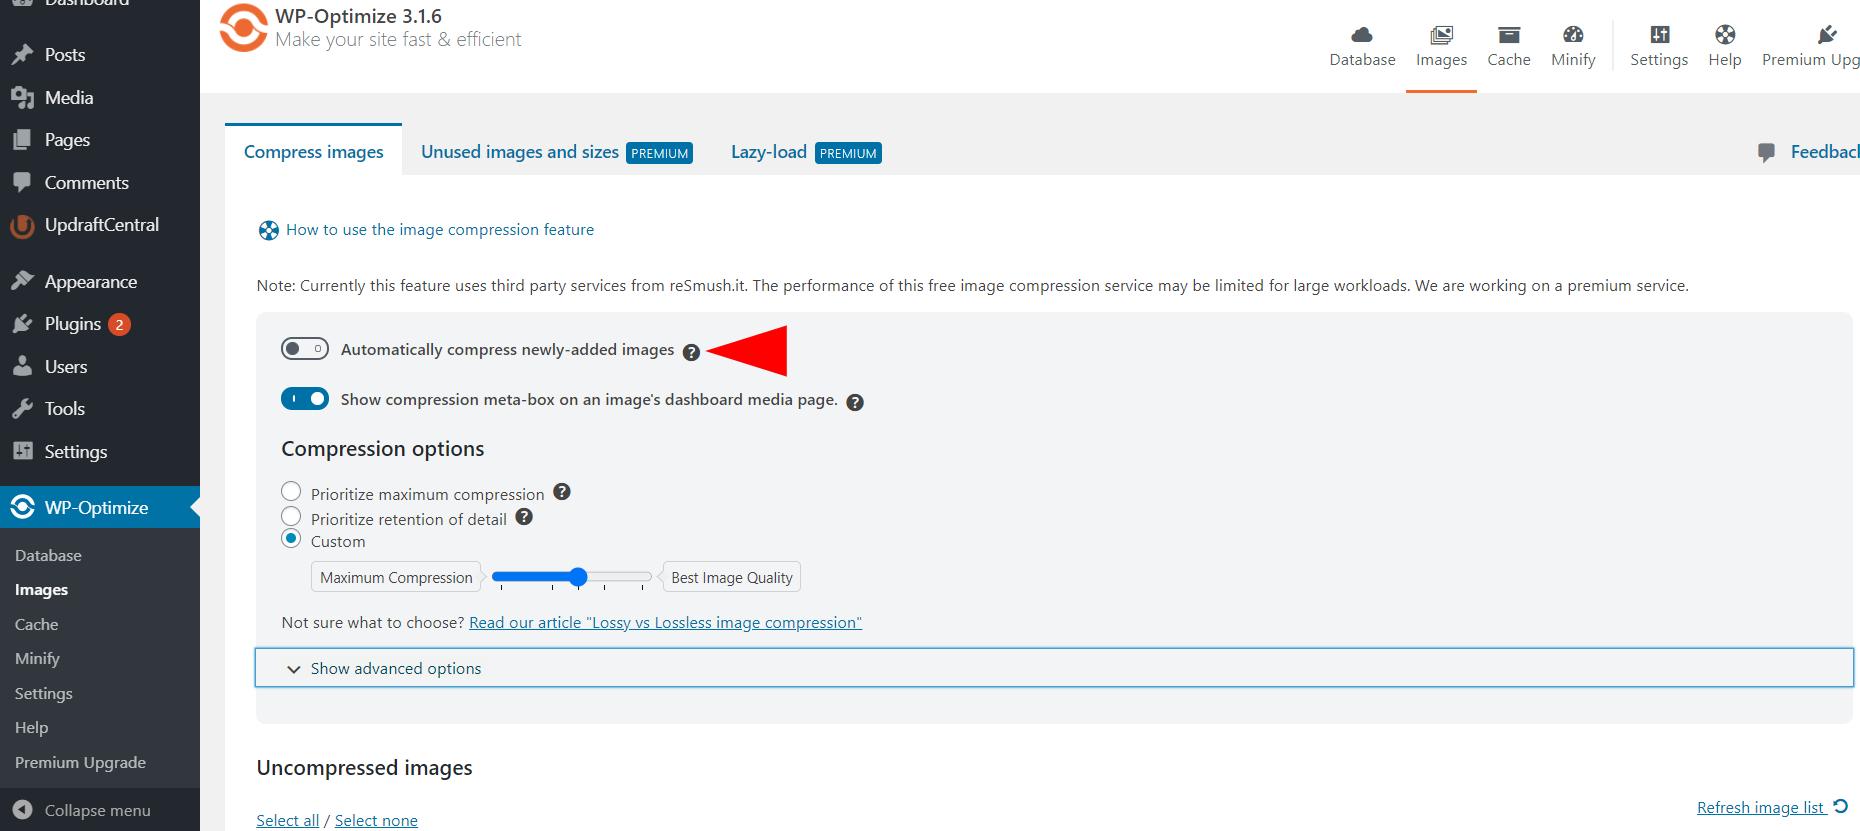
Open the ‘Images’ tab in the WP-Optimize Premium admin page and press the “Unused images and sizes” tab.

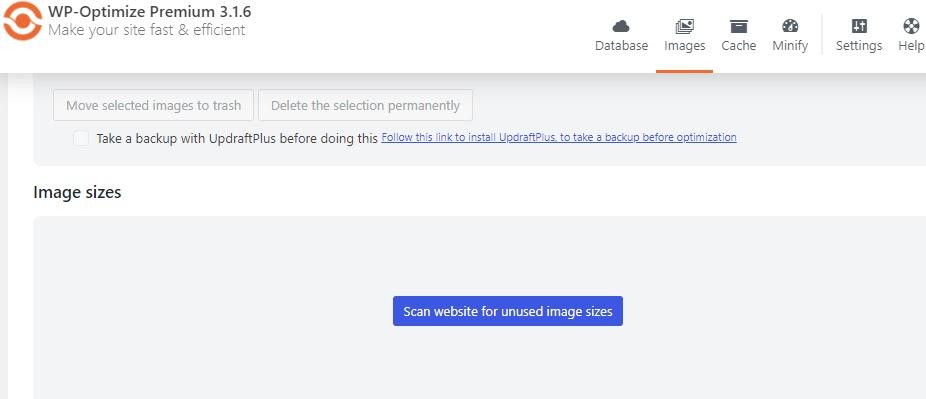
To scan your website for unused images, press the “Scan website for unused images” button. WP-Optimize will now scan for unused image files, found both in the Media Library and the ‘wp-content/uploads’ directory, that are not attached or embedded in any posts or pages.

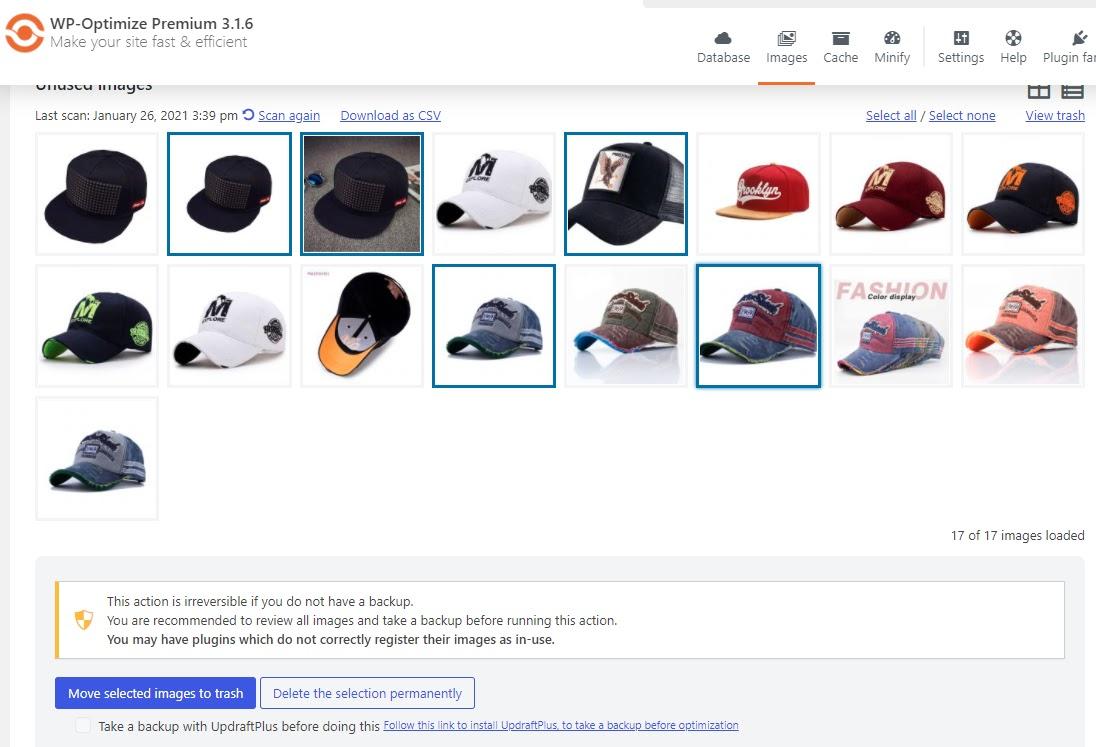
You will now be presented with all the unused images that are on your site. To delete these images, either individually select the images by clicking on the images to highlight them, or press the “Select all” button to delete all unused images.

Once you have selected all the unused images you want to delete from your site, scroll down and either choose “Move selected images to trash” or “Delete the selection permanently”. WP-Optimise will then delete all copies of the selected image file plus any record in the Media Library.

You will receive a notification that your images have now been deleted.

Removing Images by size

You can also choose to remove unused images by size, but please note that removing registered image sizes is for experienced users, and care should be taken that the image size in question is not used on the site.

This tool shows both all registered image sizes, and image sizes that are currently not in use.

The ‘Unused image sizes’ section shows a list of all image sizes that are present on the site. This includes sizes for images that are in use. Deleting a registered image size will remove all images of that size from the uploads folder, including any that are in use.

In this case, the Media Library record will only be deleted if all copies of an image have been removed.

The ‘Unused image sizes’ section shows any image sizes that are currently not used by any images on the site.

Select any image size (from either section) that you wish to remove, and press ‘Remove selected sizes’.

Restoring images that were moved to trash

If you are not sure if you might still need the image, you can send it to trash, instead of deleting it permanently. You can view and restore these images by pressing the “view trash” button. 

Here you can restore any trashed images you want to keep by highlighting them and pressing the “Restore the selection” button. These images will now be sent back to your image library. 

We recommend taking a backup of the site before performing any optimisation with WP-Optimize Premium. WP-Optimize integrates with our backup plugin, UpdraftPlus. If UpdraftPlus is active on the site, the option to take an automatic backup before images are removed will be displayed in the tab.

The post How to delete unused images in WordPress using WP-Optimize appeared first on UpdraftPlus. UpdraftPlus – Backup, restore and migration plugin for WordPress.

Upcoming UpdraftPlus feature: Clone data anonymisation

As a WordPress user, you may have created a site with members who have been granted various levels of access other than admin; such as editor or moderator. As such, you should be aware that as the owner and admin of this site, should you attempt to clone the site and its members / level of access information, many of the details about these users is classed as ‘data’. Unless this data is handled carefully, it could result in violation of GDPR laws. 

Currently, in order to comply with GDPR laws when cloning a site and user data, you need to wipe or edit all of the relevant data on the cloned site immediately after it has been created. This task can be time consuming and annoying. 

UpdraftPlus has been working on a way to help administrators fix this issue. In the 2.16.47 version of UpdraftPlus onwards, when creating a backup, you will have the following different anonymisation options: 

Anonymise personal data for all users except the logged in user: This option will anonymise all personal data for all users except for the user who is logged in and creating the backup.

Anonymise personal data for all users except staff: This option is the same as the first option, but anyone with the following user roles will be counted as staff and their data will not be anonymised.

The current staff user roles are:

  • Administrator
  • Editor
  • Moderator
  • Shop_manager
  • Fue_manager
  • Plugin_manager
  • WPSEO_editor
  • SEO_manager 

We hope these updates will help users cloning sites, to be aware of and more easily comply with GDPR regulations.

The post Upcoming UpdraftPlus feature: Clone data anonymisation appeared first on UpdraftPlus. UpdraftPlus – Backup, restore and migration plugin for WordPress.

How to use WP-Optimize image compression

Many websites can accumulate hundreds, if not thousands of images over time. Having all these images on your site in their original uncompressed format can cause frustratingly slow website loading speeds, which can impact on a website’s user experience, bounce rate and SEO performance. 

One of the best ways you can improve the speed of your site is by optimizing your images using WP-Optimize. This process, which is commonly known as ‘smush’ or ‘smushing’ allows users to optimize, compress and resize all the images on a website, potentially saving many MB per image and improving loading speeds. This feature is available on both the free and premium versions of WP-Optimize. 

How to optimize your images

Step 1


Once you have installed the WP-Optimize plugin, click on WP-Optimize>Images in your WordPress dashboard. Now you can decide what level of compression you would like to have for your images. There are 3 options:

  • Prioritize maximum compression 
  • Prioritize retention of detail 
  • Custom

By prioritizing ‘maximum compression’, the more space you can save and the quicker your website will load due to it now having smaller and quicker loading images. However, if you run a wedding photography website for example, you may not want to compress your images fully as there can be a slight drop in image quality the more an image is compressed. While the loss in quality is hardly noticeable for most people and is not a consideration for most websites, if high end quality images are important to you, then you should prioritize ‘retention of detail’. This option will still save reduce the image file size (though not as much as ‘maximum compression’), but will maintain the high quality of the original. You can also select ‘custom’, if you would like to format your images to a level that is not quire maximum compression of best image quality. 

Step 2

Below the settings options, you will see all the uncompressed images that have been uploaded to your website. Here, you can manually select individual images you wish to compress, or press the “Select All” button if you want to compress all the images to the same level. As previously mentioned, if you have high quality images that you do not wish to fully compress alongside other images that may not be so important, you can individually select them and run a ‘maximum retention of detail’ compression. You are then able to run the ‘maximum compression’ option on the remaining images.

Step 3

WP-Optimize also gives you ‘advanced options’ when compressing your images. Here you can choose option such as: 

  • Preserve EXIF data – Handy for professional photographers that may require the EXIF data at a future date.
  • Backup original images – Don’t worry if you make a mistake or want to revert back to the original image. WP-Optimize gives you the option to retain a backup.
  • Automatically delete image backups – Once you have compressed your images, you can set a date for when you want your backup images deleted. This helps prevent your site from storing large original files that are no longer needed. 
  • Delete all backup images now – If you are happy with the results and want to delete all your backed-up images, just press this button and WP-Optimize will do the rest. 
  • Mark all images as uncompressed – Use this option if you want to compress your images again, or make further changes.
  • Restore all compressed images – If you decide that you no longer want your images compressed or have made a mistake and still the original in your media library, you can restore all of your compressed images to their original state.

Step 4

Once you have set up and decided what kind of image compression you are happy with, you can tick the “Automatically compress newly-added images” button so that you do not have to go through the process every time you upload a new image. Once you activate this option, every new image you upload will be compressed according to the settings you have chosen (compression or detail). 

If you would like to read more information on the benefits of compression versus detail, be sure to check out the following blog that goes into more details and explains the benefits of both: Lossy vs Lossless image compression – A guide to the trade-off between image size and quality.

We have also put together a video of how to optimize your images.

The post How to use WP-Optimize image compression appeared first on UpdraftPlus. UpdraftPlus – Backup, restore and migration plugin for WordPress.

Comparing the best optimization plugins for WordPress

Which of the leading contenders has the best optimization plugins for WordPress?

Optimizing a WordPress site is an essential process that can help speed up your site via caching, image optimization and database optimization. It can also improve performance and help you rank higher in search engines. However, as a customer, which one is the best? When looking for the best optimization plugins for WordPress, there are so many to choose from, it can be hard to separate fact from fiction – with all of them making wild promises to make your site faster than a hammer-time Lewis Hamilton!

In the below review, we will evaluate the performance by analyzing all the the top optimization plugins and show you why WP-Optimize should be your plugin of choice. 

What does ‘caching’ do?

An important part of the optimization process is caching. The term ‘cache’ or ‘caching’ refers to when there is a collection of data that is temporarily stored to allow for quick access upon request. Caching for a WordPress site works so that every time a user visits your site, WordPress will fetch previously viewed and stored information from the file system. By using cache, it allows visitors to skip the time consuming step of loading a site for the first time, as the caching plugin has made a copy of the site and presents this copy to the visitor when they return. 

How much of a difference can optimization make?

As optimization and caching reduces the load on your WordPress hosting servers, it can help make your website run faster. However, the optimization and caching for your site needs to be properly optimized and set up in order to get the most from a optimization plugin and help improve your site’s performance and speed.

If your site offers users a faster and more user friendly experience, it can help encourage users to return again in the future, visit more pages or more likely to make purchases. This in turn helps your user engagement time and reduces bounce rate. All of these factors combined (along with other metrics such as quality of content and how often your site is updated) can help boost your SEO score and drive more traffic to your site from organic search. A faster and more optimized site that includes caching and optimization can gain a significant SEO advantage from search engines such as Google, who prioritize and rank sites higher if a site is proven to be quick and maintains good user interaction. 

There are many WordPress optimization plugins out there that claim to help boost your website’s speed through caching, image optimization and database optimization. But which one is really the best?

How we tested the top optimization plugins

To make this test fair and completely aboveboard, a new, unbiased test site was set up. This test site is a basic WordPress site that contains lots of images and content that provides the simplest way to judge each plugin when evaluating its effects on a site’s speed test results when tested using GTMetrix.com

The test site

A 3GB sized test that has not been optimized or altered in any way to favour one optimization plugin over another. 

An example of the large scale images uploaded to our test site

Results

For the following speed test, we evaluated the 4 leading optimization plugins – WP Fastest Cache, W3 Total Cache, WP-Rocket and WP-Optimize, as well as a test with no optimization in order to have a base-line to evaluate performance.

Page Speed

PageSpeed ranking gives you an indication of whether or not your front-end (what the browser sees) adheres to best practices for optimal speed. The closer to 100, the faster and more optimized your site is.

YSlow

Like PageSpeed, your YSlow ranking can also be used to give you an indication of whether or not your front-end (what the browser sees) adheres to best practices for optimal speed, with 100 being the perfect score.

Page Size

Depending on your styling, your page could potentially be delivering larger/smaller images and hiding/revealing assets or resources. This impacts the load performance, so the small the page size, the quicker it will load.

As can be seen from the combined results, even the worst performing cache plugin can offer big improvements to a WordPress site. Without an optimization plugin, the average site is losing out massively in comparison to those that have been properly optimized.

In the interest of fairness and to ensure that our test wasn’t a one off or fluke, we also had another member of staff independently test the same optimization plugins on a different test site. The results that he presented below, largely mirror those that we also carried out.

Summary

Following our testing and in-depth analysis when looking for the best caching, image and database optimization plugins for WordPress, it is recommended that if you are looking for the most effective and best optimization plugin on the market, you should install WP-Optimize today as it shows the best overall performance figures of any optimization plugin. As can be seen from these results, WP-Optimize recorded the best loading page speed, ‘YSlow’ score and is very close to the top ranking for Page Size. 

WP-Optimize is easy to set-up and use and with just these few optimization techniques, it can help improve your site’s speed greatly. When evaluating WordPress site optimization, it is important to remember that a properly cached site will not only give visitors a better user experience, but can also help your site succeed via improved SEO score, bounce rate and repeat visits.

By using the WP-Optimize all in one optimization plugin, you will get everything you need to employ the latest optimization features for optimizing your WordPress website. 

Get a copy of WP-Optimize today and increase your website speed. Be sure to let us know your feedback in the comment section below.

The post Comparing the best optimization plugins for WordPress appeared first on UpdraftPlus. UpdraftPlus – Backup, restore and migration plugin for WordPress.

Cloning a WordPress site using Updraft Migrator or UpdraftClone

The option to clone a WordPress website has proven to be a hugely popular and useful feature for both Updraft Migrator and UpdraftClone. As such, we have updated our written and video instructions on how to clone a website using these two different packages. 

There are three different ways you can clone a website using either Migrator or UpdraftClone. While these methods are pretty straight forward and intuitive, it never hurts to have a simple walk-through that can guide you through all the steps required to clone a WordPress site in just a few minutes.

There are many reasons why users of Migrator or UpdraftClone would want to use a cloning feature. Maybe you want to use Updraft Migrator to create a clone of your online store; with the intention to use it as the foundation for a whole new store? Or maybe you want to create a clone of your WordPress blog to test out a new theme update before updating on your main site using UpdraftClone? Whatever your reason for cloning a site, we have got you covered. 

Just follow this link for further detailed and up to date written instructions with videos, or check out the videos for UpdraftClone and Updraft Migrator below.


The post Cloning a WordPress site using Updraft Migrator or UpdraftClone appeared first on UpdraftPlus. UpdraftPlus – Backup, restore and migration plugin for WordPress.

Updraft adds ability to manually complete Dropbox authentication to avoid security conflicts (UpdraftPlus 1.16.42)

The latest updates for UpdraftPlus 1.16.42 have now been released. This latest update of UpdraftPlus comes with a great new Dropbox feature and a host of tweaks to help improve the usability and performance of UpdraftPlus for all it’s users.

This latest release comes with a new feature that now gives users the added ability to manually complete authentication of Dropbox as your remote storage option. This new feature will allow users to avoid any issues they may have had in the past with security modules or plugins that have broken the authentication flow. 

We hope this new update will help improve the integration of the popular remote storage option of Dropbox for all UpdraftPlus users. The change-log for the latest update is as follows:

1.16.42

  • FEATURE: Added the ability to manually complete authentication with Dropbox (Avoids issues where security modules/plugins break the authentication flow)
  • TWEAK: Replace BlockUI’s deprecated jQuery functions and/or shorthand events with the appropriate method accordingly
  • TWEAK: Replace /2/files/search Dropbox API calls with /2/files/search_v2
  • TWEAK: Replace Labelauty’s deprecated jQuery functions and/or shorthand events with the appropriate method accordingly
  • TWEAK: Fix broken multiple range selection’s highlighters due to the absence of jquery-migrate in the WordPress core on version 5.5
  • TWEAK: Add the latest jQuery UI CSS framework for compatibility with WordPress 5.6 and all ongoing versions of WordPress
  • TWEAK: Add support for PHP 8.0 in UpdraftClone
  • TWEAK: Prevent a couple of PHP coding notices on PHP 8.0
  • TWEAK: Tweak in the backing up of tables to reduce PHP memory use when working with very long row contents
  • TWEAK: Prevent a PHP warning when starting a backup
  • TWEAK: Fix a UI issue in the “send backup to remote site” options

The post Updraft adds ability to manually complete Dropbox authentication to avoid security conflicts (UpdraftPlus 1.16.42) appeared first on UpdraftPlus. UpdraftPlus – Backup, restore and migration plugin for WordPress.