Updraft adds ability to perform atomic restore database restoration (UpdraftPlus 1.16.48)

The latest updates for UpdraftPlus 1.16.48 have now been released. This latest release of UpdraftPlus includes a number of features and tweaks to improve your backup and restore experience

Following lots of work and effort, one of the new features we have included is the ability to perform ‘atomic restores’. With this latest update, UpdraftPlus will now detect if your server has the required permissions and if available, will perform an atomic restore.

An atomic restore will restore your backup alongside your existing database before replacing the original. This means that should your site die during a restore of the database, you will no longer risk losing any tables, while still keeping your site up and running. You can then use UpdraftPlus resume restore feature to carry on with the restore process until it completes.

In a previous UpdraftPlus release we added a manual authentication feature to Dropbox. This allowed users to manually complete authentication if they were getting blocked by a security plugin or module on their server. UpdraftPlus have now extended this feature to include Google Drive and OneDrive, making it easier for users to connect to these services.

There are also a good number of tweaks and fixes included in this latest release to improve the overall performance of UpdraftPlus, such as faster deletes from BackBlaze, faster uploads to Google Drive and Google Cloud, more PHP 8 compatibility tweaks and many more.

The full changelog can be found below:

  • FEATURE: If needed database permissions are available then perform an atomic restore to improve chances of successfully restoring the database
  • FEATURE: Added the ability to manually complete authentication with Google Drive (Avoids issues where security modules/plugins break the authentication flow)
  • FEATURE: Added the ability to manually complete authentication with OneDrive (Avoids issues where security modules/plugins break the authentication flow)
  • FEATURE: Google Drive and Google Cloud now allow boosting chunk size for faster transfers
  • FIX: Files/Directories Exclusion not saving correctly when adding numeric directory/file names into the exclusion list
  • FIX: Different PHP versions generate different suffixes length in the temporary ZIP filename resulting in a chance of overlapping runs
  • FIX: an issue with mysqldump password character escaping
  • TWEAK: Avoid unnecessary database writes caused by redundant jobdata updating during backup of files
  • TWEAK: Add “anywhere in their names” syntax option to the exclusion UI
  • TWEAK: Bump the requirement for the S3 enhanced module, and for using the official AWS SDK, up to PHP 5.5 (in preparation for updating the SDK version later)
  • TWEAK: Fix a bug of report emails for incremental backups displaying incorrectly in many email apps
  • TWEAK: Update Select2 library to version 4.1.0-rc.0 to work around deprecated jQuery isFunction
  • TWEAK: Update jQuery-serializeJSON library to version 3.2.0 to work around deprecated jQuery isArray
  • TWEAK: Handle hosts that have disabled some of the PHP functions thus causing a fatal error on PHP 8
  • TWEAK: Correct under-calculation of used memory in verify_free_memory()
  • TWEAK: Fix (inconsequential to this point) double-use of identifier for SQL statement type
  • TWEAK: Remove some compatibility code in Dropbox downloading pertaining to a folder selection bug eliminated ~8 years ago.
  • TWEAK: Remove unneeded sub-site tables when performing a restoration/migration (Multisite)
  • TWEAK: Improve the exclusion UI by adding new “wildcards” option thus allowing the user to add a set of patterns for excluding files/directories
  • TWEAK: Integration of the new files that were previously added for abstracting UpdraftCentral’s client code
  • TWEAK: Excluded items (Files or Folders) that are not readable should not trigger a warning about being unreadable
  • TWEAK: Fix some RTL CSS issues
  • TWEAK: OneDrive 4xx error reporting
  • TWEAK: Update the Dropbox SDK to use refresh tokens (long lived token support ends September 2021)
  • TWEAK: implement a multi-delete capability when deleting from Backblaze
  • TWEAK: On UpdraftClone display the image ID in the advanced tools tab for easier debugging
  • TWEAK: Make it more clear in the restore log that we are starting an AJAX restore
  • TWEAK: The download backup HTML so that there is only one download button per archive type

The post Updraft adds ability to perform atomic restore database restoration (UpdraftPlus 1.16.48) appeared first on UpdraftPlus. UpdraftPlus – Backup, restore and migration plugin for WordPress.

New UpdraftPlus translations added

We at UpdraftPlus have recently transferred a large number of translation sets from our dedicated translation project to the public project at translate.wordpress.org.

Once these translations are approved and released, this update will go a long way to helping UpdraftPlus become fully translated into over 50 different languages; with 25 languages already over 90% complete!

Of particular interest are these language sets, which have received a large number of new translations:

  • Bulgarian (1300+ new strings translated!)
  • Spanish (Mexico)
  • Turkish
  • Japanese
  • Danish
  • Portuguese (Brazil)
  • Indonesian
  • Chinese (China)
  • Chinese (Taiwan)
  • Greek
  • German
  • Russian
  • Polish
  • Dutch

If you are interested in completing these translation sets, you can submit your own translations here – https://translate.wordpress.org/projects/wp-plugins/updraftplus/

Additionally, if you are interested in contributing to our own project (which includes translations for Premium features), you can find more information here – https://updraftplus.com/translate/

Many thanks to all our translators, both on translate.wordpress.org and our dedicated translation project team.

The post New UpdraftPlus translations added appeared first on UpdraftPlus. UpdraftPlus – Backup, restore and migration plugin for WordPress.
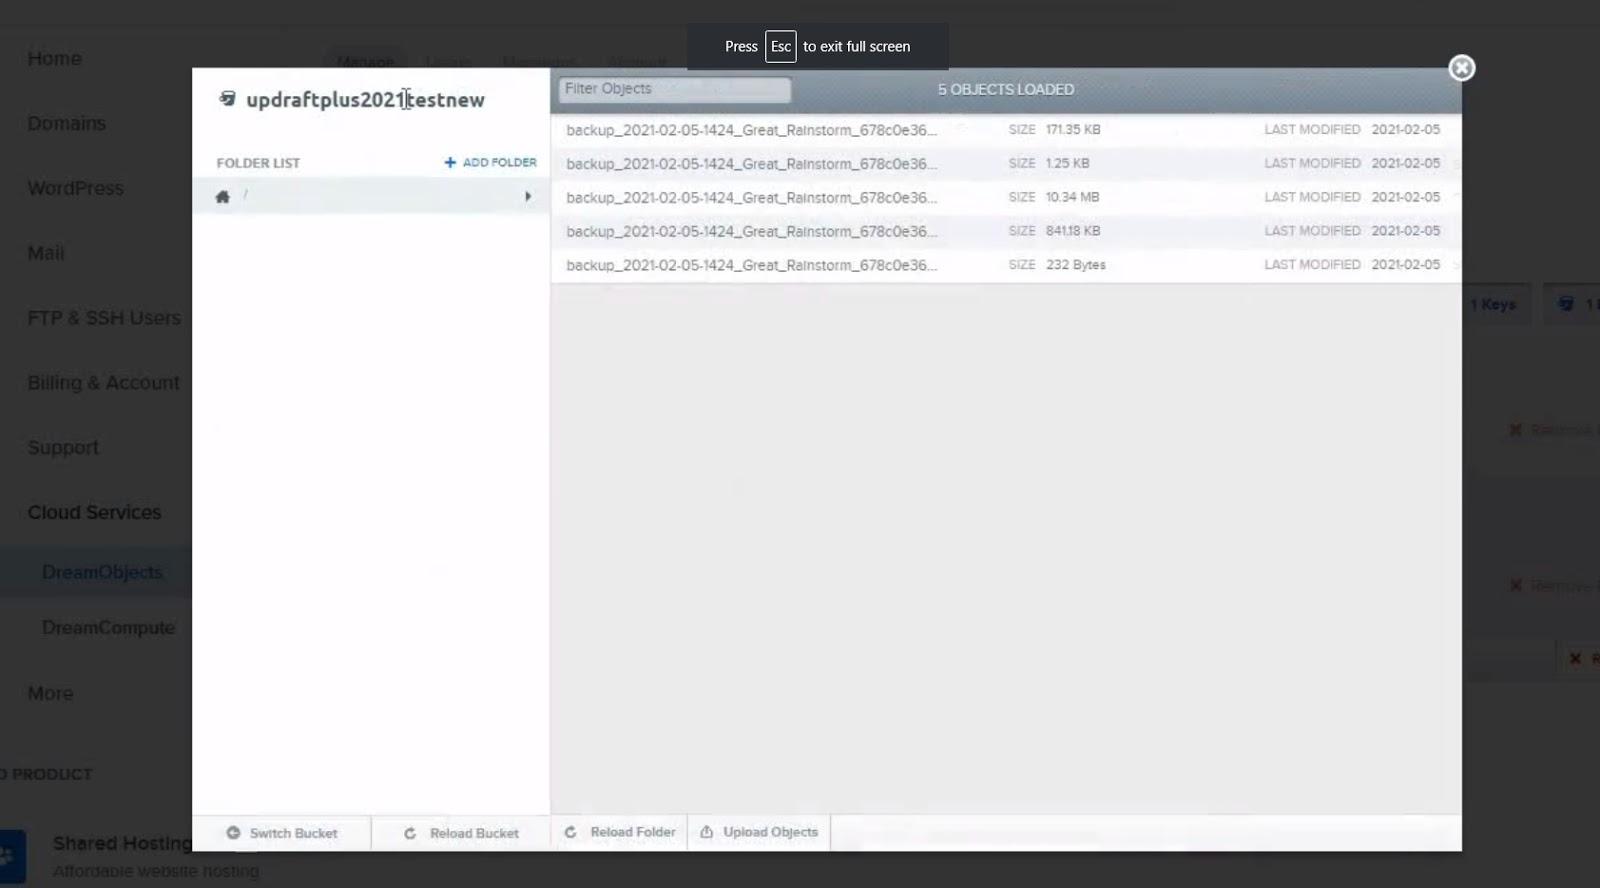
How to add DreamHost to your UpdraftPlus account settings

When backing up your WordPress website with UpdraftPlus, we have given users multiple options to backup your site using many of the top remote storage options, including Google Drive, Amazon S3 and DropBox

One of the additional storage options UpdraftPlus offers is DreamHost – the popular cloud service platform from DreamObjects. DreamHost offers a 30 day free trial account for users who want to experiment with the platform before purchasing. After this trial period, DreamHost offers the following competitive pre-paid pricing plan. 

Some users have chosen to use DreamHost as their cloud storage option over other services, such as Google or Amazon, due to DreamHost’s following features.

  • Infinitely scalable
  • Allows you to start small and grow
  • Customizable metadata
  • Inexpensive option

To find out how to add DreamHost to your UpdraftPlus backup settings, just follow the video above or written guide for step-by-step instructions.

Configuring the UpdraftPlus plugin

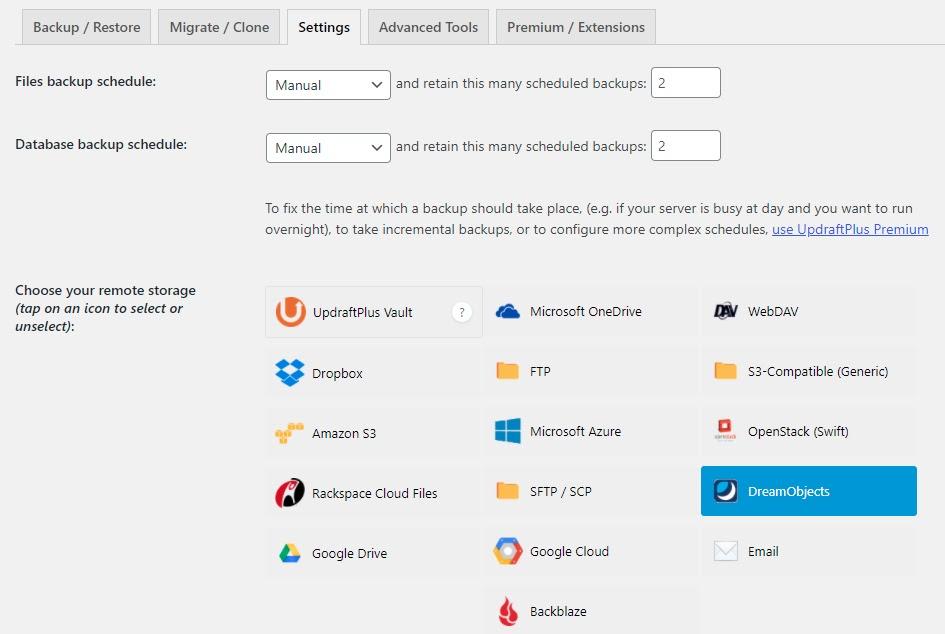
1. In the UpdraftPlus plugin of your WordPress site, select the DreamObjects remote storage option, scroll down to the bottom of the page and select the ‘Save’ button.

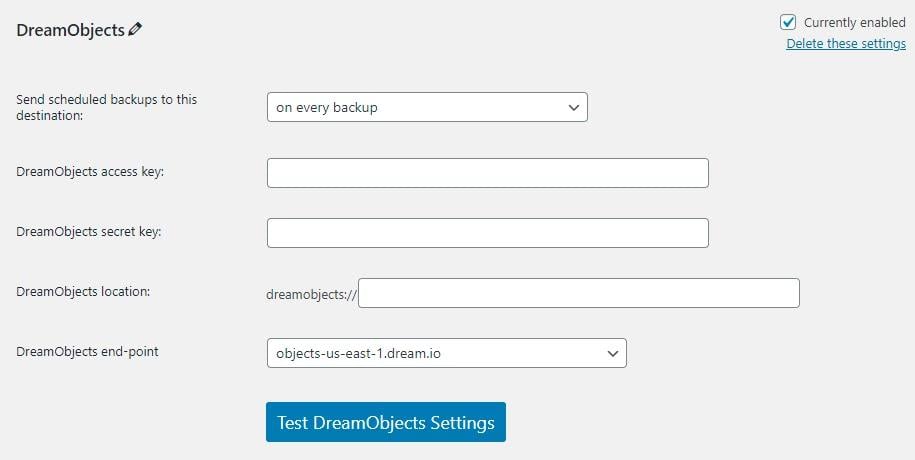
2. In the DreamObjects information section, you will need to enter an access key, secret key and the path of your DreamObjects location.

3. In your DreamObjects account, generate the required information and copy and paste it to the relevant UpdraftPlus DreamObjects settings. Next, press the ‘Test DreamObjects Settings’ button in the UpdraftPlus plugin.

4. Once you have received a ‘test was successful’ message at the top of the screen, you are now ready to create a backup. This backup will now store the information for your website in your DreamObjects cloud storage account – should you ever need to restore your site using UpdraftPlus.

DreamHost by DreamObjects is relatively simple, quick and easy to set-up, providing a secure and cost effective method to store your website’s backups should you ever need them. If you have any questions or comments, be sure to let us know in the comments section below.

The post How to add DreamHost to your UpdraftPlus account settings appeared first on UpdraftPlus. UpdraftPlus – Backup, restore and migration plugin for WordPress.
How to increase eCommerce traffic and sales with WordPress content

WordPress content

If you run an eCommerce operation that falls short of dominating its niche, you’re always going to be looking for new ways increase traffic and sales via your WordPress site. But before your eCommerce site can make more sales, you’re going to need more traffic. There are of course existing marketing channels you can explore to sell to existing customers, such as targeted email campaigns and tempting personalized offers. But they can only bring in so much growth.

The key to taking things to the next level typically lies in reaching new audiences: Specifically locating those people who stand to benefit from your product, and figuring out how you can sell it to them. This concept of course, is much easier said than done — and there are many actions you can take that might help you achieve your goals.

In this blog, we’re going to focus on one method in particular: creating rich content through your WordPress blog that will grab potential customers attention, boost your product views and earn you more conversions. Regardless of the nature of your store, this is can be a viable approach that has shown success, regardless of what you may sell.

Create slick product pages featuring rich media

WordPress may have been originally developed to serve as a blogging platform, but it’s become so much more than that over the years due to its modular nature and immense popularity (it currently powers over 40% of the world’s top websites). No matter what type of site you want to create, you can create it and manage it through the right combination of plugins and development, with eCommerce WordPress sites certainly no exception.

Eager to take advantage of its accessibility and convenience, many sellers install great retail plugins (WooCommerce being the best reviewed) to turn their WordPress sites into fully-functioning sales platforms. As noted above, this means that WordPress eCommerce content isn’t solely about supporting the site itself and helping improve SEO. The content can be directly for eCommerce and help drive traffic and sales. 

When you’re working on the content for your WordPress-based store, your primary focus should be on your product pages. The better your product pages are, the more likely they’ll be to convert visitors to customers, which is the ultimate goal for any online store. It can be extremely hard to earn hyper-relevant visits of potential buyers looking to buy your specific product, so failing to take advantage of them is a huge waste of time and effort.

A great product page should have a slick design, with content set out in a fully mobile-responsive layout with a logical structure (the most important aspects of the product covered first, with other details placed in expandable sections for those who want them). It should ideally also feature varied forms of media arranged in appealing ways, such as adding images or videos in a carousel.

bad product photo example

An example of poor and good product image examples.

Product photos in particular can help increase your eCommerce sales. As buying online prevents customers from physically inspecting something before buying it, the product image could potentially make or break the sale of an item in your store. You should always aim to create your own product photos whenever possible. This is something that can be easily achieved, as even entry level smartphones now have excellent cameras that will allow you to take unique and high quality images that can help set your store apart from those of your competitors.

Write posts covering frequently-asked questions

SEO, or search engine optimization, is a key part of making sure your potential customers can find you online. Many retail journeys start with Google searches for particular products and if your store doesn’t rank well for relevant terms, how will potential customers even find it and make a purchase? One part of ranking well is picking up high-quality back-links (your website address linked from high value websites). Another method you can explore to get your site to rank highly is to upload content that covers and includes the top keywords for your store/product.

When you’re trying to rank for terms relevant to your products, don’t obsess over reaching the first page for high-volume keywords: they’ll no doubt be incredibly competitive and challenging. Instead, look for long-tail keywords that haven’t been suitably addressed elsewhere, paying particular attention to long-form queries that keep being asked. For example, if you run a shoe website, you may find that you can generate valuable traffic by focusing on a long-tail keyword term such as ‘what are the best walking boots for snowy conditions’. This can generate valuable traffic for your site, instead of trying to rank highly for a popular and hard to rank search term such as ‘walking boots’. 

Sites like AnswerThePublic can be extremely useful for identifying these questions. Once you’ve made a list of keywords and whittled it down, you can now create content accordingly. For example, you could make one large FAQ post covering them all, or make various individual pieces answering specific queries in greater detail related to the long-tail keyword. Nail the copy and the metadata, and you’ll have a great chance of picking up some actionable visits from searchers.

Provide details on new and upcoming releases

Not all your content should be re-actively based on what people are searching for. Sometimes you need to take charge of providing information that your audience will want before they know they want it. That’s where a new product release becomes invaluable. On occasion, you’ll update your stock inventory with new items, so remember to generate some content specifically for them.

The goal in doing this should be twofold: to demonstrate to your customers how exciting and changeable your store inventory is (incentivizing people to return), and to show your unique point of view and insight into what makes a new product so interesting. Just as a successful blogger establishes the value of their unique perspective over time, so too should you use the steady release of product updates to make people eager to pay attention.

Remember that there’s nothing wrong with including some of your own personal and store brand personality. Companies like RedBull and Apple have built a massive following that goes far beyond their products by having a vibrant and engaging company personality. You don’t need to dryly recite talking points about your products and should always try to describe them in your own words, getting creative as you do so. If you’re excited about a product or feature, remember to explain why. Make the reader feel your excitement. The more emotion you can convey, the more trustworthy you’ll seem, and the more potent your posts will become.

Ultimately the production of outstanding WordPress content can work wonders for the popularity of your eCommerce brand and the conversion rates you achieve. If you can prioritize the optimization of your product pages, create SEO-polished content and build a notable brand personality through commentary and insight, it can help you get ahead of the pack and build a successful online store.

The post How to increase eCommerce traffic and sales with WordPress content appeared first on UpdraftPlus. UpdraftPlus – Backup, restore and migration plugin for WordPress.

Post and page module added to UpdraftCentral

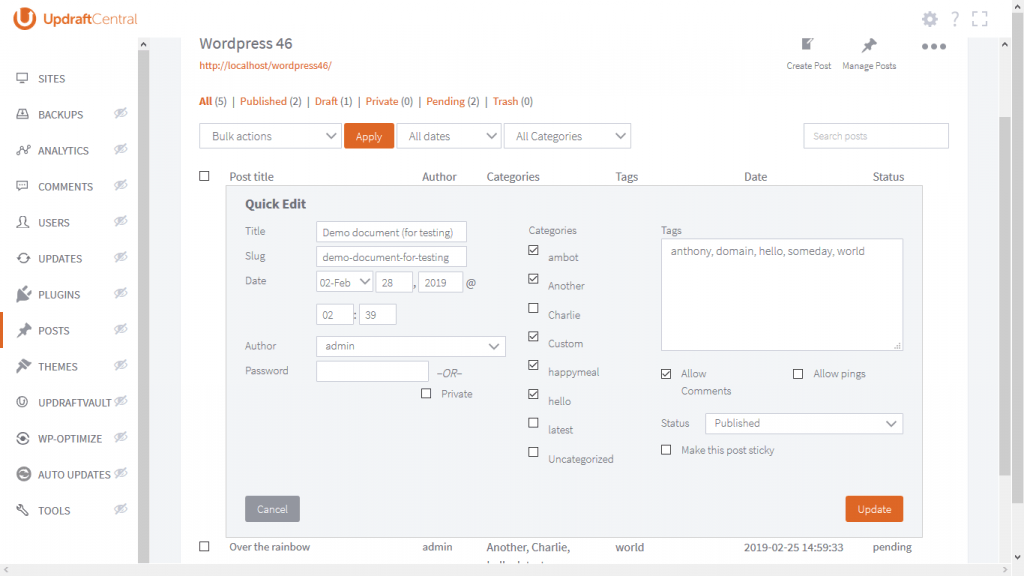
You can now manage all of your posts, from all of your sites, from a single location in Updraft Central’s dashboard posts feature. 

By going to the “Posts” tab in your Updraft Central dashboard, you can now edit all of your posts, without having to go to each individual site. 

Post and Page Modules feature details:

  • Edit page details and post content, such as article’s title, body, permalinks, etc. As you normally do within the WordPress panel, but with some limitations (see limitations section below)
  • Add/remove categories or create a new ones
  • Create or assign new categories and tags to your post
  • Upload featured image or change existing images to your content
  • Change publishing details
  • Change post owner/author
  • Preview changes

Perform quick edits on your posts for even greater time savings

  • Set parent pages and templates for your page content.
  • Edit your pages and posts content either using the classic editor or block editor (previously known as Gutenberg).
  • Quickly manage your pages and posts information through the quick edit feature.
  • Choose/edit publishing dates.
  • Schedule your posts or pages.
  • Password protect your content.
  • Easily set your content status or make it private while you are still editing.
  • Easily move around posts and pages by setting their status to a different state.
  • Pages and posts search is supported with date and category filters.
  • Bulk actions for pages and posts are supported.
  • Easily switch editing between the classic or block editor. Just close the editor and switch to the other editor when required.
  • Edited remote content and its details/properties are automatically reflected among the quick edit, classic and block editors. No re-loading needed.

Limitations:

  • Currently, both editors (classic and block) do not support custom metaboxes.
  • Block editing is only supported when WordPress version 5.0 and higher is installed on the remote sites.
  • For block editing, custom blocks that were installed on the remote sites must also be installed on the WordPress install where UpdraftCentral is installed/hosted if you wish to use them.
  • Revisions viewing and auto-saving are currently disabled as not to interfere with editing/handling of remote page and post contents.

While the new post module feature currently only works on your UpdraftCentral dashboard WordPress install, we aim to have it also support remote blocks in your block editor in the near future. There is currently a workaround that you can employ in the meantime. To use this workaround, just make sure that your UpdraftCentral dashboard WordPress install is in sync with your controlled sites that are registered with UpdraftCentral. 

Block Editor

If you wish to use a specific or custom block that you have created or installed on your controlled site/sites, then you must first copy or install them to your UpdraftCentral dashboard WordPress install also. 

Classic Editor

The post module does not currently support any third party options. Editing is limited to the following options/sections “Publish”, “Categories”, “Tags” and “Featured Image” only.

Both Classic and Block Editors

Currently the post module does not support viewing or browsing of revisions of the current post and moving of the current post to trash directly from the editor. If you want to move the current post to trash or delete it, then it is recommended to do it outside the editor via the “Post” table interface in which the list of remote posts are displayed.

Summary

The new UpdraftCentral Post module gives an extra level of control to users that have multiple sites with lots of posts. The convenience and time saving aspects of this new release further improve the overall features and usability of UpdraftCentral, making it a must have for anyone looking to update their posts with minimal fuss.

The post Post and page module added to UpdraftCentral appeared first on UpdraftPlus. UpdraftPlus – Backup, restore and migration plugin for WordPress.
WP-Optimize preload key request feature details

The latest updates for WP-Optimize 3.1.7 have now been released – including the preload key request feature. We have taken a lot of time and effort to launch these new improvements and hope that they further help improve users’ experience of WP-Optimize. 

When aiming to improve the speed of your WordPress site using WP-Optimize, one of the new features we have released with this update is the ability to preload key requests. Preload key works by using an audit to identify which resources to preload on your WordPress site. The browser will then preload resources so they are available immediately when needed, preventing eventual waiting time later on, making your site load faster. Google’s pagespeed insights will often suggest preloading the requests to font files and other assets as a speed improvement:

With the latest WP-Optimize Premium release, you now have the ability to manually add any resource you want to be preloaded:

As can be seen in the Google PageSpeed insight test, preloading key requests can result in massive time savings when visitors are loading your site.

In order to get the URL to add to WP-Optimize, just right click on the resource and copy the URL:

Next, past the URL in the ‘New Asset’ box of the ‘Preload key requests / assets’ section of WP-Optimize and press ‘Add’. 

The URL you added you will be added to your preload key requests.

The updates to WP-Optimize 3.1.7 also includes the following:

WP-Optimize: 3.1.7

  • FEATURE: Premium – Preload key requests (Preload fonts and other assets)
  • FIX: Detecting Brotli compression issue
  • FIX: Cache – PHP Warning in URLs to exclude from caching
  • FIX: Premium – Unused images – Unused Images Tool not recognising Greek characters
  • FIX: Button for disabling Gzip doesn’t showing
  • TWEAK: Database optimization – Prevent fatal error due to files missing
  • TWEAK: Skip minify when SCRIPT_DEBUG is set to true
  • TWEAK: Fixed Font-awesome settings
  • TWEAK: Add support for different spellings of “Font-awesome”
  • TWEAK: Update the feature comparison table
  • TWEAK: Added the option to not show the warning before deleting a table
  • TWEAK: Wipe all options upon plugin de-installation
  • TWEAK: Premium – Lazy-load – Lazy load support for background images
  • TWEAK: Minify – Add file size in the minify cache summary
  • TWEAK: Detect conflicting plugins for GZIP issue
  • TWEAK: Database optimization – Include all tables if database prefix is not set on WP install
  • TWEAK: Premium – Unused images – added “X of X images loaded” for unused trash images
  • TWEAK: Don’t allow to remove actionscheduler_ tables
  • TWEAK: Premium – Unused images – Show a progression screen when doing any action with unused images
  • TWEAK: Cache – Enable cache for the old default permalink structure domain.com/index.php/a-post-name by creating a folder without the extension
  • TWEAK: Show previous action as message on Trackbacks or Comments enable or disable.
  • TWEAK: Prevent deprecation notice on PHP 8.0
  • TWEAK: Update notices

The post WP-Optimize preload key request feature details appeared first on UpdraftPlus. UpdraftPlus – Backup, restore and migration plugin for WordPress.

How to delete unused images in WordPress using WP-Optimize


How it works

WordPress stores images in two parts:

  • The image files are stored on the server, typically in the ‘wp-content/uploads’ directory of the site.
  • A record of the image is then stored in the database, in the Media Library. This record also includes other data related to the image, such as the image tile, description or alt-text.

When removing an image, both the image files and Media Library record will be deleted.

Removing Unused Images

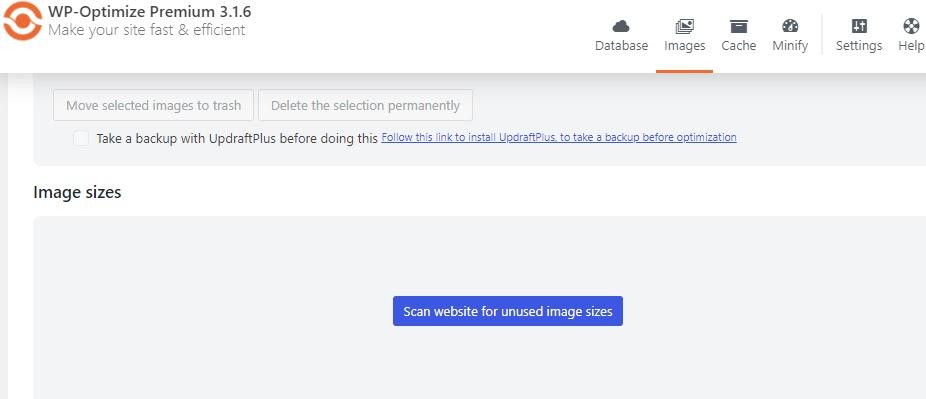
Open the ‘Images’ tab in the WP-Optimize Premium admin page and press the “Unused images and sizes” tab.

To scan your website for unused images, press the “Scan website for unused images” button. WP-Optimize will now scan for unused image files, found both in the Media Library and the ‘wp-content/uploads’ directory, that are not attached or embedded in any posts or pages.

You will now be presented with all the unused images that are on your site. To delete these images, either individually select the images by clicking on the images to highlight them, or press the “Select all” button to delete all unused images.

Once you have selected all the unused images you want to delete from your site, scroll down and either choose “Move selected images to trash” or “Delete the selection permanently”. WP-Optimise will then delete all copies of the selected image file plus any record in the Media Library.

You will receive a notification that your images have now been deleted.

Removing Images by size

You can also choose to remove unused images by size, but please note that removing registered image sizes is for experienced users, and care should be taken that the image size in question is not used on the site.

This tool shows both all registered image sizes, and image sizes that are currently not in use.

The ‘Unused image sizes’ section shows a list of all image sizes that are present on the site. This includes sizes for images that are in use. Deleting a registered image size will remove all images of that size from the uploads folder, including any that are in use.

In this case, the Media Library record will only be deleted if all copies of an image have been removed.

The ‘Unused image sizes’ section shows any image sizes that are currently not used by any images on the site.

Select any image size (from either section) that you wish to remove, and press ‘Remove selected sizes’.

Restoring images that were moved to trash

If you are not sure if you might still need the image, you can send it to trash, instead of deleting it permanently. You can view and restore these images by pressing the “view trash” button. 

Here you can restore any trashed images you want to keep by highlighting them and pressing the “Restore the selection” button. These images will now be sent back to your image library. 

We recommend taking a backup of the site before performing any optimisation with WP-Optimize Premium. WP-Optimize integrates with our backup plugin, UpdraftPlus. If UpdraftPlus is active on the site, the option to take an automatic backup before images are removed will be displayed in the tab.

The post How to delete unused images in WordPress using WP-Optimize appeared first on UpdraftPlus. UpdraftPlus – Backup, restore and migration plugin for WordPress.
Upcoming UpdraftPlus feature: Clone data anonymisation

As a WordPress user, you may have created a site with members who have been granted various levels of access other than admin; such as editor or moderator. As such, you should be aware that as the owner and admin of this site, should you attempt to clone the site and its members / level of access information, many of the details about these users is classed as ‘data’. Unless this data is handled carefully, it could result in violation of GDPR laws. 

Currently, in order to comply with GDPR laws when cloning a site and user data, you need to wipe or edit all of the relevant data on the cloned site immediately after it has been created. This task can be time consuming and annoying. 

UpdraftPlus has been working on a way to help administrators fix this issue. In the 2.16.47 version of UpdraftPlus onwards, when creating a backup, you will have the following different anonymisation options: 

Anonymise personal data for all users except the logged in user: This option will anonymise all personal data for all users except for the user who is logged in and creating the backup.

Anonymise personal data for all users except staff: This option is the same as the first option, but anyone with the following user roles will be counted as staff and their data will not be anonymised.

The current staff user roles are:

  • Administrator
  • Editor
  • Moderator
  • Shop_manager
  • Fue_manager
  • Plugin_manager
  • WPSEO_editor
  • SEO_manager 

We hope these updates will help users cloning sites, to be aware of and more easily comply with GDPR regulations.

The post Upcoming UpdraftPlus feature: Clone data anonymisation appeared first on UpdraftPlus. UpdraftPlus – Backup, restore and migration plugin for WordPress.

How to use WP-Optimize image compression

Many websites can accumulate hundreds, if not thousands of images over time. Having all these images on your site in their original uncompressed format can cause frustratingly slow website loading speeds, which can impact on a website’s user experience, bounce rate and SEO performance. 

One of the best ways you can improve the speed of your site is by optimizing your images using WP-Optimize. This process, which is commonly known as ‘smush’ or ‘smushing’ allows users to optimize, compress and resize all the images on a website, potentially saving many MB per image and improving loading speeds. This feature is available on both the free and premium versions of WP-Optimize. 

How to optimize your images

Step 1


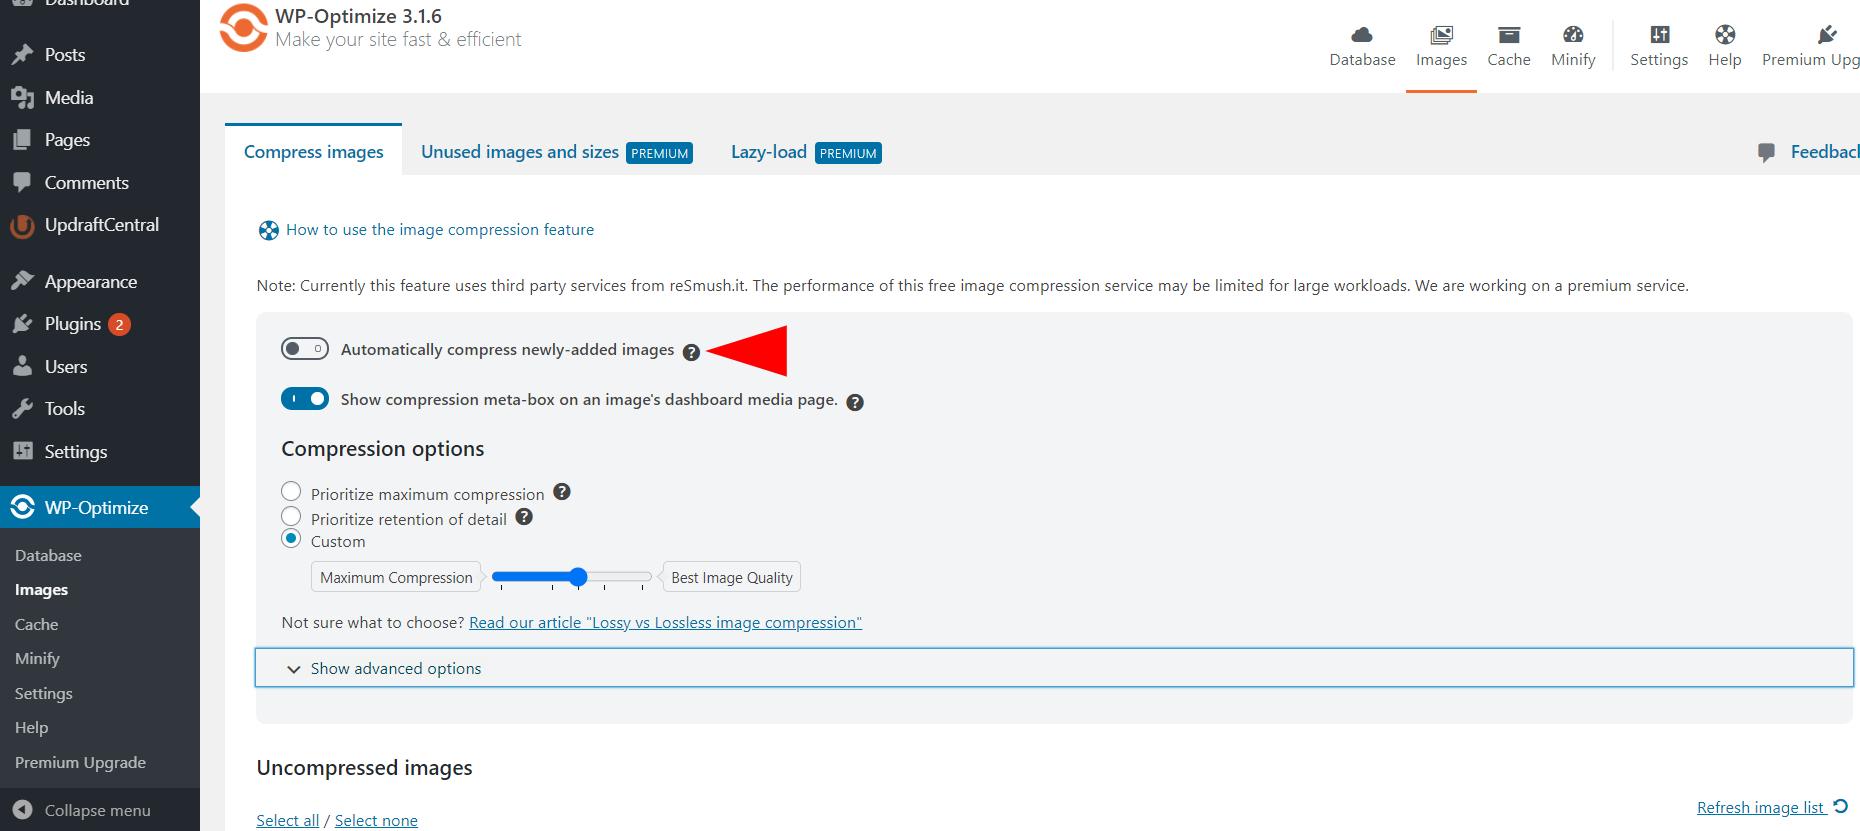
Once you have installed the WP-Optimize plugin, click on WP-Optimize>Images in your WordPress dashboard. Now you can decide what level of compression you would like to have for your images. There are 3 options:

  • Prioritize maximum compression 
  • Prioritize retention of detail 
  • Custom

By prioritizing ‘maximum compression’, the more space you can save and the quicker your website will load due to it now having smaller and quicker loading images. However, if you run a wedding photography website for example, you may not want to compress your images fully as there can be a slight drop in image quality the more an image is compressed. While the loss in quality is hardly noticeable for most people and is not a consideration for most websites, if high end quality images are important to you, then you should prioritize ‘retention of detail’. This option will still save reduce the image file size (though not as much as ‘maximum compression’), but will maintain the high quality of the original. You can also select ‘custom’, if you would like to format your images to a level that is not quire maximum compression of best image quality. 

Step 2

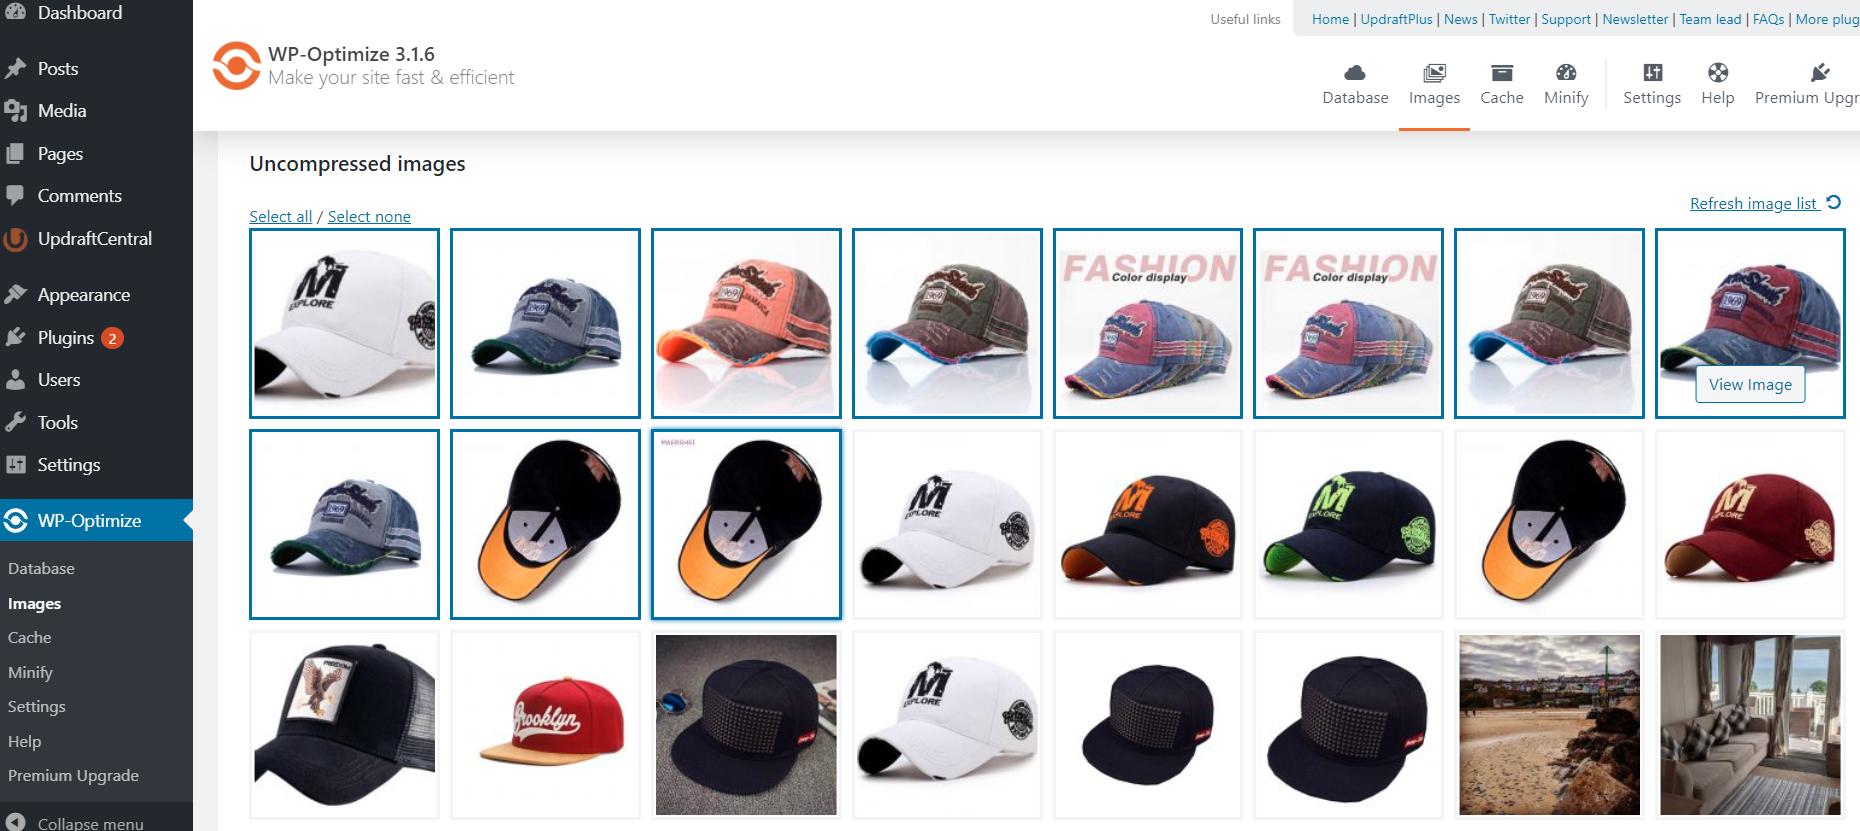
Below the settings options, you will see all the uncompressed images that have been uploaded to your website. Here, you can manually select individual images you wish to compress, or press the “Select All” button if you want to compress all the images to the same level. As previously mentioned, if you have high quality images that you do not wish to fully compress alongside other images that may not be so important, you can individually select them and run a ‘maximum retention of detail’ compression. You are then able to run the ‘maximum compression’ option on the remaining images.

Step 3

WP-Optimize also gives you ‘advanced options’ when compressing your images. Here you can choose option such as: 

  • Preserve EXIF data – Handy for professional photographers that may require the EXIF data at a future date.
  • Backup original images – Don’t worry if you make a mistake or want to revert back to the original image. WP-Optimize gives you the option to retain a backup.
  • Automatically delete image backups – Once you have compressed your images, you can set a date for when you want your backup images deleted. This helps prevent your site from storing large original files that are no longer needed. 
  • Delete all backup images now – If you are happy with the results and want to delete all your backed-up images, just press this button and WP-Optimize will do the rest. 
  • Mark all images as uncompressed – Use this option if you want to compress your images again, or make further changes.
  • Restore all compressed images – If you decide that you no longer want your images compressed or have made a mistake and still the original in your media library, you can restore all of your compressed images to their original state.

Step 4

Once you have set up and decided what kind of image compression you are happy with, you can tick the “Automatically compress newly-added images” button so that you do not have to go through the process every time you upload a new image. Once you activate this option, every new image you upload will be compressed according to the settings you have chosen (compression or detail). 

If you would like to read more information on the benefits of compression versus detail, be sure to check out the following blog that goes into more details and explains the benefits of both: Lossy vs Lossless image compression – A guide to the trade-off between image size and quality.

We have also put together a video of how to optimize your images.

The post How to use WP-Optimize image compression appeared first on UpdraftPlus. UpdraftPlus – Backup, restore and migration plugin for WordPress.

Comparing the best optimization plugins for WordPress

Which of the leading contenders has the best optimization plugins for WordPress?

Optimizing a WordPress site is an essential process that can help speed up your site via caching, image optimization and database optimization. It can also improve performance and help you rank higher in search engines. However, as a customer, which one is the best? When looking for the best optimization plugins for WordPress, there are so many to choose from, it can be hard to separate fact from fiction – with all of them making wild promises to make your site faster than a hammer-time Lewis Hamilton!

In the below review, we will evaluate the performance by analyzing all the the top optimization plugins and show you why WP-Optimize should be your plugin of choice. 

What does ‘caching’ do?

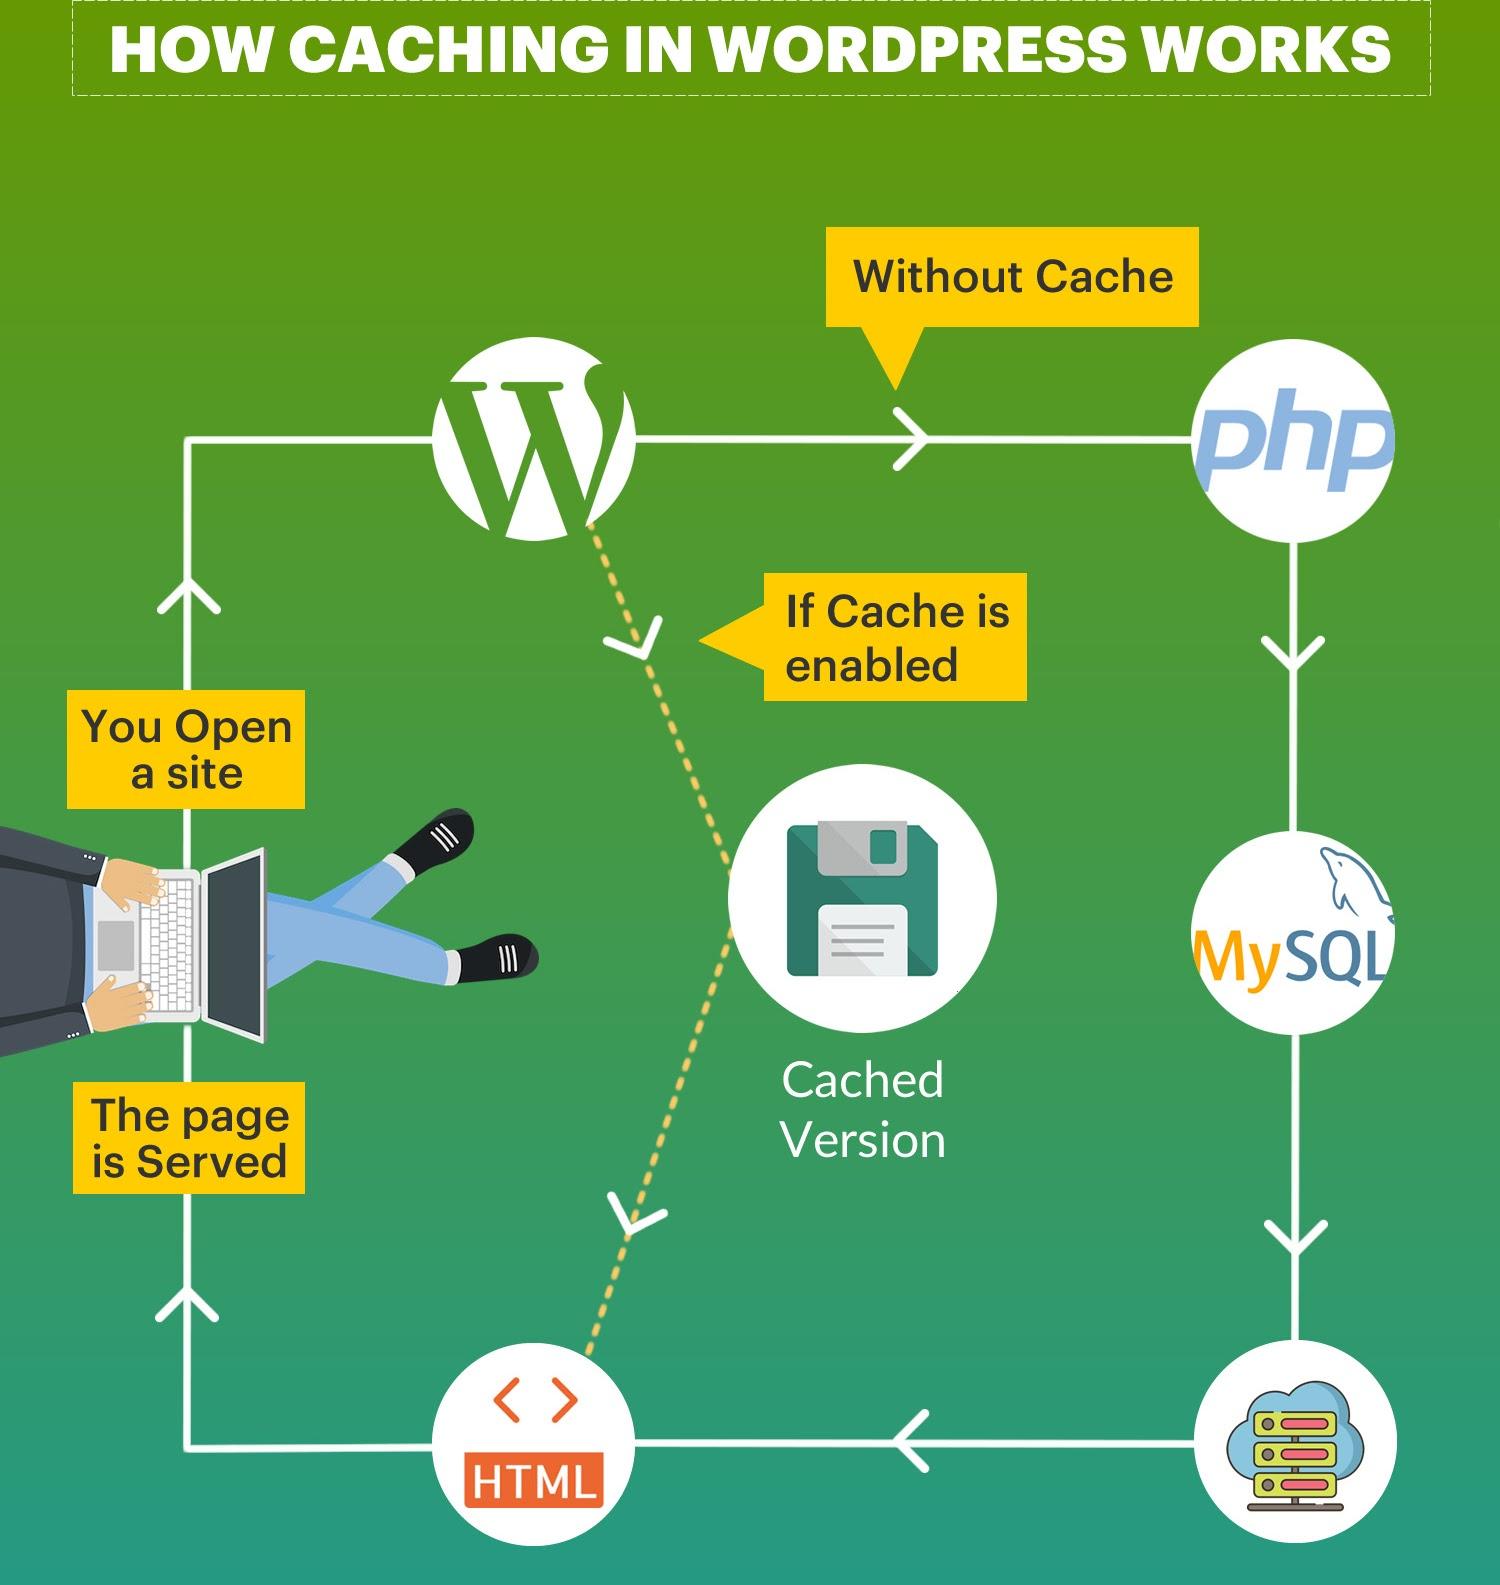
An important part of the optimization process is caching. The term ‘cache’ or ‘caching’ refers to when there is a collection of data that is temporarily stored to allow for quick access upon request. Caching for a WordPress site works so that every time a user visits your site, WordPress will fetch previously viewed and stored information from the file system. By using cache, it allows visitors to skip the time consuming step of loading a site for the first time, as the caching plugin has made a copy of the site and presents this copy to the visitor when they return. 

How much of a difference can optimization make?

As optimization and caching reduces the load on your WordPress hosting servers, it can help make your website run faster. However, the optimization and caching for your site needs to be properly optimized and set up in order to get the most from a optimization plugin and help improve your site’s performance and speed.

If your site offers users a faster and more user friendly experience, it can help encourage users to return again in the future, visit more pages or more likely to make purchases. This in turn helps your user engagement time and reduces bounce rate. All of these factors combined (along with other metrics such as quality of content and how often your site is updated) can help boost your SEO score and drive more traffic to your site from organic search. A faster and more optimized site that includes caching and optimization can gain a significant SEO advantage from search engines such as Google, who prioritize and rank sites higher if a site is proven to be quick and maintains good user interaction. 

There are many WordPress optimization plugins out there that claim to help boost your website’s speed through caching, image optimization and database optimization. But which one is really the best?

How we tested the top optimization plugins

To make this test fair and completely aboveboard, a new, unbiased test site was set up. This test site is a basic WordPress site that contains lots of images and content that provides the simplest way to judge each plugin when evaluating its effects on a site’s speed test results when tested using GTMetrix.com

The test site

A 3GB sized test that has not been optimized or altered in any way to favour one optimization plugin over another. 

An example of the large scale images uploaded to our test site

Results

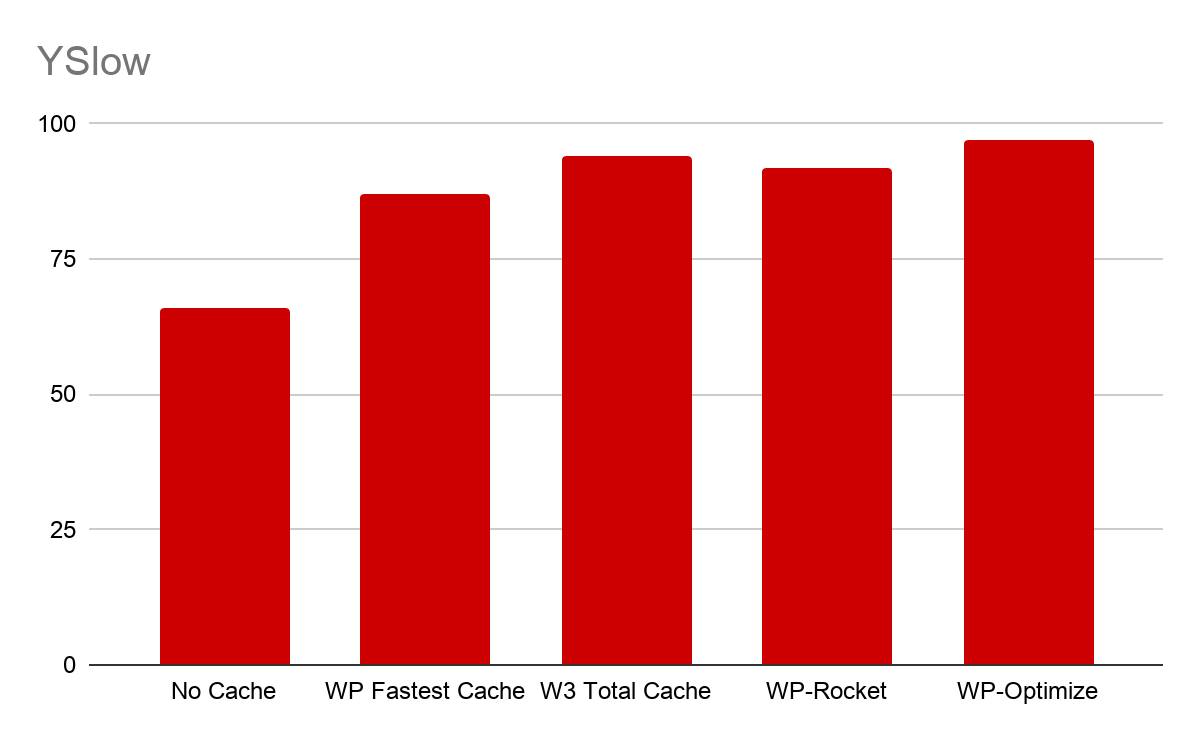
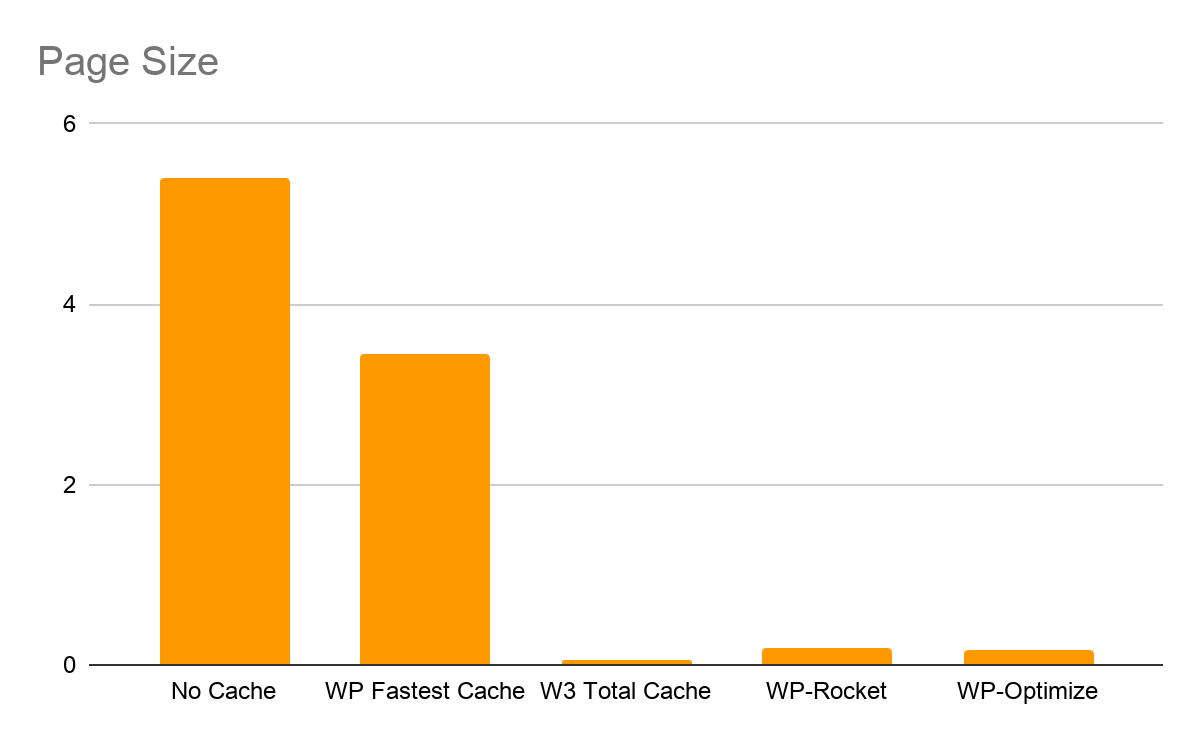
For the following speed test, we evaluated the 4 leading optimization plugins – WP Fastest Cache, W3 Total Cache, WP-Rocket and WP-Optimize, as well as a test with no optimization in order to have a base-line to evaluate performance.

Page Speed

PageSpeed ranking gives you an indication of whether or not your front-end (what the browser sees) adheres to best practices for optimal speed. The closer to 100, the faster and more optimized your site is.

YSlow

Like PageSpeed, your YSlow ranking can also be used to give you an indication of whether or not your front-end (what the browser sees) adheres to best practices for optimal speed, with 100 being the perfect score.

Page Size

Depending on your styling, your page could potentially be delivering larger/smaller images and hiding/revealing assets or resources. This impacts the load performance, so the small the page size, the quicker it will load.

As can be seen from the combined results, even the worst performing cache plugin can offer big improvements to a WordPress site. Without an optimization plugin, the average site is losing out massively in comparison to those that have been properly optimized.

In the interest of fairness and to ensure that our test wasn’t a one off or fluke, we also had another member of staff independently test the same optimization plugins on a different test site. The results that he presented below, largely mirror those that we also carried out.

Summary

Following our testing and in-depth analysis when looking for the best caching, image and database optimization plugins for WordPress, it is recommended that if you are looking for the most effective and best optimization plugin on the market, you should install WP-Optimize today as it shows the best overall performance figures of any optimization plugin. As can be seen from these results, WP-Optimize recorded the best loading page speed, ‘YSlow’ score and is very close to the top ranking for Page Size. 

WP-Optimize is easy to set-up and use and with just these few optimization techniques, it can help improve your site’s speed greatly. When evaluating WordPress site optimization, it is important to remember that a properly cached site will not only give visitors a better user experience, but can also help your site succeed via improved SEO score, bounce rate and repeat visits.

By using the WP-Optimize all in one optimization plugin, you will get everything you need to employ the latest optimization features for optimizing your WordPress website. 

Get a copy of WP-Optimize today and increase your website speed. Be sure to let us know your feedback in the comment section below.

The post Comparing the best optimization plugins for WordPress appeared first on UpdraftPlus. UpdraftPlus – Backup, restore and migration plugin for WordPress.