Easy Updates Manager release new update: Includes new automatic update notes section

Easy Updates Manager are happy to announce that we have released another update – Easy Updates Manager 8.1.0 (free and premium), featuring lots of newly added features, fixes and tweaks. One of the new features that we are sure will be of use to users is the addition of a new ‘notes section’ that will show extra detail on why an automatic update may have failed. This update will help users to identify and fix any potential problems with their automatic updates.

We recommend the update for all Easy Updates Manager Free and Premium users.

  • FEATURE: Notes section added to log to show why an automatic update failed.
  • FEATURE: (Premium) Adding version control protection so that version controlled plugins or themes will not be updated.
  • FIX: Fixed saving error when toggling auto-update on individual themes.
  • FIX: Don’t wipe settings when removing the free version, if premium is installed. Or vice versa.
  • FIX: Enabling/disabling admin bar was resetting General options.
  • FIX: Disabling Core updates will no longer block other automatic updates.
  • FIX: Translation updates are run after automatic updates have completed.
  • FIX: Translation updates now show the correct label.
  • FIX: (Premium) Slack logging now shows the site name from where the event came from.
  • TWEAK: UI Fix: Prevent notices about EUM-Premium from appearing in the premium version of the plugin.
  • TWEAK: Do not allow null values to be passed to an INSERT on the version_from field in the log table.
  • TWEAK: Add some missing translation domains.
  • TWEAK: Code-styling tweak to avoid use of extract().
  • TWEAK: Adding dashboard notice if automatic updates are disabled through constants.
  • TWEAK: Prevent unnecessary PHP notice when controlling via UpdraftCentral.
  • TWEAK: Database logging is now always turned on, to aid troubleshooting. (The storage overhead is tiny, since updates are infrequent events compared with other things going on in a WP database).
  • TWEAK: Update updater class to latest series (1.8).
  • TWEAK: Automatic update emails are only sent once every twenty four hours.

The post Easy Updates Manager release new update: Includes new automatic update notes section appeared first on UpdraftPlus. UpdraftPlus – Backup, restore and migration plugin for WordPress.

How to migrate a website to another server using Updraft Migrator

Building a website can be a complex and time consuming process that is usually comprised of 3 stages of production – Development, Staging and Production. Each of these stages has its own URL to access the website; as such users need to be aware that when migrating a site through each stage, it is essential that the user makes sure everything is migrated correctly without any bugs. If anything goes wrong during one of these stages, it could result in a broken website.

As well as the development process of a new or redesigned website, many users also perform a migration when moving the site to another domain.

A typical website migration involves the following tasks:

  • Move all files and folders
  • Move the database
  • Change all URLs in the database to match the new domain

In this blog, we will walk you through how to easily migrate a website to another server using the UpdraftPlus Migrator feature. Using the Migrator add-on, a user can migrate or clone their website in a matter of minutes, with Migrator even taking care of replacing the serialised database. Users of Migrator will not need to deal with the hassle of FTP or CPanel when uploading files and folders as Migrator moves all of these in the background for you.

Getting Started

To get started, install a copy of the Migrator add-on feature or upgrade to UpdraftPlus Premium, which represents the very best value as it includes the Migrator Add-On and 12 months of support, plus its Developer package comes with unlimited Add-On licences.

To explain how Migrator works, we are going to assume you have a development and staging server. 

Assuming all development work is completed on your site, the next stage is migrating it to your staging server. First, ensure your staging server has a fresh copy of WordPress installed. Next, to perform the migration process, install and activate the UpdraftPlus Migrator feature on both the Development and Staging server.

Before proceeding any further, make sure you turn off any proxies between you and your site, such as Cloudflare, GoDaddy’s “Preview DNS” proxy or Opera Turbo/Road mode as these can potentially interfere with the clone process. Caching and minifying plugins are also a possible cause of migration problems. If possible, disable these before you create your backup – or alternatively, turn them off if the migration stumbles.

Migrate Website on Another Server Using Migrator

  • To start the migration process, login to your staging website. 
  • Head over to Settings>UpdraftPlus Backups>Migrate / Clone. 
  • Click on the ‘Receive a backup from a remote site’ button in the Migrate section.

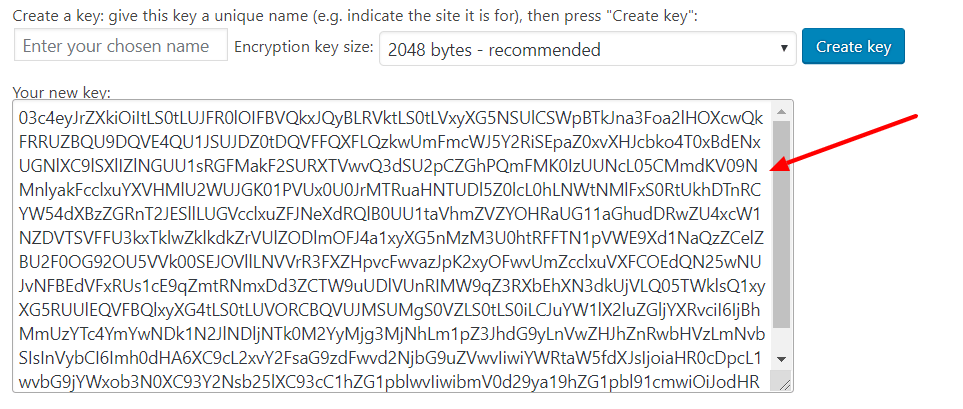
This will open settings. Click on the ‘Create Key’ button.

Copy the generated key. You will need this for the next few steps. The key acts as a bridge for transporting data from source to destination site.

  • Next, login to your development site. 
  • Go to Settings>UpdraftPlus Backups>Migrate / Clone. 
  • From the Migrate section, click on the button ‘Send a backup to another site’.

Click on the ‘Add a site’ link and add the generated site key that was created in the previous steps in the ‘Site Key’ box and then press ‘Add site’.

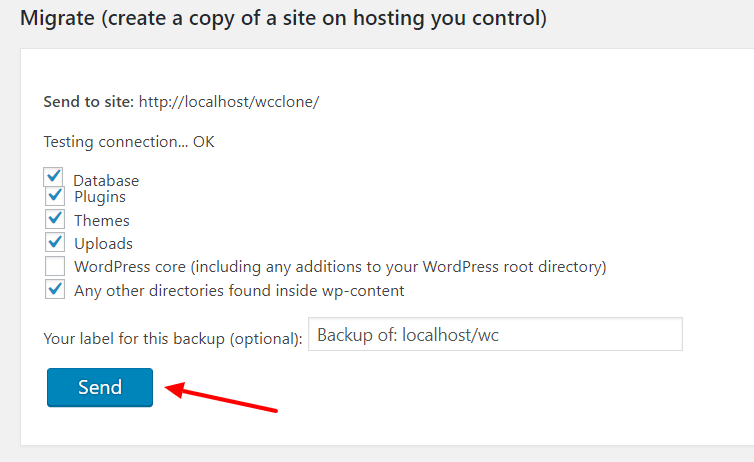
After adding a key you should now see the destination site URL. This means you are ready to migrate from development to staging server. Click the ‘Send’ button.

After clicking on the Send button, you will be asked to select the options that you want to clone. Choose all options except ‘WordPress core’, as you have already installed WordPress on the destination site.

  • Once you have ticked all the options required, click the ‘Send’ button. 
  • UpdraftPlus will now start the process of migrating your site to the destination site. This could take some time depending on the size of your website. 
  • After completion of the process, you should see a new backup visible in ‘Existing Backups’.

This new backup indicates that the source site has successfully sent a backup set to the destination site.

Restore the backup on the destination site

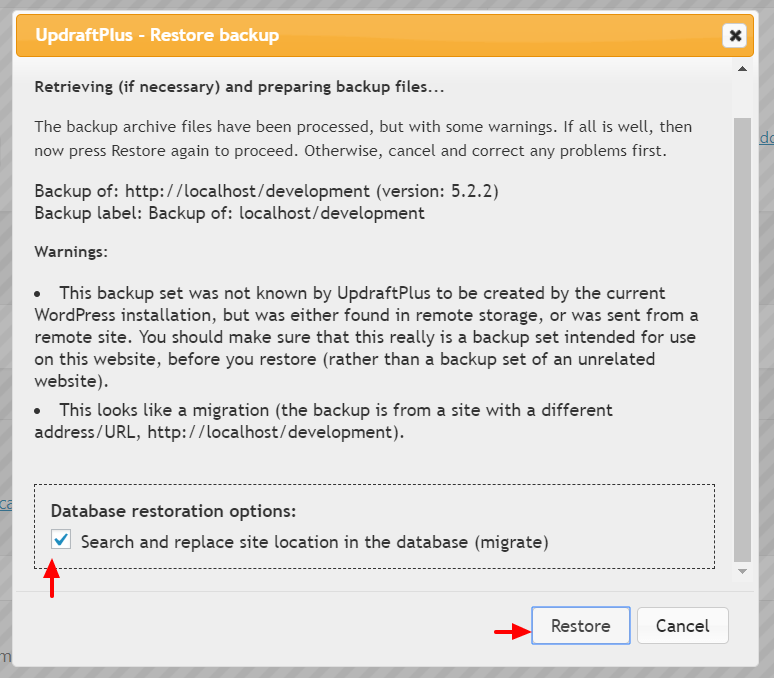
Once you have completed the above steps in the destination site, Click the ‘Restore’ button and then select all options.

Next, you will see a checkbox for database restoration options. Tick the checkbox and continue the process. As we are restoring the database of the source site, we need to update the URLs with the new site URLs.

Wait for UpdraftPlus to finish the process of migration. Once complete, log out of the dashboard and login again. You should see now your site is migrated successfully.

That’s it! It’s really that simple to migrate a website from one server to another using Migrator. 

Get Migrator by upgrading to UpdraftPlus Premium or by adding the Migrator feature today.

By Sajid Sayyad

The post How to migrate a website to another server using Updraft Migrator appeared first on UpdraftPlus. UpdraftPlus – Backup, restore and migration plugin for WordPress.

How to use Advanced Custom Fields with WPML

The Advanced Custom Fields and WPML plugins have both proven to be very popular with WordPress users. At the time of publishing this article, the WordPress plugin repository shows 1+ million active installation for the ‘Advanced Custom Fields’ plugin. For such a popular plugin, it’s seems like WPML would make it a priority to provide a compatibility bridge for users – and now they have!

With Advanced Custom Fields (ACF) users can easily add meta box(es) to a post, page, custom post type and even categories. Meta boxes can be incredibly useful when you want to show additional information regarding the resource. 

If you are building a multilingual website in WordPress, you obviously want these ACF meta boxes to work efficiently on the translated versions of your post, page, etc. In this article, we show you the steps on how to configure and use ACF with WPML, as using both plugins together makes for a great experience as it integrates with the website seamlessly.

Installation

Once you have decided on building a multilingual website with ACF, grab a copy of the following plugins and install (but don’t activate) them on your WordPress dashboard. 

The ‘Advanced Custom Fields Multilingual’ plugin can be found in the download section of your WPML account page. After you have installed all 3 plugins, activate the ACF and WPML plugins. Keep the ACF Multilingual plugin deactivated as you will need to complete setting up WPML first.

WPML setup on the WordPress dashboard

After activating the WPML plugin you will see a notice on top of the page that asks you to ‘Configure WPML’.

Press this button and it will redirect you to the WPML setup page. Here you will find the default option is set to the language you selected at the time of WordPress installation. 

For this example, it is set to ‘English’.

Press ‘Next’ once done.

In step 2, you can select your secondary language. A user can select more than one option if they intend to display their website in multiple languages. For this example, let’s say you just wanted French as a secondary language. You would tick that option from the list and press ‘Next’.

For the third step, select the default setting and press ‘Next’. 

Complete the fourth step as per the plugin instruction. 

For the final step, add your WPML registration key and press the ‘Register’ button to finish the setup.

After finishing the setup, you will be redirected to the WPML setting page. Scroll down to the ‘Language URL format’ section and choose the URL format you want. 

We recommend choosing the first option – ‘Different languages in directories’, which generates SEO-friendly URLs for translated pages.

Now go to your plugin page and activate the ‘Advanced Custom Fields Multilingual’ plugin. This plugin does not have any settings to configure and should work quietly in the background.

Advanced Custom Fields with WPML

When using Advanced Custom Fields (ACF) with WPML, you will want to show the same ACF meta boxes for both the primary and secondary languages. By doing this, it ensures a consistent functionality for both the backend and frontend. To do this, you just need to put translated content in the secondary language.

We will create a meta box for the primary language (English for this example), which causes the meta box to appear on the assigned page. 

After translating this page in our secondary language, the same meta box should now appear on the translated version of our page. 

Let’s take a look at this whole process in action…..

First, create a page called ‘About Us’ and publish this page. 

Next, head over to the ‘Custom Fields’ menu and add one meta box for the ‘About Us’ page.

Now go to the edit screen of the ‘About Us’ page, where this meta box should appear. Add some content in the ‘Our Aim’ field.

Next, you need to create the French version of this page. To do this press the ‘+’ icon under the ‘Translate’ column. This box is on right side of your edit screen.

You will now be redirected to the new page. Add the page title ‘About Us’ in French and publish the page. Reload the page and you should see your ACF meta box and also see original content of your primary language in textual format. You can now add a French translation for this content.

Note: The steps shown in this tutorial are performed on a fresh WordPress installation. If you are trying these steps on your existing site, then you might get a different result than is shown in this blog.

That’s it! You are now all set with the Advanced Custom Fields setup, with WPML functionality. 

If you have any comments or questions, we would like to hear your thoughts in the comment section below.

By Sajid Sayyad

The post How to use Advanced Custom Fields with WPML appeared first on UpdraftPlus. UpdraftPlus – Backup, restore and migration plugin for WordPress.

How restoring a WordPress website can be more difficult than you think

A website’s security, continued success and even its very existence is of fundamental importance for a site owner. What happens when you need to restore a site due to damage that can be caused by any number of factors, but then discover the data you thought was being backed-up and stored safely doesn’t actually exist? Sometimes the best case scenario can be only having a woefully out of date site that does not contain your most recent changes, data and information. The worst case scenario is that you encounter the ultimate site restore horror story and discover you do not have any backups at all!

That won’t happen to you though right? Everyone probably thinks this as they have taken steps to prevent such a scenario and

That won’t happen to you though right? Everyone probably thinks this as they have taken steps to prevent such a scenario and protect them from any potential misfortune. We’ve all heard a story of someone who installed something as simple as a WordPress update, which then crashed the site and took any chance of a restore with it. Often these scenarios can cost tens of thousand of dollars in lost business, valuable time and a loss of reputation while site owners attempt to rebuild a shattered site.

As was seen in a recent article, the hosting service A2 endured major issues related to a security breach that resulted in a shut-down of all Windows services. A malware attack resulted in A2 coming to the decision that the only way to recover the corrupted data it hosted was to do a full restore from the site backups. In theory, this should have caused very few problems as full and incremental backups should be taken regularly to ensure the most recent version of the website is always available for a restore.

Unfortunately it seems that in many cases, A2 were only able to restore from old versions of customer sites, which were very different from the latest and most recent versions their customers were anticipating.

While losing information on your site/business from just a few days or even a week ago might be bad enough, some A2 customers were faced with the prospect of having a restored site that was several months out of date. It is easy to imagine the embarrassment and issues this caused businesses that rely solely on their site to make sales. A loss of reputation and an outdated site would have been a best case scenario for many though, as some were even faced with the loss of their entire site due to the lack of security and updates in place.

This isn’t an isolated case limited to A2 however. While in a previous job, Marc Lacroix (a member of our team) experienced a situation where a client had a website with an older version of PHP hosted on an old server. The client was encouraged to contact their hosting company to find out if they could upgrade to PHP 7, to which the hosting company obliged and transferred the site to a new server, with the latest version of PHP.

When checking the website afterwards, it was noticed the content were no just old and out of date, but also had parts missing. It was discovered that the latest update for the site was dated from 2 months earlier, with no sign of all the changes that had been made since then. It remains a mystery why the hosting company used a 2 month old backup instead of migrating the live site directly. Thankfully the site owner had made a fresh backup with UpdraftPlus, which was quickly uploaded and restored. Problem solved!

While many customers depend on their hosting services to make regular backups and deal with security, the examples above clearly show that there is a massive need to take control of your own backups after investing so much time and money in your website.

That is why (according to the good people at WPbuffs.com, UpdraftPlus is the best WordPress backup plugin software available and is used by companies and individuals all over the world. Should the very worst happen and your site gets completely wiped due to a hack or malware, you can rest easy knowing that you can fully restore your site simply and easily with UpdraftPlus.

Download UpdraftPlus today

The post How restoring a WordPress website can be more difficult than you think appeared first on UpdraftPlus. UpdraftPlus – Backup, restore and migration plugin for WordPress.

The role of HTTPS in SEO and the increasing significance of SSL for better ranking

If you’ve ever done any kind of search on how to improve your SEO and website rankings then you have probably stumbled upon the “HTTP vs HTTPS” argument. Digital marketers and website owners often want to know if switching to HTTPS will help their website’s SEO.

Worry not, because we are going to tell you everything you need to know about HTTPS, its role in SEO and how it affects your overall search engine rankings.

Let’s get started

First things first, what does HTTPS actually stand for?

HTTPS = Hypertext Transfer Protocol Secure

HTTPS sites work by including an SSL 2048-bit key that protects users’ connection to the site through encryption and authentication. When an SSL certificate is installed on a website’s server, it activates a padlock (visible in the address bar) which allows secure connections between a website and a browser.

If your website doesn’t have HTTPS then a user’s connection is not secure and their information is constantly at risk of being leaked.

A secure website protects a user’s information by securing it in three different layers.

  • Encryption: Helps keep the user’s activity hidden so it can not be tracked.
  • Data Integrity: Keeps the files from being corrupted or manipulated during transfers.
  • Authentication: Protects against attacks to build user trust.

But how do these factors impact SEO and rankings?

Impact of HTTPS on SEO

The big question is:

What’s the actual impact of HTTPS on SEO and rankings?

Karen Paulsen from consumersbase.com stated, “You never know the inner workings of Google’s algorithms, but there’s ample evidence to support the claim that HTTPS is crucial for better search rankings.

Here’s how HTTPS affects each aspect of your website.

Rankings

Back in 2015, Google announced that the ranking of two similar sites could be decided in a tie-breaking situation by which one had HTTPS. If you and your competitor have the same quality signals for your search results, then Google may use the HTTPS as a deciding factor for which sites is ranked higher. So if your website does not use HTTPS while your competitor’s website does, then Google will probably rank their search results higher than yours.

If you do a quick Google search for a specific keyword, you will notice that more than 50% of Google’s first page results feature HTTPS sites. We are not saying that HTTPS alone is enough to get those sites on the first page of Google, but it does play an important role alongside other SEO best practices.

In a study by Backlinko, a moderate correlation between higher search engine rankings and HTTPS was found after a million Google search results were analyzed. Other studies have also found a minor correlation between HTTPS and higher search rankings.

Conversions

When undertaking in depth SEO to get your website to the top of search results, it is fair to assume that should you be at the top of the search results, you could expect to see a higher conversion rate as a result. However, according to GlobalSign survey, more than 80% of users will abandon a purchase if the connection isn’t secure due to the lack of HTTPS.

Given the inherent risks associated with online identity and banking detail theft, most online users are worried about their information being intercepted and misused online, and as such rarely trust websites without secure connections.

Not having HTTPS on your website could potentially drive most of your buyers away. It’s never too late to secure your website and provide your users with a secure platform that they can trust with their personal and sensitive information, without them having to worry about data interception or leaks.

Traffic

As well as offering extra security, the ultimate goal of getting your website to rank higher in search results is to bring in extra traffic, and hopefully customers who feel comfortable making a purchase now that they can see your site has HTTPS.  

People often click sites that are secure while avoiding non-secure ones. Additionally, Google Chrome has started labeling non-HTTPS sites as “Non-Secure”, which definitely gives off warning signals and will drive potential customers away from non-HTTPS websites.

As an internet user and shopper yourself, if you saw a website that had “Non-Secure” next to its name in your browser, would you even visit it, let alone make a purchase on it?

Site Speed

As one of the major signals used by Google to rank websites, a slow site with high load times will result in Google ranking it below faster loading websites, providing they have similar quality signals.

HTTPS websites have been found to be considerably faster when compared to HTTP websites. Check out HTTPvsHTTPS to see how much of a speed difference a secure protocol can make.

Not only does HTTPS make your website secure, increase confidence in customers and directly help your page ranking, we can see from the presented evidence that it can also indirectly improve other SEO aspects, such as site speed.

In Summary

Ultimately, we can see there is considerable evidence that moving your website to HTTPS will help the page rank higher with Google. Not only does HTTPS help improve your website’s overall SEO, but it is also a much more secure system for your website.

Security is one of the most important factors in the digital world today and making the switch from a non-secure HTTP site to a secure HTTPS site not only makes your website secure, but will also help protect your users’ data and sensitive information.

As you may have summarised from this blog, we highly recommend that you switch to HTTPS as soon as possible, not just for the security, but for the potential additional SEO benefits the change could have.

If your website is already using HTTPS, then we recommend that you test it’s security level by using Google’s Qualys Lab tool.

Do you know what’s so great about making the switch?

There’s nothing to lose at all. Making the switch to HTTPS does not cost you anything and will not affect your website in any negative way. So do it right now!

By Sharon Lliff

The post The role of HTTPS in SEO and the increasing significance of SSL for better ranking appeared first on UpdraftPlus. UpdraftPlus – Backup, restore and migration plugin for WordPress.

Easy Updates Manager 8.0.5 released (security fix release)

Easy Updates Manager 8.0.5 has been released and includes a small numbers of tweaks and minor improvements (including tweaks to improve compatibility with other extensions, and to improve the clarity of messages going into Slack, and a security fix.

The security defect in previous versions (present since at least version 8.0.1 in October 30th 2018), allowed a logged-in user on the site, if he possessed sufficient skills, to tweak some (but not all) settings. For example, he could adjust the settings for whether automatic (background) theme updates should occur, or not.

We recommend that all users update.

Easy Updates Manager 8.0.3 released / UpdraftCentral 0.8.2 released

Easy Updates Manager 8.0.3

The Easy Updates Manager team have been hard at work and are happy to announce another updated version of Easy Updates Manager 8.0.3, with newly added tweaks and features.We recommend the update for all Easy Updates Manager Free and Premium users.

  • TWEAK: Added seasonal notices
  • FEATURE: Logs are on by default
  • FEATURE: Logs are now displayed by default in UpdraftCentral
  • FEATURE: (Premium) White label settings can now be exported and imported


UpdraftCentral 0.8.2

A new feature has been added to the latest version of UpdraftCentral 0.8.2 that we are pleased to share with you.

We recommend the update for all UpdraftCentral Free and Premium users.

  • FEATURE: Easy Updates Manager module now shows logs by default

The post Easy Updates Manager 8.0.3 released / UpdraftCentral 0.8.2 released appeared first on UpdraftPlus. UpdraftPlus – Backup, restore and migration plugin for WordPress.

Easy Updates Manager 8.0.1 Released

Easy Updates Manager 8.0.1 has been released and includes a ton of fixes and enhancements.

It now also includes a premium version, which you can buy for a low-low price of $89 a year.

Check out the premium video below:

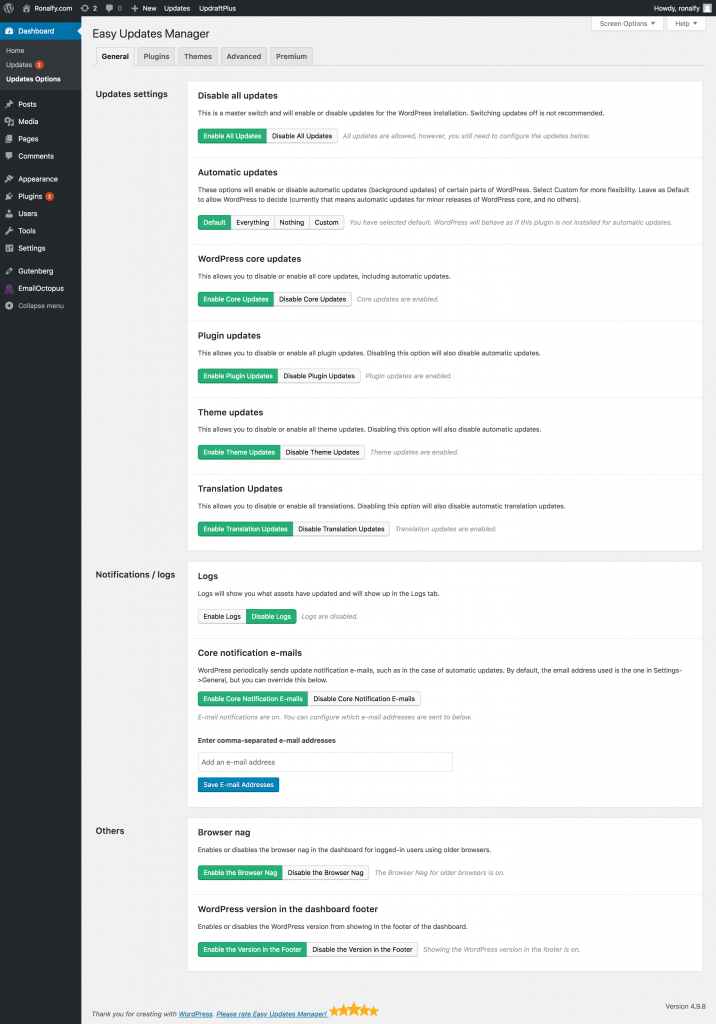
New general screen

The general screen has been updated to be more user-friendly and given a CSS overhaul. You’ll find all the same options in past versions, but it works more seamless.

Easy Updates Manager General Screen

Easy Updates Manager general screen

Logs

Logs have been refactored to increase reliability. You’ll find more options are available in logs now and that automatic and manual updates are shown more reliably.

You’ll also find a new “Clear Logs” button that will help keep your database lean. In Premium, you can schedule log clearance and log events to external channels and even have the option of exporting logs.

Easy Updates Manager Logs

Easy Updates Manager Logs

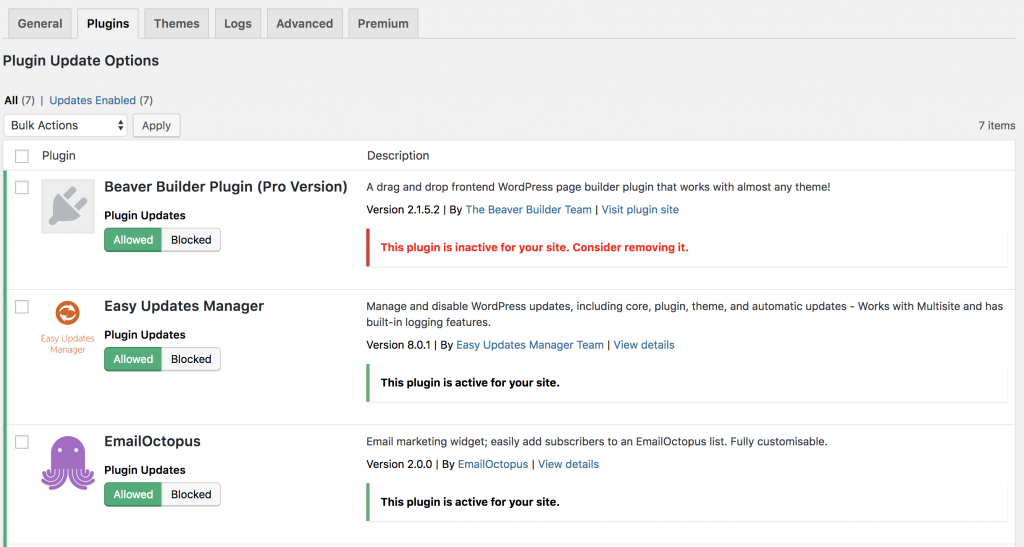
Theme and plugin tabs

Both themes and plugin tabs now work with Ajax, so there is no need to scroll down for the “Save” button.

We also show you which plugins are active on your site (or sub-sites if on multi site).

Easy Updates Manager Themes/Plugins Tab

Easy Updates Manager themes/plugins tab

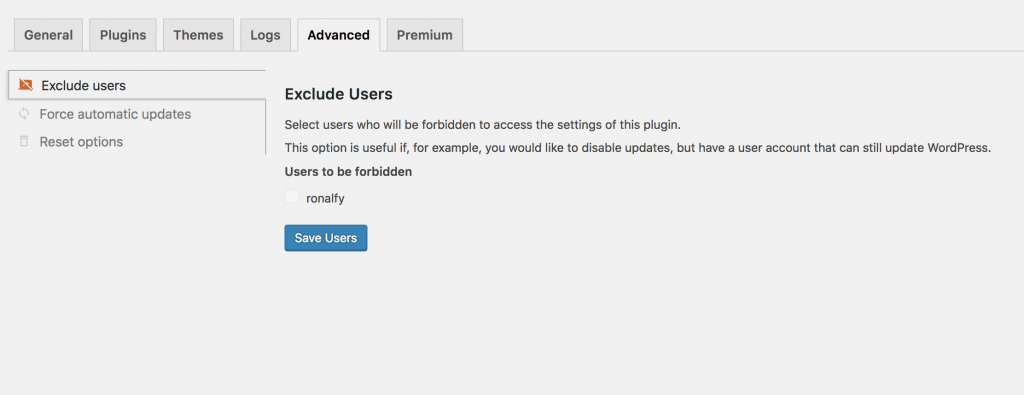
Re-worked advanced tab

Advanced options can be confusing, so we re-worked how they display and show more useful messages.

Easy Updates Manager Advanced Tab

Easy Updates Manager advanced tab

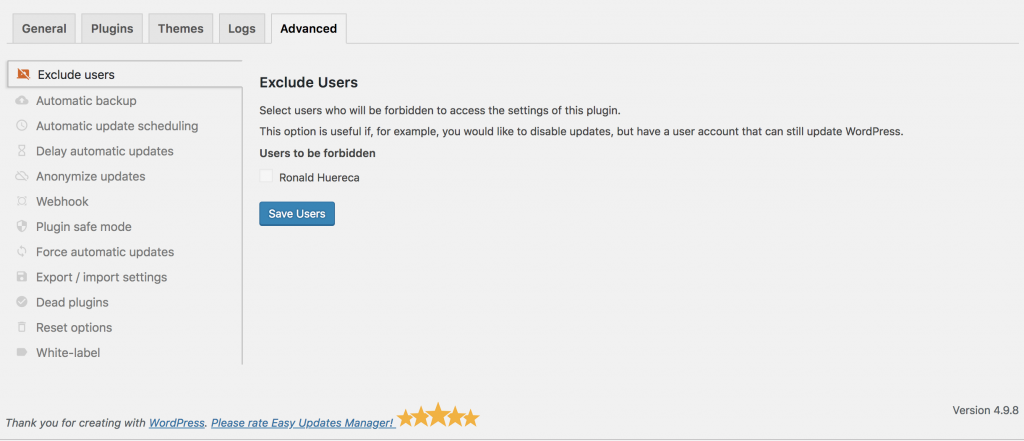
On premium, you’ll see a plethora of new options.

Easy Updates Manager Advanced Tab Premium

Easy Updates Manager advanced tab premium

Numerous tweaks and bug fixes

Here’s the full change-log for the free version:

  • TWEAK: Changes in user capability checks
  • TWEAK: Mark as supporting WordPress 5.0
  • FIX: Removing filters in 7.0.3 allowed updates for plugins and themes to be shown
  • TWEAK: Option to take backup before force updates
  • REFACTOR: Advanced tab settings page refactoring
  • TWEAK: Dashboard notice. Welcome notice now shows our other plugins
  • TWEAK: Allow a filter to disable the updates lock option for more reliability in testing
  • FIX: Admin notices show up twice in the options page
  • TWEAK: Easy Updates Manager now displays in the multi-site dashboard menu
  • TWEAK: Easy Updates Manager now displays in the admin bar
  • TWEAK: Force Updates displays more contextual errors if automatic updates are somehow modified or disabled
  • TWEAK: Enabling or disabling logs no longer requires a refresh
  • TWEAK: Select general tab if tab is invalid
  • TWEAK: Advanced settings adhere to browser history
  • TWEAK: Reset options forces browser to reload for better UX in the advanced tab
  • FIX: Clicking more details on plugins tab properly shows a modal
  • FIX: Force updates removes a space in the updates panel if there are still updates after it runs
  • TWEAK: Force updates has a better description of what it does
  • TWEAK: Clearing logs now clears the logs data upon success
  • FIX: Clicking any type of filter in logs shows an error message
  • FIX: Add a JS polyfill to provide support for IE11
  • TWEAK: Logs can now be filtered in ascending or descending order
  • FEATURE: Shows active versions if a plugin or theme is active
  • FEATURE: (Multi-site) Checks to see if any sites in the network have a plugin or theme installed
  • TWEAK: Translations now show or hide properly if plugins, WordPress Core, or theme updates are disabled
  • TWEAK: Help tab updated
  • TWEAK: Email status message shows successful if they are valid emails
  • TWEAK: Plugin and theme options save via Ajax immediately with no save button necessary
  • TWEAK: Adding loading animation to general tab to prevent multiple states from occurring at once
  • FIX: Plugin/Themes/Log tab were causing an undefined hook suffix error upon save

Full change-log for the premium version:

  • FEATURE: (Premium) Scheduled log clearance
  • FEATURE: (Premium) Automatic backup before auto update
  • FEATURE: (Premium) Automatic update scheduling
  • FEATURE: (Premium) Send anonymous update request or request with random data to protect privacy
  • FEATURE: (Premium) Import and export settings
  • FEATURE: (Premium) Introduce safe mode for PHP compatibility checks and WordPress version checks
  • FEATURE: (Premium) Logs of automatic update events can be sent to external channels such as slack, email, php error log and syslog
  • FEATURE: (PREMIUM) Send weekly or monthly emails of update notifications
  • FEATURE: (PREMIUM) Webhook to integrate with third-party services
  • FEATURE: (PREMIUM) Show plugins that have been removed from the WordPress plugin directory
  • FEATURE: (PREMIUM) Ability to white-list the plugin
  • FEATURE: (PREMIUM) Ability to search the logs by user or asset name
  • FEATURE: (PREMIUM) Ability to export logs for a date range and print them, download a CSV, or download a JSON format
  • FEATURE: (PREMIUM) Check for PHP parse errors during automatic updates and de-activate problem problems automatically
  • FEATURE: (PREMIUM) Check for plugins de-activated during auto-update and attempt to re-activate them automatically

Conclusion

Both the free and premium versions have been in the works over the past four months, with lots of working going into the release. Please check out which version is right for you. Prices for premium start at $29 USD a year for two licenses and a low-low price of $89 USD a year for unlimited sites.

Easy Updates Manager announce new Premium release

As those of you who manage multiple WordPress sites know, managing them all and dealing with each individual site’s plugins, themes, core and translations can be a time consuming and difficult task.

But now, we are thrilled to announce the launch of a service that will take all the hassle and work out of managing your sites.

It’s called Easy Updates Manager Premium – It has been specially designed and created for those that want to make quick and easy work of checking for updates and making changes across multiple websites; and we are sure you are going to love it.

With Easy Updates Manager Premium there is no need to login to each individual site and check for updates or make each individual change manually. This plugin takes care of that and does all the time consuming and difficult work for you. Simply add your site and plugin details and “set and forget” to receive automatic updates. You can also personally customise your updates on each individual aspect of WordPress core with multiple settings option; making managing your WordPress update settings quick and easy.

With all these options available for configuration, Easy Updates Manager Premium gives you complete control of how, when and what and what not to update.

We have all been in a situation where you download an update, only to instantly regret it. If you feel that an update or change caused unexpected errors or other issues, you can access the Easy Updates Manager Premium update log and check the version that caused the problem and rollback the update or change, restoring your site to an earlier version.

Easy Updates Manager Premium also allows you to have full control over safe updates, schedule updates, external logging, email notification of updates and access to premium support as well as many other features.

Premium will help you take all the work out of keeping your site’s plugins, themes, core and translations up to date. We have no doubt that once you have used our new service, you’ll appreciate just how much help it really is.

Easy Updates Manager is available for download here here.  

The post Easy Updates Manager announce new Premium release appeared first on UpdraftPlus. UpdraftPlus – Backup, restore and migration plugin for WordPress.
Easy Updates Manager Premium release imminent

UpdraftPlus will soon be releasing a new and exciting development that we want to share with you.

In order to offer a better and more user-friendly service, we are launching a new Premium version of Easy Updates Manager to give a more comprehensive user experience.

Easy Updates Manager is a powerful WordPress service that is currently helping more than 200,000 users automatically keep their site up to date and bug free. The plugin allows you to fully manage updates for all your sites plugins, themes, core and translations and offers highly customizable options and endless possibilities for configuration, giving the user the option to pick and choose what to update and what not to update.

Checking for updates can be a time-consuming and complicated process, but it can become quick and easy once you have installed Easy Updates Manager as it removes the need to login to each individual site and manually check for updates.

The all new Easy Updates Manager Premium will give you even more control over your WordPress sites. Be sure to keep an eye out for further updates and information.

The post Easy Updates Manager Premium release imminent appeared first on UpdraftPlus. UpdraftPlus – Backup, restore and migration plugin for WordPress.