Why you should upgrade to UpdraftPlus Premium

The free version of UpdraftPlus is fully functional and a great option for a lot of WordPress users. However, we’ve developed a brilliant range of features to make it even better. UpdraftPlus Premium will unlock all the extra features, including a Migrate/Clone tool, multiple online storage options, detailed scheduling, reporting, encryption and much more.

UpdraftPlus Premium also gives you free upgrades and support for a year and plus 1 Gigabyte of UpdraftVault storage, which means you can back up the site without needing to pay for space with a separate remote storage location like Dropbox.

Why go Premium?

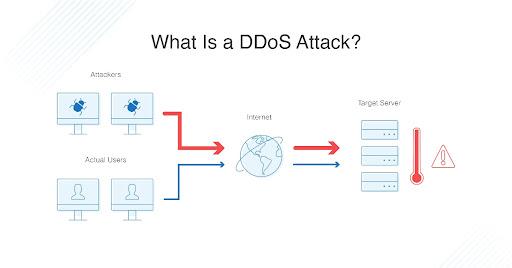
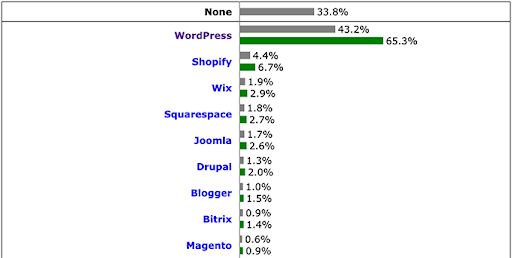
No platform offers you the kind of tools to make a highly functional website quite like WordPress. As the platform currently hosts over 40% of the world’s websites, it is a natural target for malicious attacks by bad actors looking to exploit any vulnerabilities. 

As well as the threat of hacks, your website could also fall victim to other issues, such as a server crash due to simple use errors, or the installation of badly coded plugins or themes. In just a few seconds, everything you’ve worked so hard to build could be taken away – leaving you to start again from scratch. 

To avoid such a catastrophic loss happening to you, your first task when setting up a WordPress site should be installing the WordPress backup plugin UpdraftPlus – The world’s number 1, most trusted backup and restore plugin. 

You might think you have every security box checked and have your website running perfectly, with no indication that there are any problems on the horizon. While that may be the case, it doesn’t mean a problem isn’t waiting just around the corner. Think of UpdraftPlus premium as website insurance. If your website never suffers a problem, then great. If it does however, you can rest easy knowing you are in safe hands and UpdraftPlus will be there to help you get all your hard work back.

The benefits of UpdraftPlus Premium: Backup, restore and clone

As the world’s most popular and highest rated WordPress backup plugin, UpdraftPlus Premium comes loaded with features and tools:

Backup
UpdraftPlus can perform total manual or/and scheduled backups of all your site’s databases, files, themes, and plugins. 

Restore
Just having a backup can be pretty useless if it doesn’t you are not able to perform a prompt and secure restoration. With UpdraftPlus Premium, you can restore your backup file directly from the control panel of your site.

Schedule
With most backup plugins, you are left to manually backup your website whenever you remember. With UpdraftPlus Premium, you can set your site up to automatically backup every 2, 4, 8, or 12 hours, daily, weekly, bi-weekly or monthly.

Trusted
UpdraftPlus Premium has earned the trust of its considerable user base as it has provided a trusted service to the WordPress community for around a decade. Little wonder why it is the most installed and highest rated backup plugin on the market.

Easy to use
UpdraftPlus Premium comes with an engaging, easy-to-use interface that lets you backup and restore data with just a click of a button.

What additional benefits does UpdraftPlus Premium have?
If you use the free version of the UpdraftPlus plugin, you will be familiar with many of the basic features available. If you upgrade to the Premium version, you get the following features in addition to those being available on the free version: 

Incremental backups

Incremental backups (as the name implies) only backups changes that have occurred in your WordPress website since your last full backup. If your last backup was 12 hours ago, the new incremental backup will backup only what has changed in those last twelve hours (e.g. a new photo was uploaded) and add it to the main backup file. By making incremental backups, you use less resources and have quicker backup times.

Other backup plugins will typically backup the whole website every time you make a backup. As you can imagine, this is a huge waste of your time and resources which UpdraftPlus Premium prevents by employing the incremental backup process. 

Cloning and migration
UpdraftPlus Premium has features that can clone your whole website and/or migrate it to a new domain of your choice in minutes. With UpdraftPlus Premium, you are also given free UpdraftClone tokens, so you are no longer required to buy tokens when you want to clone your site.

The UpdraftClone and Updraft Migrator features are a way for you to effectively and seamlessly “copy and paste” your website to any URL with no hosting difficulties. 

Prompt customer support
UpdraftPlus Premium also comes with quick access to expert help and support from our product developers whenever you require it. You can reach us through a web forum and ticket. 

Pre-update backups
Other backup plugins typically stand idle when you update a plugin, theme or core updates, putting your site at considerable risk. But UpdraftPlus Premium will ask you if you would like to first back up your site before any update begins. This way, you will have the most recent version of your WordPress site before you make any changes. 

Non-WP files and databases
Besides the obvious WordPress website core data that will be secured, an UpdraftPlus Premium backup will also cover non-WordPress files and databases such as third party themes. Total security is guaranteed. 

Network/multisite
UpdraftPlus Premium works with WordPress Network and Multisite to back them up securely. The backup and restore control panel can be found in the dashboard of the network. You can even restore individual websites within the network.

Advanced scheduling
The premium version also allows you to set a specific time for your website’s backup to be created, retained, or deleted.

More database options
A typical backup plugin saves all your data somewhere safe for when a problem hits your site. Should this happen, you are left with your backup copy to restore your website to its previous state.

But there are times when the hacker doesn’t just attack your site, but also attempts to steal or delete your backup files. With UpdraftPlus Premium and its enhanced security and industry-standard AES (Advanced Encryption Standard) encryptor, your WordPress site’s database (including files, passwords, and list of users) is encrypted and secured in the backup location of your choice. 

Thorough logging and reporting
UpdraftPlus Premium keeps you updated on what’s going on with your website in real time. All backup activities are carefully recorded and the backup status is displayed in the WordPress admin panel – together with warnings and error messages. You will also receive a report for when a backup completes, as well as file checksums for backup integrity verification. UpdraftPlus Premium also allows users to send reports to Slack if desired.

Importer feature
This is easily one of the coolest features of UpdraftPlus Premium. Some backup plugins are just that – they backup your website without any capacity to restore it at a later point. Besides restoring its own backup files, UpdraftPlus Premium also allows you to restore backups from other WordPress backup plugins with our importer feature.

Lock settings
Much like your smartphones, the Premium version locks access to UpdraftPlus using a password. This gives you the ability to control which site users can access the backup dashboard and files. 

WP-CLI
WP-CLI stands for WordPress Command Line Interface. CLI functions by relaying commands to a program using a line of text. So, instead of the cumbersome drag-and-drop plugins, you simply backup files using typed lines of text. 

While it may require some technical know-how, this can be a very handy feature for those that require it. 

Zero ads
No one enjoys random ads popping up, disrupting your workflow and taking up your valuable time. The Premium version of UpdraftPlus removes all adverts and lets you get to work away without any distractions

UpdraftPlus Premium packages

If you decide to upgrade to UpdraftPlus Premium, you can choose between five packages with an annual subscription. Automatic renewal gives you 40% off on renewal. What’s more? You can cancel at any time. 

Personal
Supports up to 2 websites.
All UpdraftPlus add-ons. Free updates. Free support. Free storage of 1GB UpdraftVault. UpdraftClone tokens.

Business
Supports up to 10 websites.
All UpdraftPlus add-ons. Free updates. Free support. Free storage of 1GB UpdraftVault. UpdraftClone tokens.

Agency
Supports up to 35 websites.
All UpdraftPlus add-ons. Free updates. Free support. Free storage of 1GB UpdraftVault. UpdraftClone tokens. 

Enterprise
Supports an unlimited number of websites.
All UpdraftPlus add-ons. Free updates. Free support. Free storage of 1GB UpdraftVault. UpdraftClone tokens.

Gold
All of the same features as Enterprise, but with unlimited annual UpdraftCentral Cloud subscription and an additional 50GB UpdraftVault storage

Why would you need to upgrade?

Premium can be particularly useful if you run a bigger or more complex website (or multiple websites), have a history of being targeted by malicious hackers, make a lot of changes daily to your site, or feel the limited “backup and restore” options of the UpdraftPlus free plugin no longer meet your needs. 

If you fall within the above categories, then UpdraftPlus Premium is for you. 

Benefit from UpdraftVault with UpdraftPlus Premium

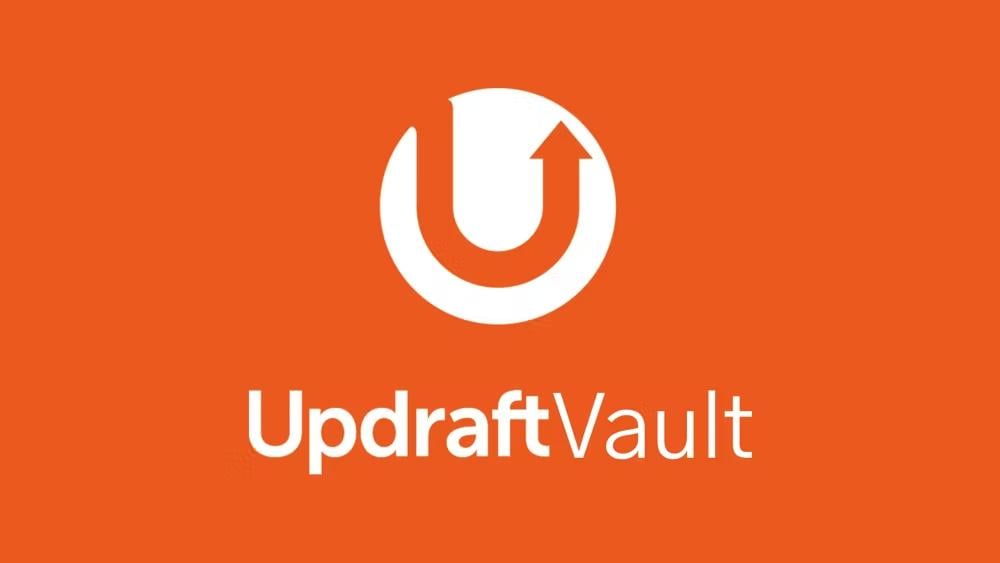
This is a built-in storage option for your UpdraftPlus backups that gives you 1GB – 50GB of free storage tailored specifically for the UpdraftPlus platform. This can save you the headache of setting up and calibrating third-party storage systems like Google Drive. 

More remote storage options

With the free version of UpdraftPlus, you can backup your website directly to UpdraftVault, Dropbox, Google Drive, Amazon S3 (or compatible), Rackspace Cloud, FTP, DreamObjects, Openstack Swift and email. 

The Premium version expands your options and allows you to backup directly to Microsoft OneDrive, Microsoft Azure, Google Cloud Storage, Backblaze B2, SFTP, SCP, and WebDAV.

Free and premium versions of UpdraftPlus plugin compared

Get it from WordPress.Org UpdraftPlus.Com
Buy It Now!
Backup WordPress files and database
Translated into over 16 languages
Restore from backup
Backup to remote storage
Dropbox, Google Drive, FTP, S3, Rackspace, Email
Incremental Backups
Free 1Gb for UpdraftVault
WebDAV, Microsoft OneDrive, Google Cloud, Microsoft Azure, SFTP/SCP, encrypted FTP, BackBlaze
Backup extra files and databases
Migrate / clone (i.e. copy) websites
Basic email reporting
Advanced reporting features
Automatic backup when updating WP/plugins/themes
Send backups to multiple remote destinations
Database encryption
Restore backups from other plugins
No advertising links on UpdraftPlus settings page
Scheduled backups
Fix backup time
Network/Multisite support
Lock settings access
Browse backup contents in WordPress
Download individual files from backup in WordPress
Personal support
Run from WP-CLI
Restore a backup from other plugins

Is UpdraftPlus Premium worth it?

For all the additional benefits and perks that it brings, we feel that UpdraftPlus Premium is more than worth it if you truly value the safety and security of your WordPress site. With Premium you can exercise full control over your backups by unlocking enhanced security features and free updates. From accessing the latest UpdraftPlus Add-Ons for a year, to free support via our forum and email for a year, extra remote storage options, incremental backups and free tokens for UpdraftClone.

UpdraftPlus Premium is what total security and peace of mind looks like! 

The post Why you should upgrade to UpdraftPlus Premium appeared first on UpdraftPlus. UpdraftPlus – Backup, restore and migration plugin for WordPress.

How to create an eLearning course site with WordPress 

The world of online course creation can seem daunting to a new instructor. Creating courses might be your forte, but making a website to sell them might seem like a difficult and daunting task. Fear not, as this blog will help you set up an create an eLearning course site with WordPress.

We understand that most people might not be adept at coding or do not have the resources to create a full-fledged website by themselves. That is where WordPress comes in. Little needs to be said about the popularity of WordPress, as it is one of the most popular CMS platforms in the world. WordPress lets users have a large number of nifty plugins and themes and can assist in setting up a site by simply dragging and dropping elements, without much need for coding. 

For this blog, we are going to go through a comprehensive view of tools that will let us set up an LMS site with ease. 

Why have an LMS site?

eLearning has seen a huge increase in popularity recently due to Covid and the rise of remote working/teaching. Business analytics forums state that 1.2 billion students were affected by the closure of educational institutions worldwide during the pandemic. Filling the gap with a fast and well-designed solution for students is the right way to make an impact in this massive market. 

What do you need to start off? We are going to talk about two main elements in this article:

  • Robust LMS plugin  
  • Innovative design pack

This may seem like a small list of tools to start with, but trust us they will be more than enough.

Making the right plugin choice

To build our LMS site on WordPress we need to be careful about the plugins that we use. While some plugins are paid versions only, they also usually offer free counterparts under the “freemium” model. We are only going to focus on an LMS plugin that offers us enough functionality without having to spend any money. But how do you determine if a plugin is right for you? An LMS plugin should offer some basic features that we need to start with:

  • Functional course building
  • Easy to use quiz building 
  • Student interaction with email 
  • Easy payment integration 
  • Certificates
  • Theme starter pack integrations 

Taking into consideration these features, we suggest using Tutor LMS. Tutor LMS offers these features on its free version for users. Although there are more features on the paid version, we will only look at the free features of plugins in this blog. 

Installing the required plugin

Now that you have decided on the choice of plugin, lets go ahead and start setting it up. To install Tutor LMS navigate first to your WordPress admin panel. From the admin panel go to Plugins > Add new, search for Tutor LMS then install and activate the plugin. In a few seconds, it should be ready to be used.

Beautifying with a theme

Before heading on to configure our LMS plugin, you must first decide on a theme for your site. The Tutor Starter theme not only is free, but it also was made to be integrated with the LMS plugin – Tutor LMS. This makes life a whole lot easier. To install Tutor Starter from the WordPress admin panel we find the Appearance tab. From there we click on Add new and search for “Tutor Starter”. Go ahead and hit install and activate.

You need to add one more plugin before you can start utilizing Tutor Starter properly. In the same way you installed the other plugins, you need to navigate to ‘Add a new plugin’ and search for TutorMate. TutorMate is a companion demo importer plugin for the Tutor Starter theme. After finding it from Plugins > Add new, click to install and activate it.

You are now geared up and ready to go. Next, ass a starter pack from Tutor Starter to your WordPress site. From the WordPress admin panel, go to Tutor Starter > Starter sites. Here you can find 4 unique demo starter sites for different types of sites according to what you want to create. 

You can preview the site before you choose to import it. When you have decided which site to import simply click the Import button. This will bring up the following popup.

From here you can choose to launch with either the Elementor or Gutenberg page builder. For this blog, we are going to go ahead and run it with Gutenberg. Tutor Starter shows us if we are missing any plugin/add-ons when we try to make this installation. So if you are missing Qubely and WooCommerce, they will be automatically installed and activated. 

Once the import is complete you can see the site by clicking “View your site”.

To edit the page, go to the WordPress admin dashboard and select Customize your site. This takes us to the customization page where you can access all the background changes, widgets, and much more. 

Configuring the back-end

Next you need to add some content to the site. Here starts your main journey to create content for your LMS site. To set up our courses, navigate to WpAdmin > Tutor LMS > Courses. From the courses menu, we select Add new to add a new course to the siteYou are then taken to the main course menu. Here input the course name, add a course description, add a video if needed and any other information. There is also a featured image section that can utilized to let students know what the course is about. 

Now comes the most important task to setting up your course – adding topics and quizzes. To add a quiz first you need to create a topic. Scroll down on the course menu to the course builder section where you can find a button that adds a new topic. Once you have added a new topic, you can now add a lesson and/or a quiz to that topic. 

Adding a lesson

Clicking the lesson button brings up the pop up that lets you configure the lesson. Add the lesson title, the actual lesson text and the lesson video, should it be required. We can even add attachments to the lesson.

Create the quiz

After you have created a lesson, for evaluation you will also need to add a quiz. Right beside the lesson button, click the Quiz button to show the quiz pop up menu. 

First, add a quiz name and hit Save & Next. The next tab gives the quiz question option where you can configure what type of questions you want to set for students. Next, select the name of the question and access the drop-down Question Type menu that shows all the different types of questions that can be set. 

The options on this pop up are easy to navigate and self-explanatory, so setting it up is a breeze regardless of what type of question selected. 

How do you monetize your course?

Once you are done with the basic setup of the course, what then comes next? The basic setup is followed by adding payments options to the course in order to generate revenue. To achieve that, you will need to integrate WooCommerce as it is one of the most popular eCommerce solutions. It is very easy to use and integrate and also FREE. 

WooCommerce integration and sales

For selling your courses as a product on your LMS site, you need to have a payment system such as WooCommerce added. As previously stated, WooCommerce is automatically installed, so you do not need to separately go through the installation process. To activate WooCommerce on Tutor LMS head to Dashboard > Tutor LMS > Settings > Monetization (Tab) > WooCommerce (Enable).

You have now activated WooCommerce for your LMS site. But how do you link the course to WooCommerce so that it can be paid for? You need to first create a Product to sell through WooCommerce. Go to the WordPress admin panel where you will see a new Product tab. From there, you can add a new product. You can set the name, price and even sale price of the said product. 

To finalize the monetization process, you must link this product to the course we want to sell. In order to do this, you need to edit the course and scroll down to the Add Product section, where you can find a drop-down menu of the product you created and link it to your course. Make sure to select the paid option and you are all set!

For any other course you want to monetize, just follow these steps and you should have no problems.. 

Market your courses 

The next task is to market your course to potential students, making sure that your product reaches its desired customer.

  • Identify your target students
  • Advertise your courses efficiently for maximum outreach
  • Promote your course as industry-standard material
  • Offer sales to increase student
  • Get affiliate personnel to promote your material elsewhere

While this is definitely not a comprehensive list, these tips could help you get on track with marketing your course.

Backing up your site

Now you have set up your eLearning site, it is important to remember to back it up using UpdraftPlus. As the world’s leading and most trusted backup plugin, UpdraftPlus can be trusted to keep your site and all the hard work you put into creating it, safe and secure. 

Just download the free plugin, or upgrade to UpdraftPlus Premium, for total peace of mind.

Best of luck with your site and if you have any queries, feel free to comment below.

The post How to create an eLearning course site with WordPress  appeared first on UpdraftPlus. UpdraftPlus – Backup, restore and migration plugin for WordPress.

What crucial WordPress security issues you be aware of?

WordPress is the most popular Content Management System (CMS) worldwide, powering more than a third of all websites existing today. Its popularity also makes it an appealing target for cyberattacks, and it too has its share of security vulnerabilities.

While WordPress may have its own security issues, it isn’t the only platform that is targeted by cyber-criminals, with the theft of data becoming a highly lucrative business. From personal blogs to large business websites, no one has been safe from the potential threats posed by malicious actors. Regardless of if your site is a small blog or a large business, you need to know how to secure your website regardless of its purpose. Top of any list should be installing the UpdraftPlus backup plugin – The world’s most popular and highest rated backup plugin. In the event that you should ever find yourself a victim of an attack, you can at least rest easy in the knowledge that you have a secure backup in order to restore your site. 

Here are some WordPress Security issues you should know about and how to address them;

1. The plugin system

Part of what makes WordPress so popular is its modularity. You can quickly and easily expand base features thanks to the plugin system. Unfortunately, not all plugins are created to the high standard of UpdraftPlus, and some can introduce new vulnerabilities to your WordPress website.

The ‘PWA for WP & AMP’ Plugin for example exposed over 20,000 WordPress websites to an access control vulnerability. Due to allowing arbitrary file uploads, attackers could remotely execute code and take over websites running this plugin. Users should be aware of two things from this example. The first is to limit the number of plugins used on your WordPress site where possible. The second is to ensure that all your applications – including plugins and WordPress version – are regularly updated. Updates sometimes add new features, but their main purpose is to address newly discovered vulnerabilities.

2. SQL injection attacks

Data is a new and highly valuable commodity, and one reason attackers target websites is to steal information held in the database. SQL Injections are a popular way of doing this, with attackers embedding SQL commands on websites that may compromise sensitive information.

If you’re wondering how this happens, think about the average form you’ll find on many WordPress websites. It allows users to provide information such as usernames and passwords for login. If an attacker inserts SQL code in these fields, the underlying database may process that code and perform unexpected actions. There are several ways you can work to prevent SQL injection attacks, but the most common is to implement strict input validation. For example, you can add the following code to your .htaccess file to ensure that all input is excluded from SQL queries;

# Enable rewrite engine

RewriteEngine On

RewriteRule ^(.*)$ – [F,L]

# Block MySQL injections

RewriteCond %{QUERY_STRING} [a-zA-Z0-9_]=http:// [OR]

RewriteCond %{QUERY_STRING} [a-zA-Z0-9_]=(..//?)+ [OR]

RewriteCond %{QUERY_STRING} [a-zA-Z0-9_]=/([a-z0-9_.]//?)+ [NC,OR]

RewriteCond %{QUERY_STRING} =PHP[0-9a-f]{8}-[0-9a-f]{4}-[0-9a-f]{4}-[0-9a-f]{4}-[0-9a-f]{12} [NC,OR]

RewriteCond %{QUERY_STRING} (../|..) [OR]

RewriteCond %{QUERY_STRING} ftp: [NC,OR]

RewriteCond %{QUERY_STRING} http: [NC,OR]

RewriteCond %{QUERY_STRING} https: [NC,OR]

RewriteCond %{QUERY_STRING} =|w| [NC,OR]

RewriteCond %{QUERY_STRING} ^(.*)/self/(.*)$ [NC,OR]

RewriteCond %{QUERY_STRING} ^(.*)cPath=http://(.*)$ [NC,OR]

RewriteCond %{QUERY_STRING} (<|%3C).*script.*(>|%3E) [NC,OR]

RewriteCond %{QUERY_STRING} (<|%3C)([^s]*s)+cript.*(>|%3E) [NC,OR]

RewriteCond %{QUERY_STRING} (<|%3C).*iframe.*(>|%3E) [NC,OR]

RewriteCond %{QUERY_STRING} (<|%3C)([^i]*i)+frame.*(>|%3E) [NC,OR]

RewriteCond %{QUERY_STRING} GLOBALS(=|[|%[0-9A-Z]{0,2}) [OR]

RewriteCond %{QUERY_STRING} _REQUEST(=|[|%[0-9A-Z]{0,2}) [OR]

RewriteCond %{QUERY_STRING} ^.*([|]|(|)|<|>).* [NC,OR]

RewriteCond %{QUERY_STRING} (NULL|OUTFILE|LOAD_FILE) [OR]

RewriteCond %{QUERY_STRING} (./|../|…/)+(motd|etc|bin) [NC,OR]

RewriteCond %{QUERY_STRING} (localhost|loopback|127.0.0.1) [NC,OR]

RewriteCond %{QUERY_STRING} (<|>|’|%0A|%0D|%27|%3C|%3E|%00) [NC,OR]

RewriteCond %{QUERY_STRING} concat[^(]*( [NC,OR]

RewriteCond %{QUERY_STRING} union([^s]*s)+elect [NC,OR]

RewriteCond %{QUERY_STRING} union([^a]*a)+ll([^s]*s)+elect [NC,OR]

RewriteCond %{QUERY_STRING} (sp_executesql) [NC]

RewriteRule ^(.*)$ – [F,L]


3. Cross-site scripting attacks

How the XSS attack works (Source: Imperva)

Like SQL Injection attacks, Cross-site scripting (XSS) attempts to inject malicious code into vulnerable websites. One example is posting information that leads website users to another website that then attempts to steal personal data. This scenario can be potentially dangerous as the other website may not even need input from the user. It can simply scan user identification data such as cookies, session tokens, and more.

You can generally prevent XSS attacks using a Web Application Firewall (WAF). This useful tool allows you to block specific traffic on websites. Most top WordPress security plugins like All In One WP Security & Firewall will have this feature available. If you’d rather focus on running your WordPress website and want to leave the security to the experts, One WP Security & Firewall is a great way of doing so. It not only helps you block most types of attacks but can also scan your WordPress website for vulnerabilities you may not be aware of.

4. Brute force attacks

WordPress makes use of a credential system that allows administrators and other authorized users to access its control features. Unfortunately, many users tend to employ weak and obvious passwords. Brute force passwords make use of scripts that make continued and multiple login attempts to a WordPress site until successful. The script works with a database that holds a dictionary of commonly used usernames and passwords (such as Admin and Password1), hoping that you would have chosen one of these combinations without putting any thought into the risks.

You can however do several things to limit the effectiveness of brute force attacks;

  • Use complex and unique passwords
  • Block access to the WordPress admin directory
  • Add Two-factor Authentication (2FA)
  • Disable directory browsing
  • Limit the number of login attempts

5. Distributed denial of service attacks

DDoS attacks try to overcome a website with a flood of requests mimicking visitor traffic. (Source: dnsstuff)

Distributed denial of service (DDoS) attacks consist of a massive flood of requests that target a website. This flood is intended to cripple a website, making it inaccessible to regular visitors as it is unable to cope with the volume of requests. While DDoS isn’t unique to WordPress, websites based on this CMS can be especially vulnerable since it requires more resources to serve a request than regular static websites. It can be impossible to guard against a determined DDoS flood however, but even the most prominent organisations have succumbed to these attacks. One example of this was the GitHub attack in 2018, in which their website came under a 20-minute DDoS flood attack.

Generally smaller websites aren’t the target of such a massive volume. To mitigate against smaller DDoS waves however, make sure you use a Content Distribution Network (CDN). These server networks can help balance incoming loads and help in serving content faster.

6. Cross-site request forgery attacks

Cross-site request forgery (CSRF) attacks are another way attackers force web applications like WordPress to recognize fake authentications. WordPress is especially vulnerable since these sites generally hold many user credentials. The CSRF attack is similar to the XSS attack discussed earlier in many ways. The main difference is that CSRF needs an authentication session, while XSS does not. Regardless, the ultimate aim is to divert a visitor towards an alternative location to steal data.

CSRF prevention needs implementation at the plugin level in most cases. Developers typically use anti-CSRF tokens to link sessions with specific users. WordPress website owners can only rely on plugin updates and general website hardening techniques to help prevent CSRF attacks.

Some hardening actions that may work include;

  • Disabling file editors
  • Targeted blocks of PHO execution
  • 2FA implementation

Final thoughts on WordPress security issues

There is sometimes a misconception that WordPress is a highly vulnerable web application. However, this isn’t an entirely fair claim. Part of it stems from the widespread use of WordPress, but a more significant reason is the failure of website owners to take the necessary proper precautions.

We often take security for granted without thinking of the consequences of choosing a simple password. Website owners however have to take responsibility not just for the integrity of their websites, but also for the safety of their users’ data.

Author Profile

Pui Mun Beh is a digital marketer of WebRevenue

The post What crucial WordPress security issues you be aware of? appeared first on UpdraftPlus. UpdraftPlus – Backup, restore and migration plugin for WordPress.

The history of WordPress: What’s next for millions of web publishers?

What is the history of WordPress? WordPress can lay more claim than any other entity for shaping the internet as we know it today. Every day, over 500 sites are created using WordPress. Compare that to the 60-80 that SquareSpace can boast, and you have an idea of WordPress’s penetration. It is ubiquitous. 

Image source

Why is this? Well, it’s effective, easy to use and largely free (although users do of course have to pay for a domain name, hosting and any premium plugins or themes). The average internet user may want to start blog posts or create a simple website, but have little in the way of tech savvy and even less disposable funds. Step forward, WordPress. 

Itt wasn’t necessarily an easy ride to the top. The history of WordPress is a story of remarkable ascendancy. It is an interesting tale of rapid improvements and refusing to sit on its laurels and success. 

Birth

The history of WordPress starts when the blogging tool b2/cafelog was parked by its developers, who had elected not to take it any further. Two programmers who had been working on the project decided to start something themselves by building a platform on top of b2/cafelog. 

These two individuals, Matt Mullenweg and Mike Little, managed to get the first instance of their product (version 0.7) released in May 2003. Upon its official launch, users responded favorably to the admin interface, user interface, text filter and templates (which were XHTML 1.1 compliant)

Early days

Image source

Version 1.0 followed, which was known as the Davis Version (named after the American musician Miles Dewey Davis III). As Matt Mullenweg is a jazz enthusiast, every version comes with a plugin called “Hello Dolly,” (in reference to Louis Armstrong) automatically installed. The Davis release included multiple post categories and an easy installation process. 

WordPress 1.2 (Mingus – named after Charlie Mingus) was released in May 2004. This release incorporated plugin architecture, a key and defining part of WordPress. This meant that users could create their own plugins and share them with other users. 

It was this openness that set WordPress apart right from the beginning. It’s this openness that has resulted in there being a total of 56,000 free plugins and 2500 themes available on WordPress.org – the official WordPress repository. 

At the same time of WordPress’ latest developments, the dominant force in blogging software (Moveable Type) was declaring a tightening up in its licensing arrangements and a pricing restructure, which left many bloggers aggrieved and looking for an alternative content management system. The result was a massive popularity boost for WordPress. 

One of the positives of this mass adoption was a consequent stream of improvements that were generated and applied due to the open nature of the program and its plugin approach. The product thus improved at a rate that was truly impressive. 

2005 saw the introduction of version 1.5 (Strayhorn – after pianist Billy Strayhorn), which incorporated Pages and seriously upgraded the themes facility, which allowed for a different theme for each weblog category. 

This was followed in the same year by version 2.0 (Duke – after Duke Ellington), which introduced a radically redesigned admin dashboard. This dashboard didn’t just look different, it gave much better usability and allowed bloggers to avail themselves of the facility to add categories or tags without having to leave the post editor. 

Further developments of WordPress were released with new and useful features. These included an anti-spam plugin, fast posting, quick imports, built-in caching, autosave options and better search engine privacy. 

Continued growth

Image source

In 2006, the WordPress name and logo were trademarked by Automattic. Following another UI redesign (involving web designers Happy Cog), the ownership of WordPress was transferred to the WordPress Foundation in 2010. This protected WordPress from the whims of any particular company and meant that growth could continue unabated. 

Version 3.0 (Thelonious – after Thelonious Monk) was released in summer 2010. This featured customization for post types, backgrounds, headers and menus, as well as admin screens with contextual help. With the addition of the Twenty Ten theme, the concept of a ‘default theme’ for each year was introduced.

In 2011, E-commerce developments really started to take off as there was a good deal of e-commerce platforms being built using WordPress. This resulted in a rapid growth in online stores being created using WordPress and moved WordPress away from it’s traditional ‘blog’ website image. 

Image galleries were then given a boost in 2012 by the introduction of a custom theme enabler and new media manager. 

The benefits of automation were delivered by Version 3.7 (Basie – after Count Basie) in 2013, which gave its users an automatic updates feature for new software releases. This wasn’t welcomed universally as it was felt it took away control from users, so tutorials were released on how to disable this feature. Another of 3.7’s extra features was support for installing files in the correct language and keeping them up to date. 

2013 also saw a big step in the history of WordPress when it became the most widely used CMS in the world. This position has subsequently been consolidated, with WordPress holding over 65% of CMS’s market share in 2022.

Image source

Staying on top

From MySpace to Atari, the enemy of continued success is complacency. This is not something that you could accuse the WordPress Foundation of, as in 2013 they introduced another improved UI (called MP6). In version 3.8 (Parker – after Charlie Parker), the platform was designed to work with any screen size. WordPress began to take notice and address the growing use and popularity of smartphone usage – particularly in the online shopping sector.  

Version 3.9 (Smith – after US jazz pianist Jimmy Smith) followed in April 2014. This gave users the ability to edit and preview images inside the post editor, which greatly enhanced convenience. Other improvements included audio and video playlists and widget previews. 

There was a significant milestone in 2014: this was the first year in which non-English WordPress downloads outnumbered English downloads. The impact of WordPress had now become truly global. 

The various incarnations of version 4 that emerged in 2015 produced greater refinements, as well as seeing the first infrastructure being put in place for REST API (an application programming interface using a particular software architectural style). 

In 2015, the leading e-commerce plugin (WooCommerce) was acquired by the makers of WordPress, Automattic. WordPress was now becoming a major commercial player and could work in close compatibility with the world’s best business apps

Version 4 continued to be improved during 2016 and 2017, with developments such as plugin and theme previews and updates, content recovery and customization and included the beginnings of the WordPress block editor. 

2018 witnessed the debut of version 5.0, with a major innovation in the shape of the completion of the block editor, which was now named Gutenberg. 

Another big step forward came in 2019 when the ‘Site Health’ facility was launched in version 5.1 (Betty – vocalist Betty Carter). This gave users the ability to see for themselves how secure and up-to-date their software was. Those who struggled previously to define zero-party data were now becoming au fait with such concepts.

Three more releases followed in 2020, with 5.4, 5.5, and 5.6 (respectively, Adderley, Eckstine, and Simone), including the launch of the ‘Full Site Editing’ feature, which was improved further in 5.7 (Esperanza) and 5.8 (Tatum). The key benefit of this feature was the ability it conferred on users to create site-wide templates and to complete post revisions with ease. 

What’s next for WordPress?

Image source

WordPress co-founder Matt Mullenweg says that the future of WordPress will continue to focus on Gutenberg and will be about the four main priorities that its developers have held since the beginning. These four are easier editing, customization, collaboration and multilingual support. 

Mullenweg also thinks that more and more people will use WordPress with self-hosted sites. New possibilities regarding hosting and domains are always coming up. For instance, users can now acquire a free io domain should they wish. 

Up until recently, relatively few large-scale organizations used WordPress as their content management system. This is changing though due to security updates combined with the other security features that have been introduced and the extensive range of features that are being constantly added.

WordPress is continuing to work on full site editing service techniques with Version 5.9, in 2022, promising to deliver an improved editing experience provided by the block editor. 

It is also a reasonably safe bet that the jazz greats will continue to be honoured! 

Conclusion

What this history lesson teaches us is the importance of small to major continuous improvements. Through active development, WordPress has become the go-to option for a wide range of content types. As a result, WordPress has been hugely responsible for the massive rise in blogging and online stores worldwide.

Its role in putting e-commerce in the hands of businesses around the globe has resulted in significant growth and wealth creation. Many, many jobs are now reliant on the brainchild of Mullenweg and Little. The history of WordPress is one of empowering bloggers and supporting business growth. 

Grace Lau – Director of Growth Content, Dialpad

Grace is responsible for leading branded and editorial content strategies, partnering with SEO and Ops teams to build and nurture content. She has written for VMBlog and Brightpearl. Here is her LinkedIn.

The post The history of WordPress: What’s next for millions of web publishers? appeared first on UpdraftPlus. UpdraftPlus – Backup, restore and migration plugin for WordPress.

WP-Optimize release latest 3.2.3 update

The latest update for WP-Optimize 3.2.3 has now been released. This new release features a fix, feature and a tweak update. 

The main focus in this latest release is the ‘Preload Minify Assets’ feature. While WP-Optimize does already have a ‘Preload’ feature with caching functionality that can preload all pages and minified assets, this new update now gives users a separate minify preload feature for users who are using a hosting provider that provides server level cache – such as Kinsta. 

As such, if a user is using a hosting provider that uses ‘Nginx’, rather than ‘Apache’ – these hosts most likely provide caching themselves. In this scenario, users of WP-Optimize need to disable the caching functionality within the host, as they are unable to use the ‘Preload’ function. Even on ‘Nginx’ servers, minified assets are allowed and preferred in order to boost performance. 

The updates to WP-Optimize 3.2.3 are available for download now and also includes the following:

  • FIX: Cache – ‘Purge cache permissions’ setting does not allow additional roles to access the purge cache tool
  • FEATURE: Minify: Pre generate assets
  • TWEAK: Make smush details button work in media modal window

The post WP-Optimize release latest 3.2.3 update appeared first on UpdraftPlus. UpdraftPlus – Backup, restore and migration plugin for WordPress.

How to revamp and redesign your WordPress site guide

It might surprise you to learn that WordPress powers nearly 40% of all the websites on the internet. It’s an outrageously high figure, considering that more than a billion websites currently exist. In this blog we are going to look at a recommended “how to redesign WordPress site guide”.

Image Source

WordPress is loved for its ease of use, the customizability it offers and the low costs associated with this particular CMS platform. While there are many advantages for the user, there are also some issues that need to be considered too.

Due to the low barrier of entry with WordPress, it’s quite common to see simply-designed websites that are basic in their design and function. For individuals, start-ups and small businesses, this might be fine to begin with. However the likelihood is that, sooner or later, a revamp is going to become necessary.

Any business that wants to take advantage of ecommerce sales channels will surely recognize that the importance of a website’s design cannot be ignored. In terms of your digital real estate, your website is of primary importance. Rather than sticking with your original and rushed site, site owners are better off pressing ahead with a redesign that is sure to impress. 

What Is a website redesign?

It might sound obvious, but the truth is that many people don’t fully understand exactly what a website redesign is or what it entails. There’s a perception that website redesigns are wholly cosmetic and simply change the appearance of the front page with a new logo and colour scheme, but of course that’s not the case at all.

A website redesign is a process where you update, refashion, repair, or restructure a website. You do this with the purpose of building greater traffic, more sustained engagement and more substantial revenue. 

The scope of a redesign can change considerably from one website to the next. Whenever starting any kind of work or making changes on your WordPress site, it is essential that you create a backup using UpdraftPlus to safeguards every page of the website. There will be some website redesigns that will only change backend upgrades or technical repairs. After all, you might have already nailed the aesthetic for your brand. 

The direction of your website revamp can also be determined by the type of business you’re running – at least in part. For example, the challenges for creating and designing an effective website for a CCaaS solution provider will obviously vary from a clothes retailer. 

Image Source

Why is a website redesign necessary?

It’s possible that the WordPress website you built is one that you really like, but have found that it is not performing to expectations. This might not be because the previous design process was a failure. Instead, it’s likely to be a simple matter of trends.

There’s also the state of your business to consider. The direction of your organization might have changed, either in terms of branding or sales strategy. These changes can result in a need for website redesigns.

A comprehensive redesign can raise the utility of your website to better focus on your sales strategy and customers. It can provide a better on-site experience, leading to more opportunities for your business, greater revenue and more profit.

Preparing for your WordPress redesign

While it might be tempting to simply throw yourself into a redesign project, certain steps need to be taken prior to any upgrading. Measured steps are your best friend here. 

Here’s how you get started:

1. Understand the redesign’s purpose

If you’re going to complete an effective WordPress redesign, you need to understand why you’re carrying out the process in the first place. 

Often, website redesigns are completed because the current setup can look dated and stale. Your site may have the right functionality, but could be in desperate need of a new aesthetic. You do not have to create a whole new site and start again from square one if your site is already achieving results, but just needs an update. 

Understanding your motivation behind a revamp means that you’re going to be far better placed to create a roadmap.

2. Collect vital data

A website redesign should never be a matter of guesswork. In the digital age we have access to a mountain of data – it’s time that you used it.

With website analytic software – like Google Analytics – you can garner all sorts of valuable information. You can unlock insights regarding the types of people visiting your website, as well as their behavior while they’re on your site. 

The more information you can gather, the better. It’s also worth considering user questionnaires, surveys and feedback forms.

Image Source

3. Complete a website audit

It can sometimes be challenging to see our own WordPress sites with clarity. To bring about effective change however, it is a process you have to complete.

A website audit is your next step.

Take a long, impartial and hard look at your website in the context of current web design trends. Go through the process of completing the actions on your website that ideally you want your users to be following in order to make a purchase/sign up etc. Is the process clear? Are there any tasks which may be a struggle? Take note in order to fix these issues when carrying out your redesign.

Visit your competitor’s websites and see how they have set up their designs and how they funnel potential customers into making a purchase. This is an excellent way to get some inspiration and take advantage of all the hard work and research others have already done. You’ll also need to undertake a review of all the plugins that you’re using for your website. WordPress is an impressive CMS platform, but having too many unused plugins on your site can cause it to load slower than it would otherwise.

4. Create a website redesign roadmap

Now that you’re armed with all the information needed to create your wonderful new WordPress site, it’s time to get started with a concrete plan.

Begin by creating a website redesign roadmap that gives you a clear plan of action. 

This will ensure you have a total understanding of the scope of the project, and the time needed to get the job done. You’ll also need to consider the key performance indicators (KPIs) that will help you understand the effectiveness of the redesign once you complete it.

Performing Your WordPress website redesign

With all the information required to optimize and update your site, you are ready to press on with the redesign. But before you do, there are some important tasks you have to complete first. 

Back-up Your site

If you are making any changes to your site – changes as small as installing, updating or deleting a plugin, then you should always take a backup first. UpdraftPlus is the world’s leading and most popular WordPress backup plugin. Download and install the plugin today for total peace of mind. Even the most minor of changes can affect your site in ways that could make it unusable. 

With UpdraftPlus installed, if anything goes awry while you’re in the midst of making changes, you have a fall-back option to restore your site to its original state. 

Image Source

Create a style guide

In web design, a style guide acts as a compilation of the code standards of a particular site. These choices impact the site’s visual style – including patterns, fonts, headers and links. For those who already have a style guide, this is also a good opportunity to update it. Playing with colors, fonts and design assets to craft an impressive aesthetic is always the goal.

Create Your wireframes

A wireframe is an illustration of a web page’s interface. It denotes the structure, allocation of space, implemented functions and the intended behaviors of users. In conjunction with the data gathered earlier, wireframes can help give your site redesign direction and focus. With wireframing carried out, it’s far likelier that your website will offer seamless navigation. 

Cut unwanted elements

This is a chance to get ruthless with the parts of your website you no longer deem necessary. Many WordPress websites get cluttered without you even realizing what’s happening. A redesign is a great chance to re-evaluate what you might or might not need. You should also prioritize getting rid of other unwanted content, like spam comments. The more clean and user-friendly your website, the better the user experience. 

Upload a Favicon

This isn’t a term that everyone is familiar with, but favicons are something you should probably know about. A favicon (sometimes known as a favorites icon or a bookmark icon) is the small image that users will see when they bookmark your website. When your site is added to a users list of bookmarks, the favicon will allow them to quickly identify you.

Every small step you take to create a more enjoyable user experience will be appreciated. 

Introduce a new TLD

The most effective websites are memorable – they stand out and stick in the memory. It might surprise you how a small change – like a new top-level domain (TLD) – can make such a large difference. Many Saas and CPaaS providers are choosing to register with new TLDs in an effort to set themselves apart, as in a crowded and competitive market space, every edge counts. You might consider an io registrar for your WordPress website for example. This TLD has a great visual, has tech associations (input/output), and has a pronunciation that rolls off the tongue. 

Image Source

Create your prototypes

Next you will want to create prototypes. This is the point at which you’ll really be able to tell how effective your website is going to be as you will get a good feel for the interface and the aesthetic. However, completing your prototypes is only half the battle. It’s also necessary to complete extensive quality assurance checks. These evaluations will ensure that no unwanted hiccups surface once your WordPress site is back up and running. 

Roll out your redesigned site

With the new design complete and the prototypes approved, the moment to go live has arrived. If you have used a staging site to redesign your site, then you will now have to transfer the new site over to the live site. You’ll have to monitor your website’s performance metrics and keep a close eye on those key performance indicators for a period after the redesign’s launch. 

Again, gathering data using analytics software and user surveys is an excellent way to determine the success of your WordPress redesign and if there are any issues that need to be fixed. 

Revamping WordPress websites made easy

A lot of time, effort and work goes into a website. There are a huge number of elements to take care of and factors to consider. Even with a user-friendly CMS platform like WordPress, things can still get complicated. As a result, many people will put off carrying out or even thinking about a redesign, as long as the site currently works. With the help of this essential guide on how to complete a WordPress website redesign, it doesn’t have to be painful. Follow the tips listed above, back-up your site using UpdraftPlus, and you can’t go wrong!

John Allen – Director, SEO, 8×8

The post How to revamp and redesign your WordPress site guide appeared first on UpdraftPlus. UpdraftPlus – Backup, restore and migration plugin for WordPress.