WP-Optimize vs. WP Fastest Cache: Which is the best WordPress cache plugin

WordPress is the largest website-hosting platform in the world. With that comes a lot of eyes and expectations. For your WordPress website to function optimally with little or no issues, you will need to install appropriate plugins. Some examples of essential plugins include a backup plugin, security plugin, and cache plugin. It is highly recommended that you install a cache plugin, as this plugin is essential to the overall speed and functionality of the website. 

For old and new WordPress users who want to speed up their WordPress site, two popular cache plugins are often at the top of any list; WP-Optimize and WP Fastest Cache. But which one is the more effective cache plugin? As you will read in this blog, both WP-Optimize and WP Fastest Cache are great plugins that are used and recommended by people all over the world. But as you would expect, not all cache plugins are created equal. While there are premium version of both plugins available with lots of additional extra features and tools, this blog will compare the features available via the free versions. 

What is a cache system?

Essentially, a cache system is the rendered WordPress page that requires PHP and MySQL. The system will also need good RAM and CPU settings. However good the RAM and CPU may be, you could find that as your visitor numbers increase, users will need and consume larger and larger amounts. As a consequence of this, your pages/site will begin to render more slowly. This can be bad news for your site as Google ranks the speed of your site as one of the primary factors in its search ranking algorithm. 

As such it is highly recommended that you use a cache plugin to help improve the load time of your page – which can help improve your Google SEO ranking as a result. 

WP-Optimize

WP-Optimize is simply outstanding in how it works. The plugin is an all-in-one platform that cam perform the following tasks quickly and easily:

  • Database cleaning
  • Site caching
  • CSS and JS minification
  • Image compression

Having racked up more than one million active installations, WP-Optimize is a powerful, successful and popular plugin you should install to keep your website in the best possible shape. 

WP Fastest Cache

WP Fastest Cache is also a highly popular WordPress caching plugin that is mostly known for its simplicity. Although it also has a free version available for download, the major features most users may require – such as Mobile Cache, Widget Cache, Minify HTML Plus, Minify CSS Plus, Minify JS, Combine JS Plus, Defer Javascript, Optimize Images, Convert WebP, Database Cleanup, Google Fonts Async, and Lazy Load are only available in the premium version

The free version is fine to use if you just want to make some quick gains in the loading times for your WordPress site. However, as someone that wants to fully optimize your site, ‘fine’ isn’t the greatest accolade when other plugins can do so much more.

WP-Optimize and WP Fastest Cache: Feature comparison

Features WP-Optimize WP Fastest Cache
Free version Yes Yes
Database Optimization Yes No
Browser Caching Yes Yes
Page Caching Yes Yes
Gzip compression Yes Yes
Lazy Load Yes No
Image Compression  Yes No
Cache Preloading  Yes Yes
HTML/CSS/JS minification Yes No
Mobile Specific Cache Yes No
Script optimization Yes No


Why is WP-Optimize a better overall caching plugin than WP Fastest Cache?

It offers more features

WP-Optimize offers more features for free. Everything from the compression of large images, to database cleaning, to site caching, is accessible on your WordPress site once you install WP-Optimize. WP Fastest Cache only provides a very limited list of features and provides the more useful and important features via it’s premium plugin. 

WP-Optimize comes with a database optimization feature

Redundant website content, including trash comments and discarded drafts are wiped clean to help keep things faster and more smoothly. WP Fastest Cache does not offer this feature via it’s free version.  

WP-Optimize compresses large websites images

With the free version of the WP-Optimize plugin, you can determine the final sizes and format of your images. All you have to do is set it to your preferred settings. WP Fastest Cache only has this feature available in its premium version. 

WP Optimize has a great customer support

With more than one million global users and thousands of 5-star ratings, WP-Optimize is committed to bringing you the best user experience possible.

Conclusion 

We encourage users to use both WP-Optimize and WP Fastest cache and evaluate the relative performance of both. While both plugins are extremely popular and both have their supporters and detractors, WP-Optimize offers a far wider range of important features that combined can help make your site run faster. This in turn can help improve your SEO score, which can lead to a higher Google ranking, more success and more interactions with your visitors.

The post WP-Optimize vs. WP Fastest Cache: Which is the best WordPress cache plugin appeared first on UpdraftPlus. UpdraftPlus – Backup, restore and migration plugin for WordPress.

8 ways to boost your WordPress website conversion rates

Your site might have lots of traffic, but if your website conversion rates are down, your bottom line will take a huge hit. It’s absolutely crucial to optimize your web design and site functionality to increase your conversion rates. All your efforts to drive traffic, like SEO or digital marketing will be futile, if that traffic will bounce away uninterested.

Website conversions are a direct indicator of sales volume. A conversion can be a click on a ‘Call to Action’ button, adding a product to a shopping cart, filling a lead generation form, or simply providing an email address to sign up for a newsletter. The ultimate conversion will always be buying a product, but you can have multiple conversions along the marketing funnel.

What is your website conversion rate? 

Conversion rate is the percentage of your web visitors that complete your desired goal. It’s a direct function of the usability and branding of your website. 

There are of course a host of tactics you can employ to improve conversion rate and SEO ranking – such as continuously improving and updating your site with new content, products, deals, videos, blogs etc. A stagnant website will miss out on many opportunities to increase revenue and fall down the SEO ranking order.

CRO – or conversion rate optimization, uses the traffic you already have to drive conversions, instead of increasing traffic to your website. This is the best way to get the most bang for your marketing buck and once you have a higher-converting website, you can start investing in driving traffic again.

Image Source

Here are eight practical and proven ways to improve website conversion rates:

1.   Use pictures

Image optimization can help instantly communicate your value proposition better than most copy. Rarely does anyone have time to read your product descriptions in full, but if you’re lucky enough to find a picture that tells all, you can change their mind and convince a potential customer to buy your product from a host of rivals. 

If you have an online video conferencing service for example, you can show a potential customer how they would look during a web meeting. Such an image will help engage the visitor further and allow you to guide them down the sales funnel with further engagement.

Here are some tips for choosing images:

  1. Choose images of people using your products and not just an image of your products.
  2. Don’t use stock photos, use Google advanced image search. Or better still create your own photos.
  3. Edit your photos to get the best optimization and loading speed
  4. Test images for landing pages
  5. Choose responsive images that attract attention

2.   Include reviews, links and ratings

Customer testimonials, star ratings and reviews all play an important role in influencing buying decisions. This is due to the phenomenon of social proof, whereby consumers believe more in a product if others are also buying, using and enjoying it. 

Leveraging social proof can be one of your biggest assets to increase trust in your brand and ultimately increase ecommerce traffic and sales.

Ensuring your brand story has social proof to support it is essential to building credibility. Incorporating social proof into your web design is a fail-safe marketing strategy. 

Add customer testimonials next to your product descriptions to show potential customers that your product has been used and highly rated by others. Customers tend to be sceptical by nature, adding the element of social proof increases their confidence and can help convince them that your brand is worth investing in. Social proof on your landing pages can also be a big source of conversions and can enhance engagement on your website.

3.   Make conversions smaller commitments

It’s a busy world and if you have a higher bounce rate, it could be because the actions needed to convert are too time consuming. 

Understand that time is money and people have short attention spans. People are commitment averse; they would rather put 10 items in their shopping cart than immediately buy one.

Ask your customers for smaller commitments, especially if you have a service company or sell expensive products that require special consideration. Changing your CTA buttons to softer alternatives to immediate purchases can work wonders. 

For instance, changing a “Buy now” button to “Book a free consultation” is much friendlier for the commitment-phobic because it reassures the user that a conversation is the next step, not an ultimate purchase.

A recent test found that simply changing a main call to action to “Contact seller” from “Buy now” increased conversion rates by 73%.

Image source

4.   Optimize UX design and copy

UX design or the user experience of your web design is perhaps the biggest decider of where a user will land. Make sure your website can be navigated smoothly and seamlessly. A great UX design is essential to increase website conversion rates.

The copy of your website goes hand in hand with your UX. Use active language and provide clickable options so users can go where they want without too much work. Expose primary navigation items at all times, so people can move through the website at will.

5.   Reduce fields in contact forms

One of the primary ways to gain leads is to have people sign up via contact forms. Filling out these forms though can be a hassle. If your form has too many fields, people might skip signing up altogether. Remove as many barriers as possible.

Let a potential customer know the benefits of filling out a form. Set out expectations so you don’t fall short. Make sure your contact forms are conversational and friendly. Forms with too many fields are intimidating and people are often wary about giving out too much personal information.

Stick to fields that are necessary for conversion and do away with all the fluff that makes form filling a hassle. You should hopefully then find that your contact form submissions will increase.

6.   Optimize customer support

Customers are more likely to buy when their concerns are addressed during their initial “buying” period, which is usually under a minute. You should have a support team available to handle queries via live chat and other channels, and have an automated system like automatic call distribution that can send the queries and questions to the relevant departments in the case of any phone calls.

Interactive voice response (IVR) is another tech example to consider to support any phone-based customer support. IVR is a form of speech recognition technology that allows customers to interact with an organization’s contact center with the minimum of fuss.

Image Source

7.   Optimize for mobile

Given the amount of traffic that is now sourced from mobile phones, it is important that you have a dedicated mobile format for your website. Failure to do this could result in a huge chunk of your potential customers being lost. 

It is important that your mobile website is responsive and optimized for mobile use, which means button sizes and font sizes should be designed to work on mobile devices. Remember to be creative with mobile marketing – if done right and integrated with social media apps, it can help improve your conversion rate.

Make sure to also optimize any newsletters, e-mails and anything that goes through an SMTP for mobile, as they can result in new leads if formatted correctly. 

8.   Strengthen your ‘call to action’ point

The following guidelines can help create call to actions (CTAs) that will increase website conversion rates, as the right CTA can be all that’s needed to set you apart:           

  • Have a clear and bright CTA on the landing page. 
  • Keep your CTA simple and use active language to communicate value and urgency.
  • Personalize your CTAs – Personalized CTAs perform 202% better than basic CTAs.
  • Don’t use multiple CTAs on each page.
  • Attract attention to CTAs by using pop ups. But remember not to be intrusive or disruptive to the customer experience.

Test before you launch

The eight examples listed above can all help boost your site performance, but all updates and changes to your site need to be tested after implementation. 

Perform A/B testing on every change you make. Web design requires you to be on your toes and make changes every so often to optimize the content, while resolving any ‘pain points’ customers may be experiencing.

When embarking on your continuous conversion rate optimization (CRO) journey, using process discovery could also be invaluable. It can help you discover processes you may be able to automate in the future to improve the user experience of your website to reduce bounce rates, gain more leads and enhance conversion rates.

Once you have reached the point where your website resonates with your target audience, you can use a SaaS retargeting strategy to directly tackle those that do not convert. This method targets that part of your traffic that bounced and shows them ads to help drive them back to your website and hopefully convert. 

If you follow all the advice above, test as you go and investigate how tech can assist you along the way, your conversion rates should improve accordingly. 

Patty Yan

Patty is the EMEA Product Marketing Manager for RingCentral Office

The post 8 ways to boost your WordPress website conversion rates appeared first on UpdraftPlus. UpdraftPlus – Backup, restore and migration plugin for WordPress.

UpdraftPlus vs. WP DB Backup: Which is the best WordPress backup plugin?

We cannot overemphasize the need to backup your WordPress website. Many people have learnt the hard way how easy it is to delete essential information on their website or the entire site by clicking one button. That doesn’t have to be you. In this blog post, we will compare two WordPress backup plugins: UpdraftPlus and WP DB, as well as show you why the former is superior and ranks the best in the world. But first, what are UpdraftPlus and WP DB Backup?

UpdraftPlus

With more than three million current active users, UpdraftPlus is the most popular and highest-ranking WordPress backup plugin. To put it simply, UpdraftPlus is the best backup plugin in the world. 

The plugin doesn’t just simplify users’ databases and files backup process, it also makes the restoration as seamless as possible. With a single click of a button, everything you need to back up and restore your WordPress site is safely stowed away on the cloud. 

What’s more, with UpdraftPlus your backup can be uploaded into multiple cloud services including Dropbox, Google Drive, and Amazon S3 (or compatible).

Installing and using Updraftplus is essentially saying goodbye to the consequences of crashed servers, hacking attempts and common user glitches on your WordPress site. 

WP DB Backup

Also known as WordPress database, WP DB Backup backs-up your WordPress site database only. More basic information, such as passwords and usernames are also retained. It also stores your themes, configuration preferences, pages, posts and accompanying comments. 

While it may not be nearly as versatile as UpdraftPlus, it can serve you well in some situations, especially if your website security needs are minimal.  

Similarities between UpdraftPlus and WP DB Backup

Before we get into the details on how UpdraftPlus is superior to WP DB Backup (and every other backup plugin for that matter), it’s worth noting that they share some similarities – albeit slight. They are as follows: 

Automatic backups

Both UpdraftPlus and WP DB Backup share a feature that allows the user to backup their WordPress site automatically, as well as restore it – should they ever need to. To take advantage of this, you will have to schedule the backups to run on their own. 

This is one way to ensure that all recent changes are saved regularly. That is to say, backups will be automatic on your website at regular intervals. It should be noted however, that UpdraftPlus packs more automatic backup features than WP DB Backup. 

Easy configuration

Both plugins are very easy to configure and use, although UpdraftPlus is noticeably easier to install, configure and navigate. First time users and experts alike will have very little or no drawback with using both backup plugins. 

Why you should use the UpdraftPlus backup plugin

UpdraftPlus and WP DB Backup are used daily by businesses and individuals all over the world. Regardless of this, it is clear that they are not in the same league. UpdraftPlus is simply the best backup plugin available. 

Here’s why: 

It’s rated number 1 in the world

One way to pick a functional backup plugin for your WordPress website is to check how they are rated on WordPress.org. You do the same for any type of plugin, whether it’s image optimization or caching. This allows users to get a good impression on the quality of a particular plugin.

With more than 3 million active users, UpdraftPlus has a 5-star rating by 5,570 reviewers and currently ranks number 1 in the world. WP DB Backup on the other hand, doesn’t come anywhere close. 

UpdraftPlus features incremental backups

Trying to backup your whole site in one go can weigh down on your server and slow down your website’s process. By using the incremental backup option, the UpdraftPlus backup plugin is able to split your site into only the latest updates/changes, so you do not have to keep uploading the whole site and putting a large work-load on the server. WP DB Backup doesn’t employ this incremental backup option, which makes it considerably less efficient. 

UpdraftPlus has more cloud storage options

Like WP DB Backup, UpdraftPlus features multiple cloud storage options. However, while WP DB Backup supports only email, Dropbox, Google Drive, and Amazon S3 – UpdraftPlus supports more options including email, Dropbox, Google Drive, Amazon S3 (or compatible), UpdraftVault, Rackspace Cloud, FTP, DreamObjects, Microsoft OneDrive, Microsoft Azure, Google Cloud Storage, Backblaze B2, SFTP, SCP, WebDAV, and Openstack Swift. 

UpdraftPlus backups both databases and files

While the WP DB Backup plugin only backups databases, UpdraftPlus backups both databases and core files, as well as the non-WordPress files of your site. While the WP DB Backup only restores the databases, UpdraftPlus can restore the entire site – containing both databases and files. This just goes to show that UpdraftPlus is a better backup plugin for anyone that is serious about backing up their site. 

Conclusion

Although WP DP Backup is a good option – UpdraftPlus is without a doubt the better WordPress backup plugin. It comes fully packed with every backup feature you could need. There may be many to pick from out there, but if you want the best backup plugin for your WordPress website, UpdraftPlus is your best bet. 

The post UpdraftPlus vs. WP DB Backup: Which is the best WordPress backup plugin? appeared first on UpdraftPlus. UpdraftPlus – Backup, restore and migration plugin for WordPress.

UpdraftPlus Black Friday sale

It is late November again, which can mean only one thing. Black Friday is upon us. A time traditionally when shoppers would be trampling over each other in search of the biggest and best bargains before Christmas.

Thankfully, with UpdraftPlus, you won’t have to brave the scrum of the local shopping centre – as we are bringing the deals directly to you.

This Black Friday we are giving everyone a 20% discount for all of our major products.

20% off UpdraftPlus Premium subscription. Use the code: BFUDP20
20% off Easy Updates Manager: Use the code EUM21SiteBF
20% off WP-Optimize Premium : Use the code: WPO21BF
20% off UpdraftCentral: Use the code: Central20BF
20% off UpdraftClone Tokens: Use the code: BFClone20

This includes UpdraftPlus. The biggest, most popular and most trusted WordPress backup plugin available. With millions of active users, UpdraftPlus is the number one backup plugin for a reason. Buy UpdraftPlus premium today using the 20% off code in the description below and enjoy total peace of peace of mind and security – should your site ever crash or get hacked.

But that’s not all! Another offer we have is 20% off WP-Optimize Premium – the revolutionary, all-in-one plugin that can help optimize and speed up your WordPress site by cleaning your database, compressing your large images and caching your site.

There is also a 20% off code available for UpdraftClone tokens – an incredibly useful service that allows users to create a cloned test site instantly and directly from UpdraftPlus. 

We also have 20% off UpdraftCentral – A hosted WordPress management solution that makes it quicker and easier than ever to use UpdraftPlus. With UpdraftCentral, you can manage your WordPress plugin and theme updates and backup and restore all your WordPress websites from one central dashboard.

 And finally, we have Easy Updates Manager Premium – An incredibly useful plugin that allows users to automatically keep their sites up to date and bug-free. The Premium version.gives users a range of enhancements and extended features that make a great plugin even better. 

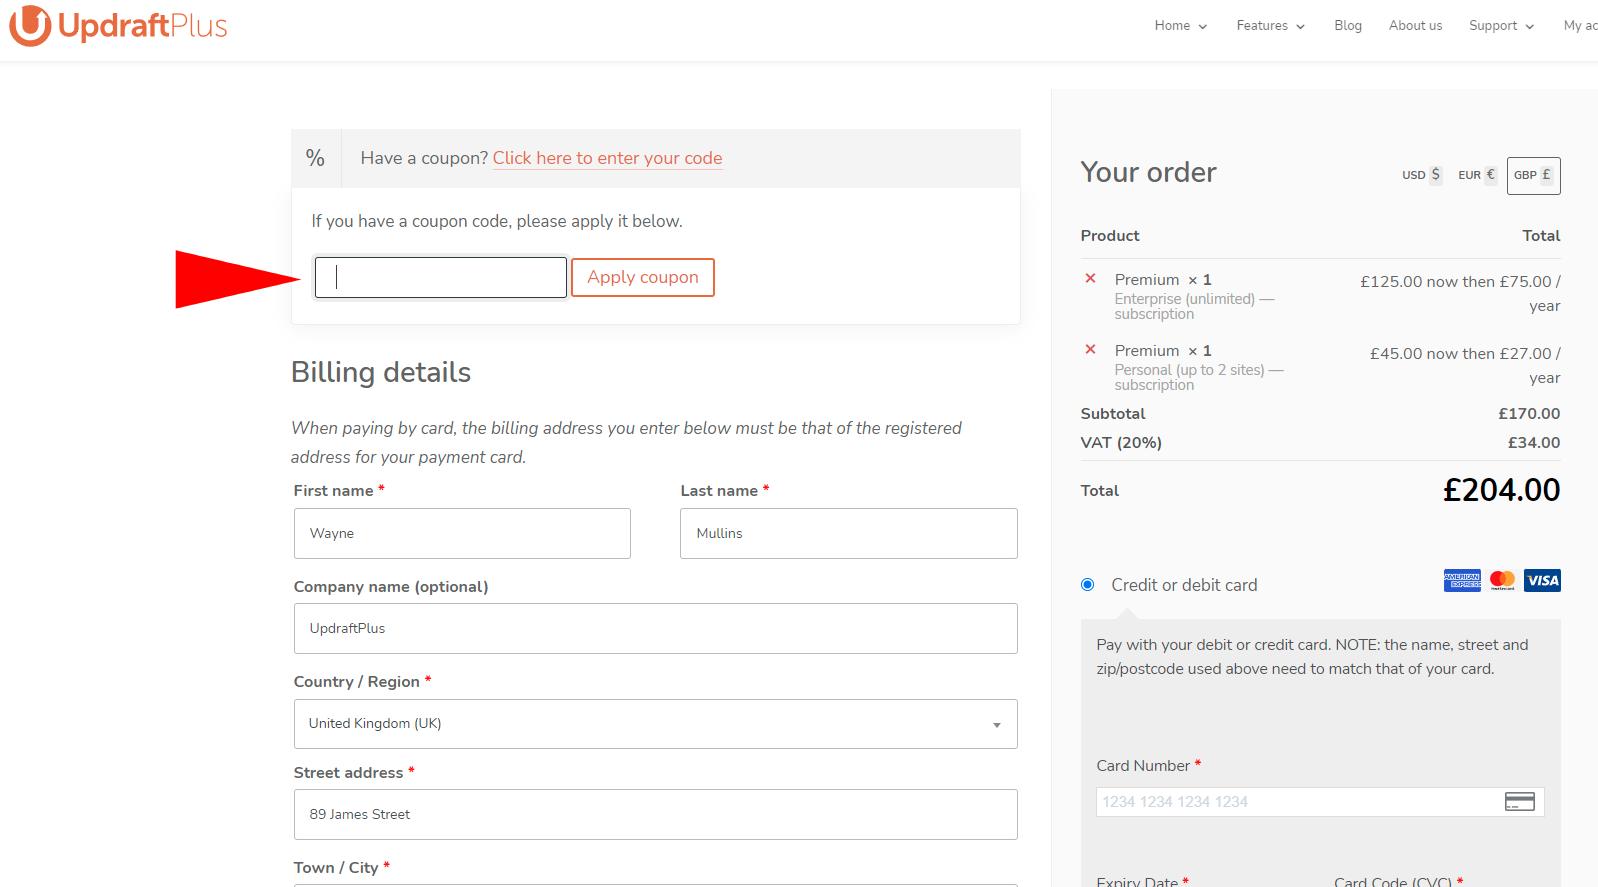
Remember to get your 20% off, just copy the code for your purchase and paste it in the coupon code box to receive your Black Friday discount. 

The post UpdraftPlus Black Friday sale appeared first on UpdraftPlus. UpdraftPlus – Backup, restore and migration plugin for WordPress.
UpdraftPlus vs. BackWPup – Which is the best WordPress backup plugin?

A WordPress backup plugin is something anyone that owns and runs a WordPress based website should have installed. We have all heard stories of those unfortunate people that have spent a significant amount of time and money on their site, only to lose everything due to an unexpected crash. Once your site has gone, it is almost impossible to retrieve and restore it back to its former working version. There is a simple way however to prevent this; by installing a WordPress backup plugin.

In this blog, we will compare and review two of the most popular WordPress backup and restore plugins: UpdraftPlus and BackWPup.

When looking for any kind of plugin, be it a backup service, caching, image optimization etc, WP.org should always be your first stop. Here you can check out all the most popular and highly rated plugins. When comparing the best backup plugins WP.org has to offer. 

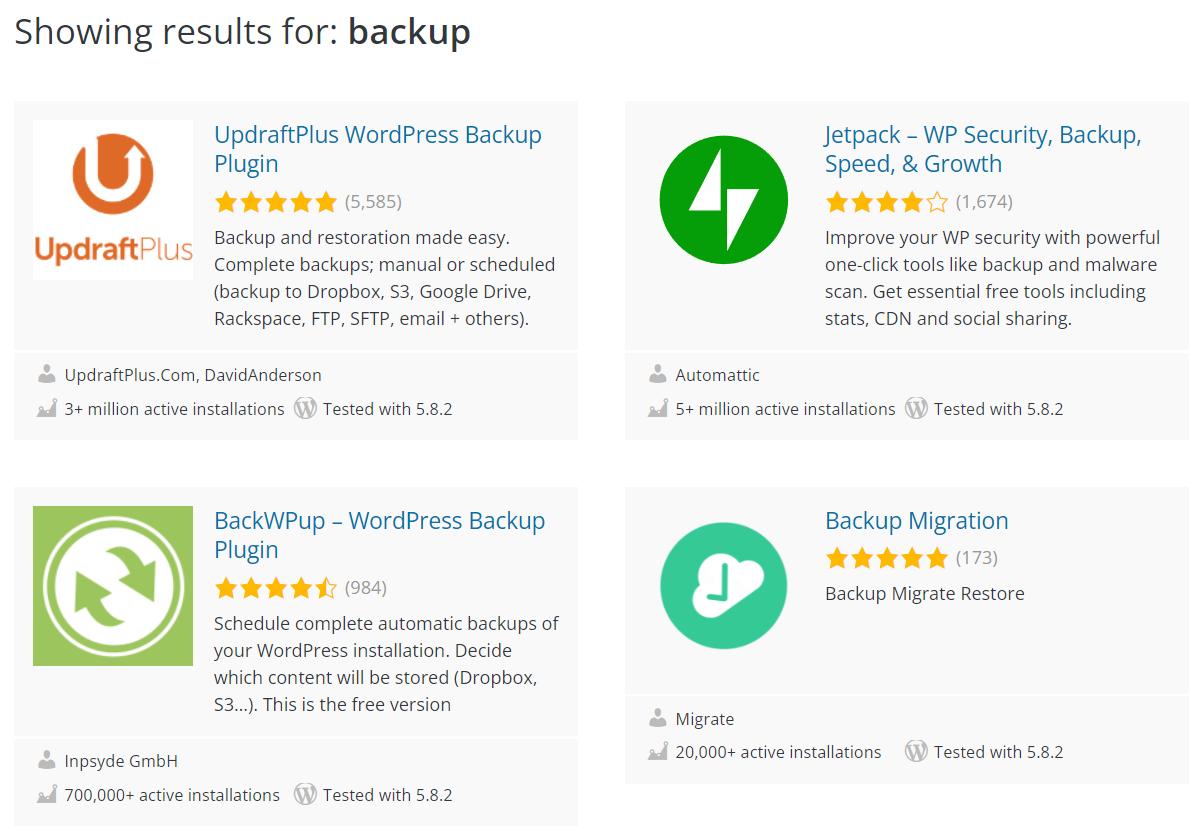
UpdraftPlus currently ranks at number 1, with over 3 million active installs and a top rated 5 star ranking from 5,570 reviews. 

BackWPup is currently ranked 3rd in WP.org, with 700,000 active installs, a 4.5 star rating from 984 reviews. 

From the WP.org ranking and reviews, we can see that UpdraftPlus isn’t only above BackWPup in the backup rankings, but it comes in at number 1 in the overall rankings for the hugely competitive ‘backup’ plugin market – even above Automattic’s own Jetpack backup plugin. 

Both plugins have been on the market for around 10 years, showing that they are established and that the developers have kept up with updates during that time. As both plugins offer free and premium versions, we will be evaluating and comparing the free options for UpdraftPlus and BackWPup as they offer similar services and options. 

Remote storage options

Even with the free version of UpdraftPlus, users are able to backup large sites and can use its proprietary cloud backup storage service. BackWPup does not have a proprietary storage option and have to be made via external backup locations, unless you have the space needed on your server. 

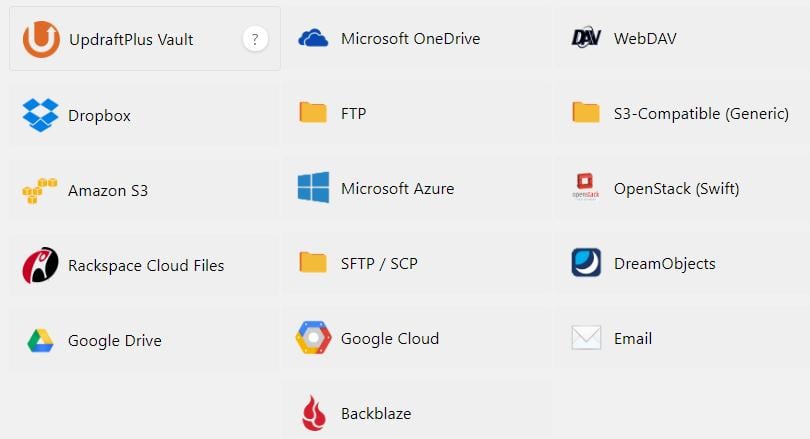
UpdraftPlus has a wide range of external remote storage backup options, including the following:

BackWPup does not offer such a wide range and leaves users limited to the following remote storage options:

UpdraftPlus has a clear advantage over BackWPup when it comes to remote storage options, with several big name backup locations that are missing from BackWPup. 

Encryption

When backing up your files and databases, UpdraftPlus utilizes advanced encryption techniques to help keep your backup secure and encrypts every database backup. If you transfer any of your files or databases to a remote cloud storage option, such as Google Drive, it will automatically encrypt the data, keeping it secure and safe. 

BackWPup also gives you the option to encrypt your files as you are backing up with symmetric and asymmetric procedures. However these procedures can be complex and difficult to follow, even with the instructions provided, making UpdraftPlus the better and easier option. 

Conclusion

If you review the rankings, features and services of UpdraftPlus and BackWPup, UpdraftPlus comes out as the clear winner in a straight comparison.

While the free version of UpdraftPlus offers various benefits and advantages over BackWPup, it has lots of additional features and add-ons that BackWPup lacks, such as UpdraftClone, Migrator and further remote storage options. This increased functionality gives users the option to take full control of their WordPress site with the UpdraftPlus plugin. As BackWPup has no property storage location or migration or cloning options in it’s premium version either, UpdraftPlus emerges as clearly the better and more user friendly plugin, with an extensive collection of additional functionality options, should you ever need them.

The post UpdraftPlus vs. BackWPup – Which is the best WordPress backup plugin? appeared first on UpdraftPlus. UpdraftPlus – Backup, restore and migration plugin for WordPress.
UpdraftPlus vs WP Vivid Backup: Which is the best WordPress backup plugin?

We may be slightly biased, but we believe that installing a reliable and user-friendly backup plugin is something everyone who has set-up and runs a WordPress site should do. There are so many backup plugins to choose from, that it can be difficult to figure out which is the right one for you. In this blog, we will compare two of the most popular and biggest WordPress backup plugins: UpdraftPlus and WP Vivid.

As you would do for any piece of software you are going to install, users should always check out the reviews and user feedback as it can give a ‘real-world’ analysis and level of usability better than any review could. Currently UpdraftPlus has over 3 million active installs, with a top mark 5 star ranking from 5,539 reviews. The UpdraftPlus plugin is being constantly updated, so you can be confident that no vulnerabilities or compatibility issues will arise. WP Vivid currently only has 100,000 active installs, also has a 5 star rating, but only has 474 reviews. WP Vivid, like UpdraftPlus has also received constant updates, removing any potential compatibility issues for newer versions of WordPress. 

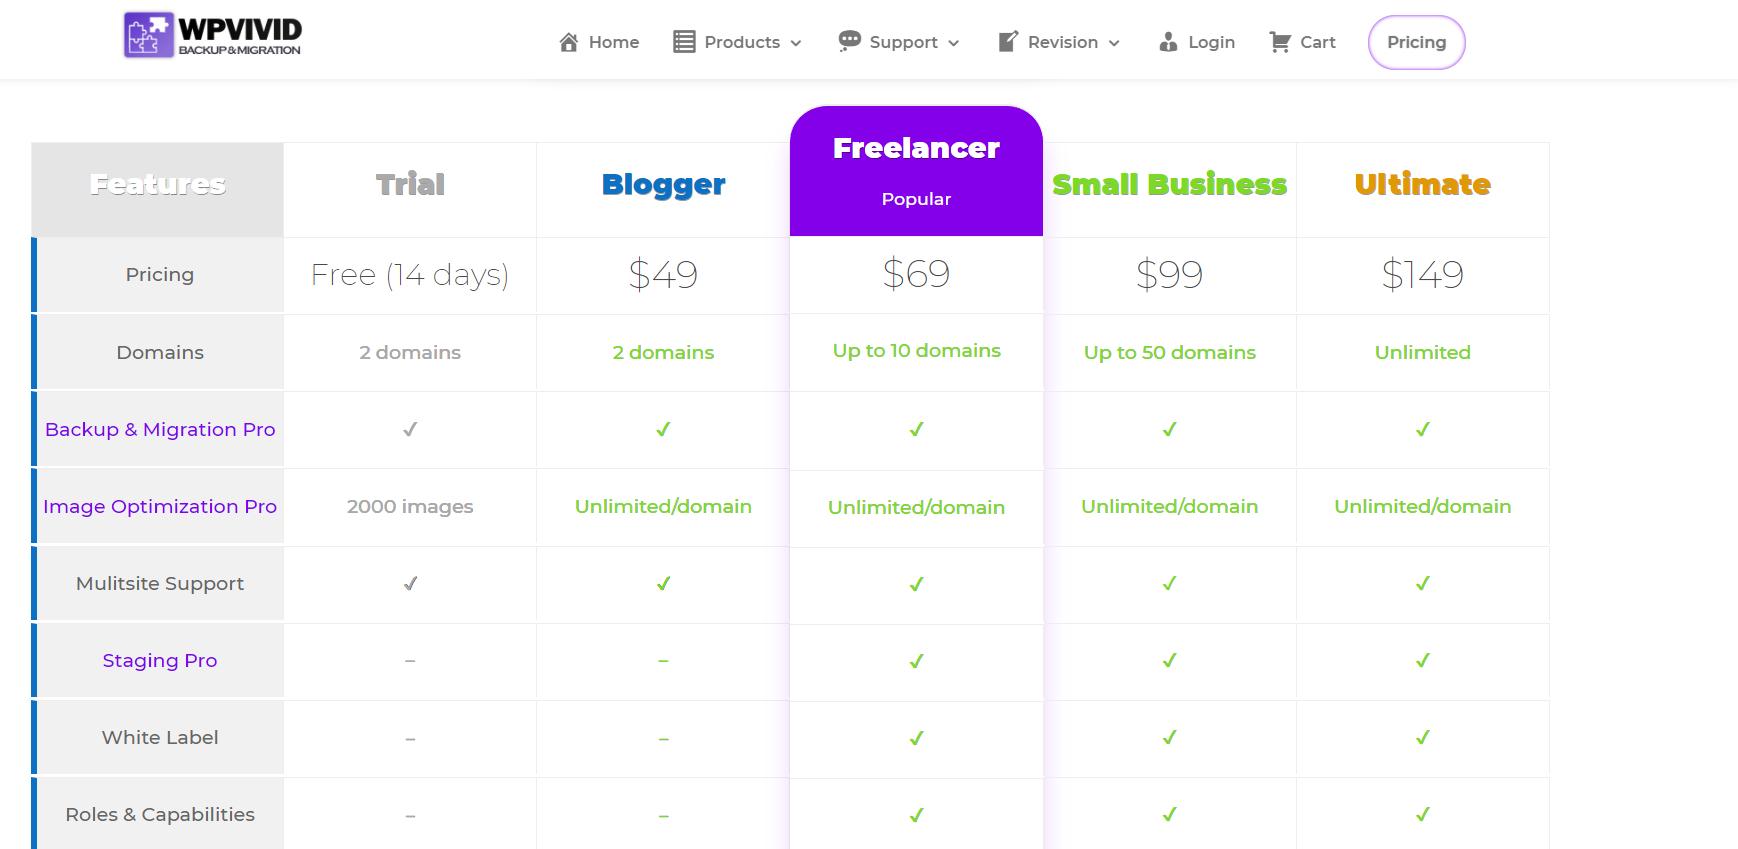
In this comparison, we will be looking at the free version of UpdraftPlus and WP Vivid. There are several premium packages of UpdraftPlus and Vivid also available, offering similar services and features for similar prices.

Features

Both UpdraftPlus and WP Vivid offer many of the same features, including the following:

  • Easy to backup your site at the press of a button
  • WordPress site Migration – Copy your WordPress site and migrate it to a new domain.
  • Staging sites – Both UpdraftPlus and WP Vivid allow you to create a clone of your site in order to create a staging site in which to test updates, new plugins etc.
  • Backup schedule – Select how often you wish to backup your WordPress site and how many copies you wish to keep with this feature that is available in both plugins.
  • Remote storage option – Both UpdraftPlus and WP Vivid allow you to choose from a selection of personal remote storage options.
  • Simple restore with a single click – Just go to your backup and press restore. Both plugins will then restore your site.

Remote storage options

With the free version of UpdraftPlus and WP Vivid, you can either save it to the localhost – which saves your backup files to the same server your website is hosted on, or you can save it to a remote storage location. This gives the user an extra level of security, peace of mind and space needed for larger websites. 

UpdraftPlus remote storage options

  • UpdraftPlus Vault
  • DropBox
  • Google Drive
  • Amazon S3
  • Dream Objects
  • OpenStack Swift
  • Rackspace
  • SFTP, FTP and Email.

WP Vivid remote storage options

  • Dropbox
  • Google Drive
  • Microsoft OneDrive
  • Amazon S3, 
  • DigitalOcean Spaces

As can be seen from the list above, UpdraftPlus gives users a more comprehensive list of backup options for the free version of the plugin. UpdraftPlus will also allow users to backup to their own email address. This is a feature that many users have found particularly useful, as it allows them to keep track of their backup records.

Conclusion

UpdraftPlus and WP Vivid are very similar backup plugin options and offer broadly the same kind of services and features. However, for extra peace of mind, confidence in a long standing market leader and a wider range of remote storage backup options, UpdraftPlus should be your first choice as your backup plugin.

UpdraftPlus allows you to easily, quickly and safely backup your website to the remote storage location of your choice and restore in just a press of a button. Download UpdraftPlus today and backup your WordPress site. 

Be sure to check out all of our WordPress backup comparison pages:

UpdraftPlus vs. BackupWordPress comparison
UpdraftPlus vs. BackupBuddy comparison
UpdraftPlus vs. Akeeba comparison
UpdraftPlus vs. Jetpack comparison 

Get it from WordPress.Org UpdraftPlus.Com
Buy It Now!
Basic – Private website
Backup WordPress files and database
Translated into over 16 languages
Restore from backup
Backup to remote storage
Dropbox, Google Drive, FTP, S3, Rackspace, Email
Incremental Backups
Free 1Gb for UpdraftVault
WebDAV, Microsoft OneDrive, Google Cloud, Microsoft Azure, SFTP/SCP, encrypted FTP, BackBlaze
Backup extra files and databases
Migrate / clone (i.e. copy) websites
Basic email reporting
Advanced reporting features
Automatic backup when updating WP/plugins/themes
Send backups to multiple remote destinations
Database encryption
Restore backups from other plugins
No advertising links on settings page
Scheduled backups
Fix backup time
Network/Multisite support
Lock settings access
Browse backup contents in WordPress
Download individual files from backup in WordPress
Personal support
Run from WP-CLI
Restore a backup from other plugins


The post UpdraftPlus vs WP Vivid Backup: Which is the best WordPress backup plugin? appeared first on UpdraftPlus. UpdraftPlus – Backup, restore and migration plugin for WordPress.
UpdraftPlus vs Jetpack: Which is the best WordPress backup plugin?

As backups are so important for anyone running a WordPress site, it is important that you make the right choice when it comes to choosing the right plugin. There are several available that can carry out a standard backup of your site, but which has the most features and offers the easiest, quickest and most user friendly option? In this blog, we are going to compare two of the most popular WordPress backup plugins: UpdraftPlus and VaultPress.

Before you pick any plugin, be it a backup plugin or an optimization plugin, It is important to check how highly rated they are within WordPress.org. By checking the reviews, rankings and active installs, it can give you a general representation of how well each plugin is perceived by the WordPress community. 

Currently, UpdraftPlus has over 3 million active installs, has a 5 star rating from 5,520 reviews and is constantly being updated. The Jetpack plugin (which includes the Jetpack backup feature being reviewed here) has over 5 million active installs and a 4 star rating from 1,665 reviews. While the Jetpack plugin has more installs, these are from a combined list of features and services it includes, such as malware scanning and site search. UpdraftPlus is a dedicated backup plugin (with many additional backup related features in it’s premium version – such as migration) and has a higher rating from over 3 times as many reviews.

In this comparison, we will be looking at the premium versions of UpdraftPlus and Jetpack, as there is no free version of Jetpack backup available. There is a free version of UpdraftPlus however, which will backup your WordPress site and do pretty much everything you need your backup plugin to do.

While Jetpack appears to be the more cost effective option for a basic package, users should remember that they are paying for the basic backup option – and nothing else. Buying a premium version of Jetpack can turn out to be a lot more expensive in the long term, due to higher recurring costs. With UpdraftPlus, you can backup 2, 10, 35 or unlimited sites, depending on which premium package you buy. However with Jetpack, you have to buy a new version of the premium plugin for each individual site, making UpdraftPlus the far more cost effective option for users that have more than one site.

Backup file analysis 

Keeping your backup file safe and secure is arguably the most important factor of any backup plugin. Without your backup file to restore from, there is little point in having a backup plugin on your site. One of the biggest issues found in this review is that Jetpack will only store your website backup file for 30 days on the basic plan, on their personal servers – giving users no option to automatically save the file to a personal remote storage location. 

As such, if you forget to carry out a backup of your site after 31 days and then attempt to restore your site from your Jetpack backup – you will find that your backup file has been deleted from the Jetpack servers. As you are unable to restore, you would be left with no other option other than having to rebuild your entire site again from scratch. 

UpdraftPlus gives users the option of saving their backups to their personal remote storage location such as Google Drive or DropBox, as well as to the dedicated UpdraftPlus remote storage UpdraftVault. Many users prefer to keep their backups in their personal remote storage location, as it removes any potential issues that could be faced down the line, such as Jetpack’s servers being hacked or your data accidentally removed or deleted. Jetpack does not offer any kind of remote storage location option, even with the most expensive premium option; forcing users to backup their site on unknown servers. This makes it harder for users to really feel like their backups are their property or that they have full control and ownership over them. You can download your backup file from Jetpack and manually upload it to your remote storage location yourself, but remembering to do that every time there is an automatic backup is something not many people will do. 

While Jetpack Premium backup offers just the basic backup option, UpdraftPlus Premium not only offers a backup option, but also the incredible useful following features:

  • Incremental backups
  • Multiple storage destinations
  • Automatic backup before updates
  • Migrator
  • WP-CLI integration
  • Importer
  • Enhanced reporting
  • No adverts
  • Fix backup time
  • More files
  • More database options
  • Multisite/network
  • WebDAV
  • Microsoft OneDrive, SFTP/FTPS/SCP, enhanced support for Dropbox (sub-folders), Rackspace, Cloud Files, Amazon S3 (Standard and Standard – Infrequent Access Storage classes) and Google Drive (sub-folders)
  • Free storage a year’s 1GB subscription to UpdraftVault, our own remote storage product
  • Free tokens for UpdraftClone. Allows you to create a cloned test site instantly and directly 

Backup test

When running a test backup using Jetpack, the process removed you from the home page and took you to Jetpack’s dedicated external dashboard. This requires you to navigate back to your own site, causing delays in the time needed to complete a simple task. The dashboard for UpdraftPlus however is located within your WordPress site, so you don’t have to risk getting logged out and having to re-access the WordPress backend.

Restoring your site with Jetpack is a drawn out, complicated and confusing process. Users are required to provide their website’s SSH, SFTP or FTP server credentials in order to restore. For the vast majority of WordPress users, these requests will be difficult to follow. If a user is upset and stressed about their site getting hacked or crash due to a bad plugin or theme, the last thing they need is to fill out a complicated form requesting credentials that the majority of users will have no knowledge of. 

Should the worst happen, you will of course want to restore your site as quickly as possible and in a press of a button. With UpdraftPlus, you can do just that. Just select which backup file you want to restore, press the restore button and you’re done. There is no need for you to enter any complicated questions regarding your site’s credentials. Just log in to your UpdraftPlus account and your backups will be ready to restore.

Conclusion

While Jetpack backup does offer a safe and secure backup plugin option, it can only really be recommended if you need the full Jetpack package and are making use of other features such as social media promotion, Elastic search and CRM Entrepreneur. Most users however will want a quick, easy to use and reliable backup plugin that allows you to store your backup file in the location of your choice for extra security. Additional features such as scheduled backup can make all the difference, as users can just set it to back up every 12 hours or every week and forget about it. 

One of the most important factors to remember is how easy it is to restore your site, should you need to. With UpdraftPlus, you can do this with just a press of a button. With Jetpack, you will be forced to go through a complicated setup process and will require specialist knowledge that most users will not have. 

The post UpdraftPlus vs Jetpack: Which is the best WordPress backup plugin? appeared first on UpdraftPlus. UpdraftPlus – Backup, restore and migration plugin for WordPress.

How to backup your WordPress site in one minute


Backing up your WordPress site is probably the most important decision you can make when working on your WordPress site. Just one bad plugin or theme update can take down your entire site. Without a secure and recent backup, you could find yourself having to start again from square one.

With UpdraftPlus, you can backup your site in just 1 minute. The process is easy to do and can be set up, so that once you have set it up the first time, you can just leave it running and it will backup by itself according to your schedule. 

For a step by step written instructions, check out the following guide: https://updraftplus.com/how-to-backup-a-wordpress-site-step-by-step-guide/

For anyone that is looking to protect your site from hacking, issues with updates to your plugins or themes, server issues or malicious actors – then a WordPress backup plugin is one of the most important moves you can make for your WordPress site. 

UpdraftPlus is the world’s most popular and trusted WordPress backup and restore plugin. While the free version of UpdraftPlus will do most of what you need to backup your site, it is a good idea to upgrade to UpdraftPlus Premium, as it offers extra features and functionality including:

  • The ability to clone your site so you can carry out updates in a testing environment
  • Schedule backups at specific times of the day to take advantage of when fewer people are on your site
  • Multiple storage destinations for extra safety
  • Detailed reports of your backups
  • Password protection for your UpdraftPlus backups to keep other administrators out
  • Automatic backups before updating WordPress core, themes and plugins

Install UpdraftPlus today and backup your site, safe in the knowledge that should the worst happen, you can restore your site in just a few minutes.

The post How to backup your WordPress site in one minute appeared first on UpdraftPlus. UpdraftPlus – Backup, restore and migration plugin for WordPress.

How to fix unable to access WordPress admin dashboard

The WordPress admin dashboard is the control center for your WordPress website. Everything you do on-site runs through this. The admin dashboard can be used to access and make design changes, add plugins, enable extra features, create written content, add/remove users and assign roles and change functionality. 

With all of these options available, there are a few different elements of a WordPress site that can occasionally cause admin access issues, including to the all important admin dashboard. Being unable to access it can be a nerve-wracking experience, particularly if you’re new to WordPress and need to make quick updates to your site. 

There are several steps you can take before you may need to escalate the matter to WordPress support. What these steps are will depend on why you’re locked out of your admin dashboard. You can find out more in the blog below.  

Why are you locked out?

Some of the most common reasons for being locked out of the WordPress admin dashboard are simple to resolve. These issues could arise through human error or via a WordPress auto-update. These could include:

  • A lost password (and password recovery doesn’t work).
  • Too many login attempts. You’ve entered an incorrect password too many times and your security features have disabled further logins.
  • “Error establishing database connection”. WordPress uses a database server called MySQL. If you see this message across your dashboard pages, there may be an error with the database and its connection.
  • Lost administrator access. You may not be locked out of your admin dashboard, but you will still be unable to use functions that require administrator access.
  • The ‘White Screen of Death’. A blank screen. This is usually caused by something that affects the storage and memory of your site. For example, a plug-in may be causing the issue.
  • “This has been disabled”. This happens when you’re using the wrong admin address for your dashboard. Usually, you’ll have a custom login URL to help prevent fraud or hacks that you’ll need to use.
  • Numerical errors. Common examples include ‘404 not found’, ‘401 not authorized’, and ‘403 forbidden’. This is usually to do with permissions and access authorization. 

Keep up to date with your team to make sure everyone has the file permissions they need. There are plenty of ways to keep in touch, for example, by free web conferencing or email. 

How to solve the problem

Most WordPress admin dashboard problems have a simple solution. Take the time to work methodically through the problem to reach a positive outcome. 

1. Lost password

The easiest way of getting around this problem is to reset your password using your login email. All you need to do is click ‘reset password’. 

However, this may not work if the email does not arrive in your inbox or you don’t have access to your original login email anymore. If this happens, you need to head over to ‘phpMyAdmin’. To find this, go to your hosting platform and navigate to where the site manager is. 

After you’ve done this, click on the WordPress database you need to manage. Locate your ‘wp_users’ table and click on ‘browse’ until you find your admin username. Under this username, locate the ‘user_pass’ key. Set the format of ‘user_pass’ to ‘md5’ and ’type in your new password, remembering to save it. 

2. Too many login attempts

To gain access to your site after too many login attempts, you’ll need to disable your security plugins. To do this, go into your ‘File Transfer Protocol’ (FTP) server and locate your site files. Next, find your content folder and then the file containing your plugins. 

Your content folder is most likely called ‘wp-content’. To disable the plugin, you need to rename it. Save these changes and exit. You should now be able to get into your admin dashboard again. 

Don’t forget to enable the plugin again once you’ve logged in if you want to continue using it. Security plugins are useful for protecting your site from interference and to protect customer data

3. “Error establishing database connection”

These types of errors are typically caused by a server issue or incorrect site credentials. For WordPress to connect to your website’s database, it needs to know your database username, password, name and server. If you’ve recently updated any of these, WordPress may be trying to access the database with incorrect credentials. 

To fix this, use your FTP client to locate your configuration file. It should be labeled ‘wp-config.php’. You can edit this file by right-clicking on it. This will take you to MySQL settings, where you will need to update your information and save it. 

This should give you access to your dashboard again. If it fails to help, contact your host to see if the database is down. It might be that the error is on their end, in which case you’ll need to wait for it to be repaired.

4. Lost administrator access

To restore admin privileges, you’ll need to add a new user and assign administrator access. You’ll be using ‘phpMyAdmin’ again for this. Select your site’s name from the database and head to the ‘wp_users’ table and click ‘insert’. You’ll then be asked to fill out the following form:

  • ID: A unique number not already assigned to another site user. You can choose this.
  • user_login: Your new username.
  • user_pass: New user password. (remember to set the format for this to ‘md5’)
  • user_nickname: A shortened name for the system to assign to you.
  • user_email: Account email address.
  • user_url: Site URL.
  • user_registered: The current date.
  • user_status: Enter ‘0’.
  • display_name: Your chosen display name for this site.

Next, go to the ‘wp_usermeta’ table and press ‘insert’. You’ll be asked to complete the following:

  • unmeta_id: leave blank.
  • user_id: Your new user ID from the previous form.
  • meta_key: Enter “wp_capabilities”.
  • meta_value: Type “a:1:{s:13:”administrator”;b:1;}”.

Click ‘go’ and then fill in this form. 

  • unmeta_id: Leave blank.
  • user_id: Your new ID number from the previous form.
  • meta_key: Type “wp_user_level”.
  • meta_value: Set to “10”.

You should now be able to access the site as an administrator. 

5. Blank screen

Several things could be causing this issue, but plugins are often the culprit. For example, if you are trying to make changes to your hosted contact center site for your business, you may find plugins designed to make it easier for customers to contact you are badly coded.

The first thing you should try here is to disable your site’s plugins in order to find the culprit. To do this, go into your FTP and locate your plugin file. The guide to where to find this is outlined under ‘too many login attempts’.

Instead of renaming each plugin individually, rename the whole folder so WordPress can’t recognize the contents. You should then be able to log in to your account without a problem. 

Remember to re-enable all necessary plugins later. 

6. “This Has Been Disabled”

This error message usually arises due to WordPress security efforts. There are two ways you can go about fixing this issue. 

Firstly, try disabling your security plugin as outlined previously. This may prevent your security features from accidentally preventing your genuine login. 

Secondly, check your WordPress login URL. WordPress sometimes changes the generic login URL to a custom URL for each client to prevent fraud or hacking. Check you aren’t using the generic URL when a custom one has been generated for you. 

7. Numerical errors

How you resolve this will depend on which error message you are getting. Errors you might see (and how to fix them) include:

    • 404 not found. This means you may have accidentally made an error when changing your site address. To correct this, you’ll need to connect your WordPress account to a File Transfer Protocol (FTP) client and head to the ‘your themes’ folder. You’ll find a functions.php folder, in which you can edit the code as needed. 
    • 403 forbidden. This error arises due to an incorrect security configuration, either on your server or with the file permissions. To correct this, contact your site host to check whether you have the correct file permissions to access the site. You can also try disabling plugins to see whether the issue is caused by a security plugin error. 
  • 401 not authorized. As with many WordPress errors, this one can be solved by disabling the security plugin. If you have password protection on your WordPress files, this could also be causing the error. Try using your host server to remove this protection. 

Final thoughts

Make sure you regularly backup your WordPress data using the world’s most popular and highly rated WordPress plugin – UpdraftPlus.

If you can’t access your admin dashboard even after following these processes, contact your IT department or WordPress help for more information and support. 

The post How to fix unable to access WordPress admin dashboard appeared first on UpdraftPlus. UpdraftPlus – Backup, restore and migration plugin for WordPress.
How to move your WordPress site using UpdraftPlus Migrator without losing Google ranking

There are many reasons why someone would want to migrate their WordPress website, running from trouble with your hosting company, a name change for your business or a new and better branding approach.

When you are ready to migrate your website, the last thing you want is to lose all the valuable Google ranking work you have done in the process. Losing your Google ranking would undo all the progress you may have made up until that point. The good news is that there are steps you can take to avoid losing your place on search engines due to a website migration – in this article, we will walk you through each of those steps using Updraft Migrator, to ensure you do not lose all the ranking work you have done so far. 

It is crucial that you pay close attention to the steps below, as even the slightest mistake when transferring a website can have significant consequences. 

Things to note before you begin the site transfer

Turn off any proxies 

Before beginning your website migration process, you should turn off all proxies that are between you and your site. Proxies such as Cloudflare, Pmsproxy, Opera Turbo/Off-road mode, GoDaddy’s “Preview DNS” proxy, etc., should be disabled until after the migration is complete.  

Ensure you are migrating to equivalent sites 

UpdraftPlus migrator tool is designed to migrate between equivalent sites. As such, if you are using a WordPress Multisite Network, then you would need to ensure the source and destination domains are set up as networks. 

Disable caching 

Turn off all caching and minifying plugins before you begin the migration process as they can be a cause of migration problems. 

Setup backup settings 

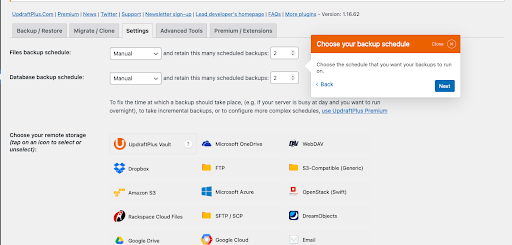
Before using UpdraftPlus for the first time, you may want to visit the settings tab on the UpdraftPlus dashboard. On this tab you can choose your backup schedule, backup location, and what files to include in the backup process. 

Here you can choose how frequently you want your files or database to be backed up. File backup frequency ranges from hourly to monthly, while database frequency ranges from every 2 hours to monthly. Similarly, you can decide where you want to store your backup files and choose between storing them on your server, offline or third-party cloud services. 

How to migrate a WordPress website using UpdraftPlus

WordPress consists of files and database tables; if you move the files, you have moved the site. The following steps describe the processes you can use to transfer these files and database. To use the Migrator tool on UpdraftPlus, you first need to upgrade to the UpdraftPlus Premium package or buy the Updraft Migrator add-on

Note: for the purpose of this blog, ‘source site’ will refer to your original domain, and ‘destination site’ will refer to the site you are migrating to. 

Install UpdraftPlus 

To migrate your site, first install the UpdraftPlus Premium WordPress backup plugin on both the source and destination websites. To do this, follow our installation guide and video that will take you through all the necessary steps.

Backup your source domain 

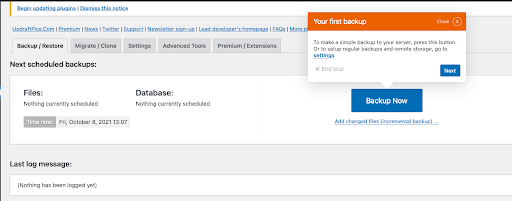
After activating the UpdraftPlus plugin, on the backup/restore tab of the plugin page, click the backup now button to backup the files on your website. 

Copy the source website 

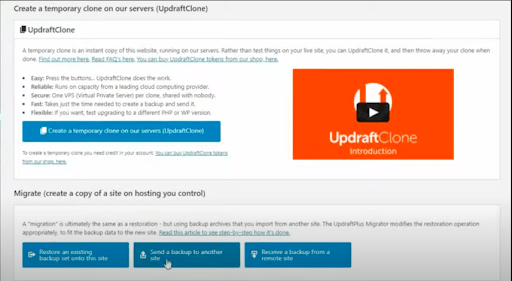
Click on the UpdraftPlus migrate/clone tab to copy the files and database of your source website. Scroll down and click on the “send a backup to another site” option. 

Clicking on the “send a backup to another site” button brings up a dialogue box for you to provide a “site key” for the destination website. 

Generate site key from the destination site 

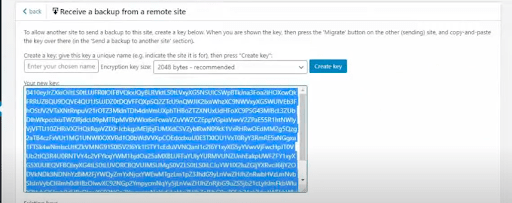
To get the site key, open the migrate/clone tab of the UpdraftPlus plugin on your destination site, select the “receive a backup from a remote site” option, and click on the “create key” button. 

Clicking “create key” will generate a unique code for your destination website. Highlight and copy the code. 

Note: you may want to change the key name to something memorable. 

Upload site key to the source website 

On the source site, click on the “add site” button and a dialogue box will appear for you to add the destination site key. Click in the box to add the site key, and then click on the add site button to the side of the box to add your destination site. 

After you add your destination site, click on the send button to send a copy of your primary site. 

Ensure you select every aspect of the source website that you intend to copy. You will find options such as themes, plugins, database, etc. To migrate the entire website, be sure to tick all the boxes. 

Finally, click on the send button to complete the cloning process. 

Restore backup files on your destination site 

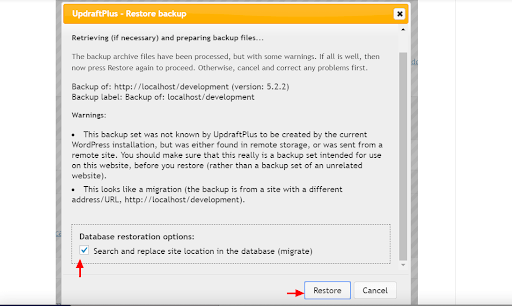
On the backup/restore tab of your UpdraftPlus plugin, you should now find the backup file. Click on restore and select all the check-boxes to complete the website transfer. Remember, for a full site migration you must tick ALL the boxes. 

UpdraftPlus provides the option of automatically converting all the URLs to that of the new domain. This can be done by ticking the “Search and Replace site location in the database” option.

Note: To see the changes after moving your website, you would have to log out and log back into your destination site. After this, you can check and see your source site as “cloned successfully.”

How to migrate your domain without losing Google ranking 

As you could see in the steps above, it is quick and easy to transfer your site using UpdraftPlus Migrator and can only take a couple of minutes. But believe it or not, that is the easy part. 

Being careful enough to ensure there is no long-term negative effect on your search engine rankings and user experience requires extra steps. Here are the things you should do to prevent negative results after a website migration. 

Update your website URL 

After migrating a website to a different domain, you would need to update the website URL and domain name. If the file transfer is within the same domain, you may not need to worry about that, however it is good practice to check that the URL is correct. 

To do this, navigate to WordPress Settings on your site and click on General. Here you can replace the old domain with the new one, or confirm the domain is correct. UpdraftPlus migration also takes care of updating all the links within your destination site, so you do not have to check that internal links are still working properly.

Note: UpdraftPlus takes care of the URL and links, but it is still a good idea to double check. 

Use 301 redirects 

301 redirect helps to permanently redirect traffic from one website to another. They can be used to transfer over the full ranking power to your new destination address. Applying 301 redirect is crucial to save all the back-links to your previous domain. 

When you switch domains, you may still have significant traffic moving to the previous domain. But by using 301 redirect, all that traffic will be redirected to your new site. However, to do this, you have to ensure that you don’t delete the old website. 

Update Google search console and Analytics

To save your rankings, it is crucial that you inform Google of the recent changes. This means that you have to inform Google of the website migration from your previous site to your new site by sending a request. 

Upon receipt of your request, Google will verify your new domain, and then ask for redirects to help preserve your site authority and exposure. Next, add the new domain as a property on Google Analytics to continue tracking traffic. 

Submit sitemap

After updating your new domain on Google search console, you would need to update the sitemap to allow proper indexing of the pages on your new website. Doing this will help your website to be crawled quicker by search engine bots. 

Pay attention to the details

Don’t forget, the devil is in the details. Little errors and unchecked boxes can damage your SEO efforts. Remember small issues, such as optimizing the images on your website and ensuring you have double checked basic SEO requirements before submitting your sitemap. 

Be sure to track and fix all 404 errors. 404 errors are as a result of deleted or removed pages. Google penalizes websites with too many 404 pages, so you need to make sure any 404 issues are resolved. 

Final thoughts 

After your website migration is complete, you may want to access the front-end of the destination website to check if everything is working properly. You should open as many pages as possible, make purchases, change options, Submit info on the contact page, click links etc. to make sure everything is working as intended. 

Even after following all the steps in this guide, you might notice a slight drop in traffic initially after the website migration. This is because the site’s new posts will be crawled under a new domain name with a low domain authority. However, this should only last a couple of days to a week if you follow the steps closely.

The post How to move your WordPress site using UpdraftPlus Migrator without losing Google ranking appeared first on UpdraftPlus. UpdraftPlus – Backup, restore and migration plugin for WordPress.