UpdraftPlus vs Jetpack: Which is the best WordPress backup plugin?

As backups are so important for anyone running a WordPress site, it is important that you make the right choice when it comes to choosing the right plugin. There are several available that can carry out a standard backup of your site, but which has the most features and offers the easiest, quickest and most user friendly option? In this blog, we are going to compare two of the most popular WordPress backup plugins: UpdraftPlus and VaultPress.

Before you pick any plugin, be it a backup plugin or an optimization plugin, It is important to check how highly rated they are within WordPress.org. By checking the reviews, rankings and active installs, it can give you a general representation of how well each plugin is perceived by the WordPress community. 

Currently, UpdraftPlus has over 3 million active installs, has a 5 star rating from 5,520 reviews and is constantly being updated. The Jetpack plugin (which includes the Jetpack backup feature being reviewed here) has over 5 million active installs and a 4 star rating from 1,665 reviews. While the Jetpack plugin has more installs, these are from a combined list of features and services it includes, such as malware scanning and site search. UpdraftPlus is a dedicated backup plugin (with many additional backup related features in it’s premium version – such as migration) and has a higher rating from over 3 times as many reviews.

In this comparison, we will be looking at the premium versions of UpdraftPlus and Jetpack, as there is no free version of Jetpack backup available. There is a free version of UpdraftPlus however, which will backup your WordPress site and do pretty much everything you need your backup plugin to do.

While Jetpack appears to be the more cost effective option for a basic package, users should remember that they are paying for the basic backup option – and nothing else. Buying a premium version of Jetpack can turn out to be a lot more expensive in the long term, due to higher recurring costs. With UpdraftPlus, you can backup 2, 10, 35 or unlimited sites, depending on which premium package you buy. However with Jetpack, you have to buy a new version of the premium plugin for each individual site, making UpdraftPlus the far more cost effective option for users that have more than one site.

Backup file analysis 

Keeping your backup file safe and secure is arguably the most important factor of any backup plugin. Without your backup file to restore from, there is little point in having a backup plugin on your site. One of the biggest issues found in this review is that Jetpack will only store your website backup file for 30 days on the basic plan, on their personal servers – giving users no option to automatically save the file to a personal remote storage location. 

As such, if you forget to carry out a backup of your site after 31 days and then attempt to restore your site from your Jetpack backup – you will find that your backup file has been deleted from the Jetpack servers. As you are unable to restore, you would be left with no other option other than having to rebuild your entire site again from scratch. 

UpdraftPlus gives users the option of saving their backups to their personal remote storage location such as Google Drive or DropBox, as well as to the dedicated UpdraftPlus remote storage UpdraftVault. Many users prefer to keep their backups in their personal remote storage location, as it removes any potential issues that could be faced down the line, such as Jetpack’s servers being hacked or your data accidentally removed or deleted. Jetpack does not offer any kind of remote storage location option, even with the most expensive premium option; forcing users to backup their site on unknown servers. This makes it harder for users to really feel like their backups are their property or that they have full control and ownership over them. You can download your backup file from Jetpack and manually upload it to your remote storage location yourself, but remembering to do that every time there is an automatic backup is something not many people will do. 

While Jetpack Premium backup offers just the basic backup option, UpdraftPlus Premium not only offers a backup option, but also the incredible useful following features:

  • Incremental backups
  • Multiple storage destinations
  • Automatic backup before updates
  • Migrator
  • WP-CLI integration
  • Importer
  • Enhanced reporting
  • No adverts
  • Fix backup time
  • More files
  • More database options
  • Multisite/network
  • WebDAV
  • Microsoft OneDrive, SFTP/FTPS/SCP, enhanced support for Dropbox (sub-folders), Rackspace, Cloud Files, Amazon S3 (Standard and Standard – Infrequent Access Storage classes) and Google Drive (sub-folders)
  • Free storage a year’s 1GB subscription to UpdraftVault, our own remote storage product
  • Free tokens for UpdraftClone. Allows you to create a cloned test site instantly and directly 

Backup test

When running a test backup using Jetpack, the process removed you from the home page and took you to Jetpack’s dedicated external dashboard. This requires you to navigate back to your own site, causing delays in the time needed to complete a simple task. The dashboard for UpdraftPlus however is located within your WordPress site, so you don’t have to risk getting logged out and having to re-access the WordPress backend.

Restoring your site with Jetpack is a drawn out, complicated and confusing process. Users are required to provide their website’s SSH, SFTP or FTP server credentials in order to restore. For the vast majority of WordPress users, these requests will be difficult to follow. If a user is upset and stressed about their site getting hacked or crash due to a bad plugin or theme, the last thing they need is to fill out a complicated form requesting credentials that the majority of users will have no knowledge of. 

Should the worst happen, you will of course want to restore your site as quickly as possible and in a press of a button. With UpdraftPlus, you can do just that. Just select which backup file you want to restore, press the restore button and you’re done. There is no need for you to enter any complicated questions regarding your site’s credentials. Just log in to your UpdraftPlus account and your backups will be ready to restore.

Conclusion

While Jetpack backup does offer a safe and secure backup plugin option, it can only really be recommended if you need the full Jetpack package and are making use of other features such as social media promotion, Elastic search and CRM Entrepreneur. Most users however will want a quick, easy to use and reliable backup plugin that allows you to store your backup file in the location of your choice for extra security. Additional features such as scheduled backup can make all the difference, as users can just set it to back up every 12 hours or every week and forget about it. 

One of the most important factors to remember is how easy it is to restore your site, should you need to. With UpdraftPlus, you can do this with just a press of a button. With Jetpack, you will be forced to go through a complicated setup process and will require specialist knowledge that most users will not have. 

The post UpdraftPlus vs Jetpack: Which is the best WordPress backup plugin? appeared first on UpdraftPlus. UpdraftPlus – Backup, restore and migration plugin for WordPress.

How to backup your WordPress site in one minute


Backing up your WordPress site is probably the most important decision you can make when working on your WordPress site. Just one bad plugin or theme update can take down your entire site. Without a secure and recent backup, you could find yourself having to start again from square one.

With UpdraftPlus, you can backup your site in just 1 minute. The process is easy to do and can be set up, so that once you have set it up the first time, you can just leave it running and it will backup by itself according to your schedule. 

For a step by step written instructions, check out the following guide: https://updraftplus.com/how-to-backup-a-wordpress-site-step-by-step-guide/

For anyone that is looking to protect your site from hacking, issues with updates to your plugins or themes, server issues or malicious actors – then a WordPress backup plugin is one of the most important moves you can make for your WordPress site. 

UpdraftPlus is the world’s most popular and trusted WordPress backup and restore plugin. While the free version of UpdraftPlus will do most of what you need to backup your site, it is a good idea to upgrade to UpdraftPlus Premium, as it offers extra features and functionality including:

  • The ability to clone your site so you can carry out updates in a testing environment
  • Schedule backups at specific times of the day to take advantage of when fewer people are on your site
  • Multiple storage destinations for extra safety
  • Detailed reports of your backups
  • Password protection for your UpdraftPlus backups to keep other administrators out
  • Automatic backups before updating WordPress core, themes and plugins

Install UpdraftPlus today and backup your site, safe in the knowledge that should the worst happen, you can restore your site in just a few minutes.

The post How to backup your WordPress site in one minute appeared first on UpdraftPlus. UpdraftPlus – Backup, restore and migration plugin for WordPress.
How to fix unable to access WordPress admin dashboard

The WordPress admin dashboard is the control center for your WordPress website. Everything you do on-site runs through this. The admin dashboard can be used to access and make design changes, add plugins, enable extra features, create written content, add/remove users and assign roles and change functionality. 

With all of these options available, there are a few different elements of a WordPress site that can occasionally cause admin access issues, including to the all important admin dashboard. Being unable to access it can be a nerve-wracking experience, particularly if you’re new to WordPress and need to make quick updates to your site. 

There are several steps you can take before you may need to escalate the matter to WordPress support. What these steps are will depend on why you’re locked out of your admin dashboard. You can find out more in the blog below.  

Why are you locked out?

Some of the most common reasons for being locked out of the WordPress admin dashboard are simple to resolve. These issues could arise through human error or via a WordPress auto-update. These could include:

  • A lost password (and password recovery doesn’t work).
  • Too many login attempts. You’ve entered an incorrect password too many times and your security features have disabled further logins.
  • “Error establishing database connection”. WordPress uses a database server called MySQL. If you see this message across your dashboard pages, there may be an error with the database and its connection.
  • Lost administrator access. You may not be locked out of your admin dashboard, but you will still be unable to use functions that require administrator access.
  • The ‘White Screen of Death’. A blank screen. This is usually caused by something that affects the storage and memory of your site. For example, a plug-in may be causing the issue.
  • “This has been disabled”. This happens when you’re using the wrong admin address for your dashboard. Usually, you’ll have a custom login URL to help prevent fraud or hacks that you’ll need to use.
  • Numerical errors. Common examples include ‘404 not found’, ‘401 not authorized’, and ‘403 forbidden’. This is usually to do with permissions and access authorization. 

Keep up to date with your team to make sure everyone has the file permissions they need. There are plenty of ways to keep in touch, for example, by free web conferencing or email. 

How to solve the problem

Most WordPress admin dashboard problems have a simple solution. Take the time to work methodically through the problem to reach a positive outcome. 

1. Lost password

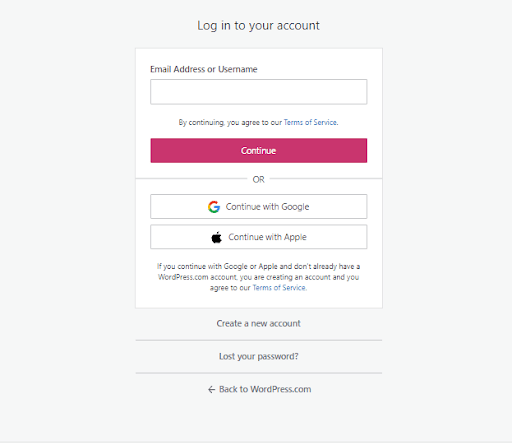
The easiest way of getting around this problem is to reset your password using your login email. All you need to do is click ‘reset password’. 

However, this may not work if the email does not arrive in your inbox or you don’t have access to your original login email anymore. If this happens, you need to head over to ‘phpMyAdmin’. To find this, go to your hosting platform and navigate to where the site manager is. 

After you’ve done this, click on the WordPress database you need to manage. Locate your ‘wp_users’ table and click on ‘browse’ until you find your admin username. Under this username, locate the ‘user_pass’ key. Set the format of ‘user_pass’ to ‘md5’ and ’type in your new password, remembering to save it. 

2. Too many login attempts

To gain access to your site after too many login attempts, you’ll need to disable your security plugins. To do this, go into your ‘File Transfer Protocol’ (FTP) server and locate your site files. Next, find your content folder and then the file containing your plugins. 

Your content folder is most likely called ‘wp-content’. To disable the plugin, you need to rename it. Save these changes and exit. You should now be able to get into your admin dashboard again. 

Don’t forget to enable the plugin again once you’ve logged in if you want to continue using it. Security plugins are useful for protecting your site from interference and to protect customer data

3. “Error establishing database connection”

These types of errors are typically caused by a server issue or incorrect site credentials. For WordPress to connect to your website’s database, it needs to know your database username, password, name and server. If you’ve recently updated any of these, WordPress may be trying to access the database with incorrect credentials. 

To fix this, use your FTP client to locate your configuration file. It should be labeled ‘wp-config.php’. You can edit this file by right-clicking on it. This will take you to MySQL settings, where you will need to update your information and save it. 

This should give you access to your dashboard again. If it fails to help, contact your host to see if the database is down. It might be that the error is on their end, in which case you’ll need to wait for it to be repaired.

4. Lost administrator access

To restore admin privileges, you’ll need to add a new user and assign administrator access. You’ll be using ‘phpMyAdmin’ again for this. Select your site’s name from the database and head to the ‘wp_users’ table and click ‘insert’. You’ll then be asked to fill out the following form:

  • ID: A unique number not already assigned to another site user. You can choose this.
  • user_login: Your new username.
  • user_pass: New user password. (remember to set the format for this to ‘md5’)
  • user_nickname: A shortened name for the system to assign to you.
  • user_email: Account email address.
  • user_url: Site URL.
  • user_registered: The current date.
  • user_status: Enter ‘0’.
  • display_name: Your chosen display name for this site.

Next, go to the ‘wp_usermeta’ table and press ‘insert’. You’ll be asked to complete the following:

  • unmeta_id: leave blank.
  • user_id: Your new user ID from the previous form.
  • meta_key: Enter “wp_capabilities”.
  • meta_value: Type “a:1:{s:13:”administrator”;b:1;}”.

Click ‘go’ and then fill in this form. 

  • unmeta_id: Leave blank.
  • user_id: Your new ID number from the previous form.
  • meta_key: Type “wp_user_level”.
  • meta_value: Set to “10”.

You should now be able to access the site as an administrator. 

5. Blank screen

Several things could be causing this issue, but plugins are often the culprit. For example, if you are trying to make changes to your hosted contact center site for your business, you may find plugins designed to make it easier for customers to contact you are badly coded.

The first thing you should try here is to disable your site’s plugins in order to find the culprit. To do this, go into your FTP and locate your plugin file. The guide to where to find this is outlined under ‘too many login attempts’.

Instead of renaming each plugin individually, rename the whole folder so WordPress can’t recognize the contents. You should then be able to log in to your account without a problem. 

Remember to re-enable all necessary plugins later. 

6. “This Has Been Disabled”

This error message usually arises due to WordPress security efforts. There are two ways you can go about fixing this issue. 

Firstly, try disabling your security plugin as outlined previously. This may prevent your security features from accidentally preventing your genuine login. 

Secondly, check your WordPress login URL. WordPress sometimes changes the generic login URL to a custom URL for each client to prevent fraud or hacking. Check you aren’t using the generic URL when a custom one has been generated for you. 

7. Numerical errors

How you resolve this will depend on which error message you are getting. Errors you might see (and how to fix them) include:

    • 404 not found. This means you may have accidentally made an error when changing your site address. To correct this, you’ll need to connect your WordPress account to a File Transfer Protocol (FTP) client and head to the ‘your themes’ folder. You’ll find a functions.php folder, in which you can edit the code as needed. 
    • 403 forbidden. This error arises due to an incorrect security configuration, either on your server or with the file permissions. To correct this, contact your site host to check whether you have the correct file permissions to access the site. You can also try disabling plugins to see whether the issue is caused by a security plugin error. 
  • 401 not authorized. As with many WordPress errors, this one can be solved by disabling the security plugin. If you have password protection on your WordPress files, this could also be causing the error. Try using your host server to remove this protection. 

Final thoughts

Make sure you regularly backup your WordPress data using the world’s most popular and highly rated WordPress plugin – UpdraftPlus.

If you can’t access your admin dashboard even after following these processes, contact your IT department or WordPress help for more information and support. 

The post How to fix unable to access WordPress admin dashboard appeared first on UpdraftPlus. UpdraftPlus – Backup, restore and migration plugin for WordPress.
How to move your WordPress site using UpdraftPlus Migrator without losing Google ranking

There are many reasons why someone would want to migrate their WordPress website, running from trouble with your hosting company, a name change for your business or a new and better branding approach.

When you are ready to migrate your website, the last thing you want is to lose all the valuable Google ranking work you have done in the process. Losing your Google ranking would undo all the progress you may have made up until that point. The good news is that there are steps you can take to avoid losing your place on search engines due to a website migration – in this article, we will walk you through each of those steps using Updraft Migrator, to ensure you do not lose all the ranking work you have done so far. 

It is crucial that you pay close attention to the steps below, as even the slightest mistake when transferring a website can have significant consequences. 

Things to note before you begin the site transfer

Turn off any proxies 

Before beginning your website migration process, you should turn off all proxies that are between you and your site. Proxies such as Cloudflare, Pmsproxy, Opera Turbo/Off-road mode, GoDaddy’s “Preview DNS” proxy, etc., should be disabled until after the migration is complete.  

Ensure you are migrating to equivalent sites 

UpdraftPlus migrator tool is designed to migrate between equivalent sites. As such, if you are using a WordPress Multisite Network, then you would need to ensure the source and destination domains are set up as networks. 

Disable caching 

Turn off all caching and minifying plugins before you begin the migration process as they can be a cause of migration problems. 

Setup backup settings 

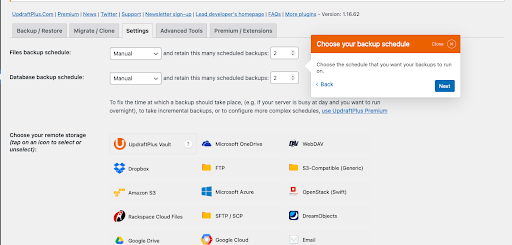
Before using UpdraftPlus for the first time, you may want to visit the settings tab on the UpdraftPlus dashboard. On this tab you can choose your backup schedule, backup location, and what files to include in the backup process. 

Here you can choose how frequently you want your files or database to be backed up. File backup frequency ranges from hourly to monthly, while database frequency ranges from every 2 hours to monthly. Similarly, you can decide where you want to store your backup files and choose between storing them on your server, offline or third-party cloud services. 

How to migrate a WordPress website using UpdraftPlus

WordPress consists of files and database tables; if you move the files, you have moved the site. The following steps describe the processes you can use to transfer these files and database. To use the Migrator tool on UpdraftPlus, you first need to upgrade to the UpdraftPlus Premium package or buy the Updraft Migrator add-on

Note: for the purpose of this blog, ‘source site’ will refer to your original domain, and ‘destination site’ will refer to the site you are migrating to. 

Install UpdraftPlus 

To migrate your site, first install the UpdraftPlus Premium WordPress backup plugin on both the source and destination websites. To do this, follow our installation guide and video that will take you through all the necessary steps.

Backup your source domain 

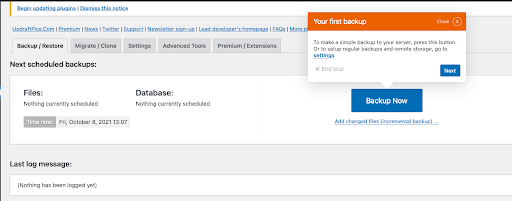
After activating the UpdraftPlus plugin, on the backup/restore tab of the plugin page, click the backup now button to backup the files on your website. 

Copy the source website 

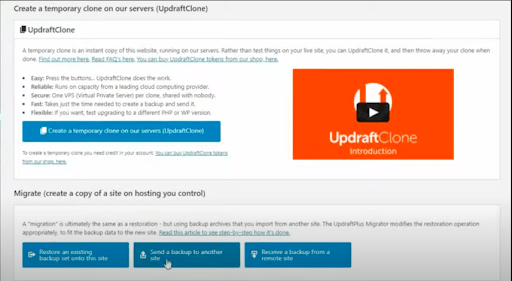
Click on the UpdraftPlus migrate/clone tab to copy the files and database of your source website. Scroll down and click on the “send a backup to another site” option. 

Clicking on the “send a backup to another site” button brings up a dialogue box for you to provide a “site key” for the destination website. 

Generate site key from the destination site 

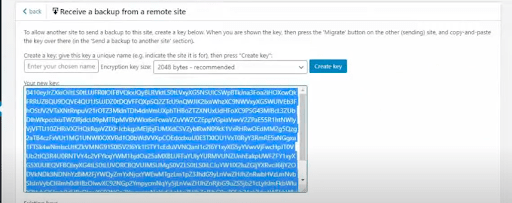
To get the site key, open the migrate/clone tab of the UpdraftPlus plugin on your destination site, select the “receive a backup from a remote site” option, and click on the “create key” button. 

Clicking “create key” will generate a unique code for your destination website. Highlight and copy the code. 

Note: you may want to change the key name to something memorable. 

Upload site key to the source website 

On the source site, click on the “add site” button and a dialogue box will appear for you to add the destination site key. Click in the box to add the site key, and then click on the add site button to the side of the box to add your destination site. 

After you add your destination site, click on the send button to send a copy of your primary site. 

Ensure you select every aspect of the source website that you intend to copy. You will find options such as themes, plugins, database, etc. To migrate the entire website, be sure to tick all the boxes. 

Finally, click on the send button to complete the cloning process. 

Restore backup files on your destination site 

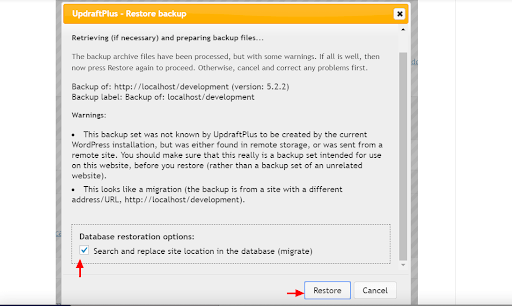
On the backup/restore tab of your UpdraftPlus plugin, you should now find the backup file. Click on restore and select all the check-boxes to complete the website transfer. Remember, for a full site migration you must tick ALL the boxes. 

UpdraftPlus provides the option of automatically converting all the URLs to that of the new domain. This can be done by ticking the “Search and Replace site location in the database” option.

Note: To see the changes after moving your website, you would have to log out and log back into your destination site. After this, you can check and see your source site as “cloned successfully.”

How to migrate your domain without losing Google ranking 

As you could see in the steps above, it is quick and easy to transfer your site using UpdraftPlus Migrator and can only take a couple of minutes. But believe it or not, that is the easy part. 

Being careful enough to ensure there is no long-term negative effect on your search engine rankings and user experience requires extra steps. Here are the things you should do to prevent negative results after a website migration. 

Update your website URL 

After migrating a website to a different domain, you would need to update the website URL and domain name. If the file transfer is within the same domain, you may not need to worry about that, however it is good practice to check that the URL is correct. 

To do this, navigate to WordPress Settings on your site and click on General. Here you can replace the old domain with the new one, or confirm the domain is correct. UpdraftPlus migration also takes care of updating all the links within your destination site, so you do not have to check that internal links are still working properly.

Note: UpdraftPlus takes care of the URL and links, but it is still a good idea to double check. 

Use 301 redirects 

301 redirect helps to permanently redirect traffic from one website to another. They can be used to transfer over the full ranking power to your new destination address. Applying 301 redirect is crucial to save all the back-links to your previous domain. 

When you switch domains, you may still have significant traffic moving to the previous domain. But by using 301 redirect, all that traffic will be redirected to your new site. However, to do this, you have to ensure that you don’t delete the old website. 

Update Google search console and Analytics

To save your rankings, it is crucial that you inform Google of the recent changes. This means that you have to inform Google of the website migration from your previous site to your new site by sending a request. 

Upon receipt of your request, Google will verify your new domain, and then ask for redirects to help preserve your site authority and exposure. Next, add the new domain as a property on Google Analytics to continue tracking traffic. 

Submit sitemap

After updating your new domain on Google search console, you would need to update the sitemap to allow proper indexing of the pages on your new website. Doing this will help your website to be crawled quicker by search engine bots. 

Pay attention to the details

Don’t forget, the devil is in the details. Little errors and unchecked boxes can damage your SEO efforts. Remember small issues, such as optimizing the images on your website and ensuring you have double checked basic SEO requirements before submitting your sitemap. 

Be sure to track and fix all 404 errors. 404 errors are as a result of deleted or removed pages. Google penalizes websites with too many 404 pages, so you need to make sure any 404 issues are resolved. 

Final thoughts 

After your website migration is complete, you may want to access the front-end of the destination website to check if everything is working properly. You should open as many pages as possible, make purchases, change options, Submit info on the contact page, click links etc. to make sure everything is working as intended. 

Even after following all the steps in this guide, you might notice a slight drop in traffic initially after the website migration. This is because the site’s new posts will be crawled under a new domain name with a low domain authority. However, this should only last a couple of days to a week if you follow the steps closely.

The post How to move your WordPress site using UpdraftPlus Migrator without losing Google ranking appeared first on UpdraftPlus. UpdraftPlus – Backup, restore and migration plugin for WordPress.
WordPress shortcode – Why you should use it

Want to add dynamic content very easily into your WordPress posts, pages, and sidebars? Adding shortcode can be the easiest and most suitable way to do just that and has the additional benefit that you can put it pretty much anywhere in your WordPress site.

There is no better way to add reusable features on your WordPress website than shortcodes, as you can use the same shortcode in a variety of different places and still get exactly the same result. While there are a range of default shortcodes you can choose from, some WordPress plugins also allow you to add new shortcodes to them as an added feature. 

In this blog, we will try to tell you everything you need to know about WordPress shortcodes, what the how, how they work, how to use them and hope you will learn all you need to know about from this guide. Let’s get started!

What is a Shortcode?

Shortcode is a portmanteau of the words ‘shortcut and code’. 

It is typically a small piece of code that can be identified and indicated by square [ ] brackets and is a code that when inserted into any page or post, generates a predefined specific functionality. 

For example, if you want to add a gallery, the following code can be added to any page or post within your WordPress site.

This will output a gallery with your site’s image IDs referenced within the code. As per the code, the gallery will have 4 columns and their max size will be ‘medium’ (as defined by WordPress).There are many more small shortcodes like this available in WordPress for outputting   different features and functionalities. Below, we will go through the different types of WordPress shortcode you can use on your WordPress site.

Types of shortcodes

WordPress offers two types of shortcode –

Self-closing shortcodes: These do not require a closing tag. For example, the gallery shortcode –

– does not need a closing tag.

Enclosing shortcodes: These types of shortcode do require closing tags. For example, the caption shortcode – 

–  is used to wrap captions around the contents.

Default WordPress shortcodes

Below are 6 default shortcodes offered by WordPress:

  • Audio: Embeds audio files and enables playback on your website. 
  • Caption: Helps to wrap captions around content. 
  • Embed: Allows you to set a maximum level for embedded items as well as set different attributes in your embeds.
  • Gallery: Adds a customizable image gallery to your site. You can use the features to customize what the gallery looks like or determine which image is used.
  • Playlist: You can create audio or video playlists with these self-enclosing shortcodes.
  • Video: Allows you to embed a video file and play it back. With this shortcode, you can embed videos in formats like MP4, WebM, M4V, OGV, WMV and Flv.

In addition to these default shortcodes, many WordPress plugins will offer custom shortcodes that you can use in the same way. 

How to use shortcodes in WordPress

Using shortcodes in WordPress should be a simple and straightforward process, although it does depend on where you want to add the shortcodes on your site. 

Using WordPress shortcodes in Pages and Posts

First, navigate to the respective page/post you want to add the shortcodes to and then access the editor. Now you need to click the add block button to add a shortcode block.

If you are using the Gutenberg editor, you can easily add shortcode tags to the shortcode block. After adding the shortcode block, simply paste your shortcode in the text box and you’re done. The functionality of the shortcode should now be visible on the published page.

Insert shortcodes in WordPress widgets

Inserting shortcodes into a WordPress widget should also be fairly straightforward and easy to do. The latest release of WordPress 5.8 comes with the Gutenberg Block based widget area built in, so now you can add & customize Gutenberg blocks in your widgets.

To start, go to Appearance>Widgets in your WordPress Dashboard. Here, you’ll find all the pre-made widgets based on your theme. Select the widget in which you want to add your shortcode and then find the Gutenberg shortcode block. Insert the shortcode into the block and click the ‘Save’ button once complete.

The task is now complete. You can now visit the respective page to see your shortcode in action.

Add a shortcode in WordPress theme files

We’ve already seen how shortcodes can be used inside WordPress posts/pages and widgets. WordPress made it simple to also add a shortcode inside a theme file as well. You can add the shortcode to any WordPress theme template following the below format.

How to create a custom shortcode in WordPressJust replace the your_shortcode with the shortcut of your choice and you should find it works exactly as intended. 

Creating a custom shortcode is all about technical and coding knowledge. It is also helpful if you should also have a solid understanding of why you need to create a custom shortcode and where you want to use it.

To create a custom shortcode, first open the backend file directory of your website. Next, navigate to wp-content > themes > youractivetheme > function.php file. You can now enter the required function for the shortcode and save it for further use. 

Below is an example in which you can see that we’ve created a custom shortcode in order to display our Twitter account on our WordPress website.

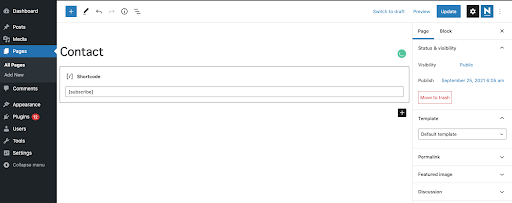
Next, we are going to add the shortcode to our website contact page using the Gutenberg Shortcode block.

Let’s see how this shortcode works in the front end.

Where to add your custom shortcode script

If you wish to add the custom shortcode to your theme file, they can be added to your theme’s functions.php file, or included in the plugin. If you decide to add them to the theme file, you can create a child theme and modify the code safe in the knowledge that you will have the original theme on hand, should you ever need to revert back.

If you are adding a new shortcode to a plugin on your WordPress site, it is recommended that you initialize it only once WordPress has finished completely loading. You can do this by wrapping the add_shortcode() function within another function by using a method called ‘the wrapper function’

By using the add-action() function hooks, the  ‘shortcodes_init’ shortcode has been instructed to only initialize once your WordPress site has completely finished loading by using the init hook.

Shortcodes vs Gutenberg Blocks

The operation of shortcode is actually quite similar to Gutenberg blocks, with the latter offering diverse customization options. Since Gutenberg’s arrival, usage and popularity of shortcodes have slightly decreased, with many popular WordPress plugins now coming up with dedicated Gutenberg blocks instead of shortcodes.

While you can still add shortcodes inside a dedicated Gutenberg block, blocks alone can achieve the objective of shortcodes and can do so in a more optimized way. 

If you find shortcodes useful, you may prefer WordPress blocks, as blocks can allow you to do the same thing in a more user-friendly way. It also allows users to add dynamic content to posts/pages with a more intuitive user interface, that shortcode is unable to do.

However, this does spell the complete end of the traditional shortcode as there are still some uses that have not yet been replaced by blocks. As such, you are likely to see the use of shortcodes continue into the near future.

The benefits and disadvantages of using shortcode

Benefits

  • Shortcodes make it easy to add complex features to a WordPress site with a single line of code.
  • Normally shortcodes are easier to create and set-up than the traditional HTML code or PHP scripts.
  • Eliminates the need to write complex scripts by automating the development workflow whenever you want to insert a specific feature.
  • Shortcodes are easily customizable, so that users can modify how the same shortcode will work out by changing its attribute options.
  • Can be inserted inside Plugins, so even if you update WordPress or change your theme, the shortcodes will not be lost and will continue to work as before.

Disadvantages

  • Not intuitive: Using multiple shortcodes on a single page and then customizing them can be a struggle.
  • Theme dependent: As soon as you change your theme, shortcodes can sometimes stop working with your new theme.
  • Can break HTML: Due to interoperability issues or conflicting tags, problems can sometimes occur. As such, you will need to have a backup plugin in place if you want to use them on your site.
  • Extra server load: Additional shortcodes may add load to your server. It is natural that as the number of shortcodes on your page/post increases, so does the load, which can lead your website to decrease in speed.

WordPress Shortcode Common FAQs

There are some questions about WordPress shortcodes that people often ask. Below is a brief overview of the common questions and their answers, which we have not discussed before.

Do shortcodes slow down WordPress?

Site speed is a huge issue in WordPress and using a lot of shortcodes on a single page or a site can slow your website down. So it’s better to use shortcodes only when needed, especially now that you have the option of using Gutenberg blocks.

Where are WordPress shortcodes stored?

WordPress shortcodes are usually placed on posts or pages. However, now that the widget section of WordPress also supports Gutenberg block editing, it is possible to use shortcodes almost anywhere on the website.

Is the shortcode HTML?

Yes, the shortcodes are HTML-based codes that can be integrated into a WordPress website.

Are there any “bad” aspects when using shortcodes?

As discussed above, if you use shortcodes in your theme and decide to change the theme, that particular shortcode will stop working. Otherwise, shortcodes are universal and not dependent on any other factors.

Does WordPress have built-in shortcodes?

Yes, WordPress does offer some shortcodes by default. For example, a gallery that can be added via the shortcode API.

How do I add a shortcode image in WordPress?

Firstly, go to the Page or Post you wish to work in. Then select the page or blog post where you want to add the shortcode. Click the ‘Add Shortcode’ button on the next screen. Select your preferred shortcode in the “Insert shortcode pop-up” box. Now you can create a shortcode image by clicking “Text and Image shortcode”.

Remember to back up your WordPress site before working on the shortcodes

Backup is the first level of security for any WordPress site. Every piece of content, post, comment and piece of valuable data you have on your site can be lost in a single second.

If you have ever worked on a WordPress site in the past, you will know that you can lose all of your data and work for any number of reasons. For example, sometimes your website may just crash due to incompatible software. Or maybe your site has been attacked with malware and cyber hacking, traffic overload or has suffered hardware failures. Another reason you can lose your data is if your content or customization has conflict with the WordPress core files, resulting in your site going down. As shortcode plays with codes, there will always be a chance of something unexpected happening (possibly a conflict of code with WordPress core files) that might bring your site to a standstill.

It’s not always possible to prevent such unfortunate events. However, what you can do is to be prepared on how you can get your site back and up and working again, even if something terrible does happen. Our suggestion? Protect your site from this ever-present threat, by using a tool that you can use is the top-notch WordPress backup plugin – UpdraftPlus.

UpdraftPlus provides an easy-to-use interface that makes it very simple to backup your WordPress site. You can save your backups directly to online storage locations, such as Dropbox or Google Drive. With UpdraftPlus, you can set an automatic backup schedule so you don’t even have to remember to back up. Just install, set up, and you are good to go.

Conclusion 

Shortcodes in WordPress were first introduced back to WordPress 2.5. In addition to the themes and plugins, shortcodes make it easy to customize your WordPress site. By using shortcode, it’s easy to implement and reuse certain features over and over again without the need for coding. Apart from the default WordPress shortcodes, third-party plugins can also come with shortcodes to make your WordPress journey easier. 

We hope this guide has helped you learn and discover WordPress shortcodes and help you add shortcodes to your site.

If you have any questions regarding this article, pleaselet us know in the comment section below.

The post WordPress shortcode – Why you should use it appeared first on UpdraftPlus. UpdraftPlus – Backup, restore and migration plugin for WordPress.
How to create a staging site/clone for WordPress with UpdraftClone


‘Let’s make it live in the staging environment first.’ 

As a developer, you may have heard this a lot; and if not – trust me, you will hear this a lot going forward.

So, what exactly is a staging server?

If you want to add new functionality or change a specific behavior of an existing live website, you need to first test it on a staging server. It’s like a test environment – where you can experiment without any risks – If everything works fine, then you are free to make the same changes on your production server in the knowledge that it will not have any kind of negative impact on your live site.

A staging server is a test server used to test a website in a ‘production-similar’ environment. This server is a completely safe way to add/change flow for your website, as since it’s just a testing server, it doesn’t matter if it reports any errors or the site completely crashes due to the changes you made. You can figure out where you went wrong, fix the errors and create a stable version of your site.

By using UpdraftClone, you can create a clone of your WordPress website instantly and from within the UpdraftPlus settings. But before choosing UpdraftClone, we will explain briefly why all WordPress site developers and owners should pick this option.

Why Choose UpdraftClone?

To run a staging site, you will require a separate server. In order to do this, you will first need to buy a website hosting package. The charges of website hosting vary depending on the type of host environment you decide to go with. Usually there are 4 types of hosting – Shared hosting, dedicated hosting, VPS hosting and managed WordPress hosting.

Shared hosting: On shared hosting, multiple websites are hosted together on a single physical web-server. The server resources are then shared among all hosted websites.

Dedicated hosting: A physical web server that is dedicated to a single website.

VPS hosting: Virtual private server(VPS) hosting copy dedicated server environments within a shared server. This option is quite popular as it is cheaper than dedicated hosting and provides better performance, reliability and security than shared hosting.

Managed WordPress hosting: This option provides powerful technological options for your WordPress site. This hosting option takes care of the backups, security checks, updating WordPress and much more.

You can purchase any one of the above hosting services to set up a staging site. Once you have a hosting server, you would then need to set the same environment as your live site server. By doing this, it ensures your site will not have any problem once your changes on the staging server are moved to the live server.

Upon setting up your ideal staging server environment, you will have to perform the following steps which will set up the staging version of your site. This will require a fair degree of technical knowledge to achieve.

  • Download files and database from the production server.
  • Upload files and database on the staging server.
  • Run a search/replace in the database matching your staging URL. You will need to replace all occurrences of live URL with a staging URL.

Note: To simplify this migration process, you can use the UpdraftMigrator. This option enables this process in a matter of minutes and is completed within the UpdraftPlus settings.

Even if you only need the hosting server for a day or two, you will usually have to pay a yearly fee at a minimum. For example, it is possible that you could complete all the changes you want to make to your test site in 2 or 3 days. However, you will have to pay for a whole year’s worth of hosting.

Instead of wasting lots of money on paying hosting fees that you will not use, you can use UpdraftClone instead for just the time frame you need it for. This can save you lots of extra time and money, making the whole process much more user friendly..

UpdraftClone will allow you to create a clone with the same configuration as the original site. You don’t need any advanced coding or technical knowledge to configure the staging site as it is all taken care of. UpdraftClone also uses a cloud-based VPS server, which is more reliable and efficient than other servers.

How to clone a site using UpdraftClone

UpdraftClone works on a token basis, which can be purchased in our store. You will need 1 token to generate a cloned version of yoursite for 24 hours. For each subsequent week, 1 additional token is required to keep the site live.

To start and set-up your clone, you can purchase 5 tokens for a 1 month package that will only cost users $12. Within this period, you can host your cloned staging site for a month and test/update any new flow/functionality to your website.

The process of cloning your WordPres site using UpdraftClone is straightforward and easy to do – even for those without expert knowledge of WordPress.

Once you have purchased your Clone tokens, login to the WordPress dashboard of your live site. Head over to the Settings >> UpdraftPlus Backups. Under the ‘Migrate/Clone’ tab, click on the ‘UpdraftClone’ button.

You will be presented with a form in which you will need to connect your UpdraftPlus account. You can connect it through your UpdraftPlus.com credentials or by using a UpdraftClone key.

To get an UpdraftClone key, login to UpdraftPlus.com.
Navigate to the My account >> UpdraftClone.

Click on the ‘Create keys’ button under the ‘UpdraftClone key management’.

Next, click on the ‘Show existing keys’ button and you will see a couple of keys created. You can use a single key to start cloning your site.

You can choose either option – UpdraftPlus credentials or UpdraftClone key – Just click on the ‘Connect’ button when ready.

On the next screen, all the default settings will display, much like the screenshot below. It also shows you the current running version of PHP and WordPress on the cloned site.

These should be the same settings your live site is using. As such, you should get an exact production-ready environment for your cloned site. Press the ‘Create clone’ button and let UpdraftClone carry out the process of cloning your site on the staging server.

UpdraftClone will show you the cloning progress on the same screen as it may take a couple of minutes to fully clone your site, depending on the size of all the images, plugins, content etc. During the process, you will be presented with the staging URL of the clone version. Your admin and password details will then be sent to you via your UpdraftPlus registered email. This is the URL you can use to work when carrying out changes and updates – risk free.

How to make changes on a cloned site?

Once your website is cloned on a VPS server, you will obviously want to make changes to it. For that, you need access to the filesystem and most probably database. You can get access to these options from your ‘My Account’ on UpdraftPlus.com.

Go to the My account >> UpdraftClone page. Here you will get a list of your clone sites. Click on ‘Manage’ next to the clone you just created.

On the next screen, you will see the options like Database Login, SSH access, SFTP access, etc. In order to update a website flow, you will be required to have filesystem access. Click on the ‘Show SFTP access credentials’.

This will present you with the SFTP credentials of your cloned site. Using these credentials, you can connect to the staging site through FTP client and modify the files as per your requirements.

Using the same method, you can enter the database by clicking on the ‘Database Login’ box.

That’s it! You can now test the new changes on your cloned staged site. Once you are done with the changes and are happy that everything works to your standards, you will need to move them to the live site. If you want an exact copy of the new cloned staging site on the live one, then you can achieve this by using the UpdraftMigrator plugin. See the following tutorial, which explains how to migrate a site to another server using UpdraftMigrator.

Happy cloning / staging! 

The post How to create a staging site/clone for WordPress with UpdraftClone appeared first on UpdraftPlus. UpdraftPlus – Backup, restore and migration plugin for WordPress.