As an experienced PHP Developer, I have more often or not used WordPress when working on my web projects. Like many other developers, I have started to lose the same level of excitement I used to have when working within its rigid structure, as I found it has restricted form and limited functionality over time.
Recently however, I found a WordPress boilerplate called ‘Bedrock’ – which was created by the guys from Roots that pleasantly surprised me. It works by allowing the user to leverage a modern day development workflow that can help speed up your development process.
In this blog, we will go through the steps to set-up Bedrock for WordPress development. Throughout this tutorial, I will be using and referring to the Windows OS only. When working on other operating systems, the steps to set-up the document root will differ slightly, but everything else should be broadly similar.
Installation of Bedrock
Using a Windows computer with XAMPP already set-up, install Bedrock to begin setting up the WordPress boilerplate for development. We’ll use Composer to create our project, so make sure it is installed on your system before proceeding.
To create the project using Composer, head over to your htdocs directory from the command line and run the following command:
composer create-project roots/bedrock
This command creates a bedrock folder inside the htdocs. You can also pass the directory name as follows:
composer create-project roots/bedrock DIRECTORY_NAME
If you jump into your project directory, you will notice a few files such as;.env, composer.json have been created. There is also a pre-filled .gitignore file with all rules defined already in it.
Next, go to the project directory in the terminal window/command line and install the dependencies using the command:
composer install
This installs all the dependencies required for the development and adds them inside the vendor folder created on your project’s file system.
We are now done with the installation, so let’s go ahead and configure Bedrock.
Bedrock setup and configuration
Start with the document root set-up on your OS for the Bedrock project.
Open xamppapacheconfextrahttpd-vhosts.conf in your text editor to configure the virtual hosts.
Add the following to the end of the file.
</em> <em><VirtualHost *:80></em> <em>DocumentRoot "D:/xampp/htdocs"</em> <em>ServerName localhost</em> <em></VirtualHost></em> <em><VirtualHost *:80></em> <em>DocumentRoot "D:/xampp/htdocs/bedrock/web"</em> <em>ServerName bedrock.local</em> <em></VirtualHost></em> <em>Here I have entered the directory path of the project – i.e. “D:/xampp/htdocs/bedrock/web” You can adjust this path as per your XAMPP setup.
Next, we need to make a small change to the Windows system file.
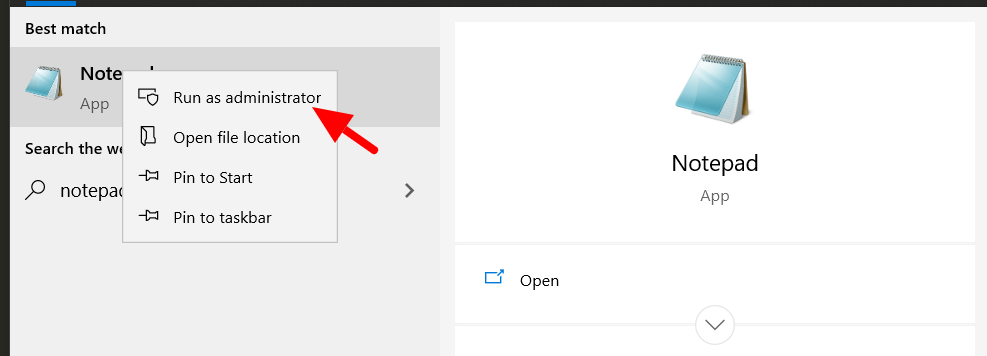
OpenC:WindowsSystem32driversetchostsin the Notepad application.Be sure you have opened the Notepad application with administrator access to make this change. To do this, Right-click on the App icon > Run as administrator.
Add the following lines to the end of the file.
</em> <em>127.0.0.1 localhost</em> <em>127.0.0.1 bedrock.local</em> <em>Note that I passed ‘bedrock.local’ as the local IP address with the same string (‘bedrock.local’) added in the ‘httpd-vhosts.conf’ file and it is mapped to my project directory path. If I now run bedrock.local on the browser it will point to the project directory that is associated with the above steps.
The final step in our setup is to create an empty database for our website and add its credentials in the
.envfile.
You can find this file in the root directory of the project.
Open the.envand add the DB Credentials as constants.DB_NAME=bedrock
DB_USER=ADD_DB_USERNAME
DB_PASSWORD=ADD_DB_PASSWORDAlso, add the WP_HOME URL & the salt key (You can generate a salt key at https://roots.io/salts.html)
</em> <em>WP_HOME=http://bedrock.local</em> <em>Keep the rest of the document as is, save and close the file.
Restart the Apache server and go to the URL: http://bedrock.local in your browser. It should redirect you to the famous 5-minute WordPress installation.
How to use Bedrock for WordPress development
We have so far learned how to install and set-up Bedrock, so let’s see how we can use Bedrock to develop a WordPress project.
In a default WordPress installation, the themes and plugins folder are found inside the ‘wp-content’ directory. With Bedrock, they are situated inside the ‘web/app’ folder. To set-up themes or plugins for Bedrock, add your theme(s) in ‘web/app/themes/’ and your plugins in the ‘web/app/plugins’ directory.
Using Composer, you can install the plugin as follows:
composer require wpackagist-plugin/updraftplusHere ‘updraftplus’ is a slug of a plugin. This means you just need to use the ‘slug’ and Composer will install the plugin for you. There is no need to follow the manual process for installing plugins as you can search for the plugin packages on WordPress Packagist.
This concludes our quick tutorial on how to setup Bedrock – a very useful tool to manage your development. I recommend using it for all your upcoming WordPress developments.
Please share your thoughts or suggestions in the comment section below.
Sajid Sayyad
The post Setup Bedrock for WordPress Development on Windows OS appeared first on UpdraftPlus. UpdraftPlus – Backup, restore and migration plugin for WordPress.