If you have a WordPress website, you will know that it should always be run on the latest version of WordPress as the updated version of the software provides better performance and security.
In this blog, we will discuss all the ways you can update your website to the latest version of WordPress. We will go through the process on how to download the latest WordPress version and update it manually and also show you how to automate your WordPress updates – which can be highly beneficial, as it can save you a lot of time and effort.
Why you should always use the latest version of WordPress
WordPress is an extremely popular and open source software platform. This means everyone can study the code, as it is available publicly as open source. This allows developers to analyze, improve and contribute to the WordPress codebase. Whenever a developer finds any bugs or security issues, it is reported to the WordPress software team, who then fix the issue and release a new WordPress update, with all the issues hopefully fixed. This approach to problem analysis/solving has largely been the reason why WordPress has managed to grow so rapidly.
However, the web is not populated only by people with good intentions. There are entire cottage industries in operation that exist to employ hackers to actively look for vulnerabilities and loopholes in the source code. As it powers over a third of all the websites in the world, WordPress is a hugely popular target and often top of the list for hackers. If a vulnerability is found in an older version of WordPress, hackers will attack these sites and steal all valuable data (such as emails, billing information etc).
Apart from security fixes, users of WordPress will also get access to new features and better performances when they download the latest version of WordPress. For example, the latest WordPress 5.8 version has introduced a few new features that you can read in the release documentation.
Now you are aware and understand the need to upgrade WordPress, let’s take a detailed look at how to perform the upgrade.
Things to do before upgrading WordPress
Whenever you plan to update the software, remember to always take a backup of the current site with UpdraftPlus. By doing this, you will be able to restore the site immediately if the new updates result in unexpected issues and break your website. It is recommended that you store your backup in a remote storage location (such as Google Drive), so you will always have access to it; even if an upgrade causes an issue with your server.
For extra safety and security, you can also use UpdraftClone to create an identical copy of your site and test out any update on, further removing any potential risks as UpdraftClone allows you to create a cloned test site of your live site instantly and directly from UpdraftPlus. Once you have created a clone of your site, you can carry out updates and tests, safe in the knowledge that your live site is completely safe from any potential issues.
When it comes to WordPress backup, UpdraftPlus is the number one choice of users. At the time of writing this article, it is being used on over 3 million websites. Follow our guide: How to Backup a WordPress Site: Step by Step Guide for instruction on how to backup your site before updating WordPress.
Once you have your website backed-up, remember to choose the right time to schedule your upgrade. Updating WordPress usually only takes a minute or two, but in certain situations it may take longer than expected. During this process, it is important to remember that customers/visitors to your site should not face any unexpected behavior or access issues. To avoid this, it is best to pick a time when you typically have less users active on the site.
Manually upgrading WordPress to the latest version
WordPress regularly releases updates with both major and minor releases. Minor releases are typically reserved for security and bug fixes. Since WordPress 3.7 or above, automatic updates are turned on for minor releases. This means you do not need to upgrade it manually as WordPress handles these minor updates on it’s own.
When it comes to major releases, there are 2 options available to upgrade to the latest version – automatic (via a press of button) or manual.
Upgrading WordPress from the Dashboard
This is a straightforward and easy to follow process. All you need to do is press on the “Update now” button and the upgrade will start automatically. It can be done in a few moments.
To access this option, go to Dashboard->Updates page in your WordPress site. You will see the ‘Update now’ button as shown below.
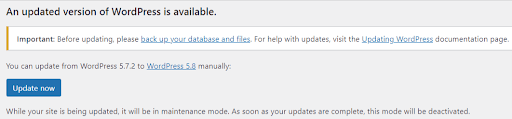
In the screenshot, you will see that it states that your site will be in maintenance mode until the updates are complete. As previously mentioned, this is the reason for picking the “low visitor” hours when carrying out your upgrade.
Press the ‘Update now’ button and WordPress initiates the upgrading process for you. It may take a couple of minutes.
Once WordPress has installed the updates, you should be redirected to a page where you can see a list of new features available in the latest update.
There may be some cases where this process is not possible. If this is the case, you can follow the below update process instead.
Upgrade WordPress using FTP Client
In order to update WordPress manually to the latest version, you will need to perform the following steps.
- Download the latest WordPress zip.
- Extract the zip.
- Connect your site with an FTP client (FileZilla is a popular FTP Client).
- Upload wp-admin, wp-includes directories (from the extracted zip) on your site, replacing older versions.
- Upload all core files from the root directory of extracted zip. Remember not to change the wp-config.php file.
- Upload wp-content/index.php.

WordPress writes the code for core functionalities and new features in the wp-admin and wp-includes folders. The files in the root directory also contain the code for new updates. While updating WordPress, we need to only replace these files and folders. When developing your WordPress websites, remember not to touch these files – at any cost, as it can break the system. These files are part of the core development and must remain untouched.
Once you are done with the manual process, go to the admin area of your site. Sometimes you need to update your database for the new version. You may see the below notice asking to update your WordPress database.
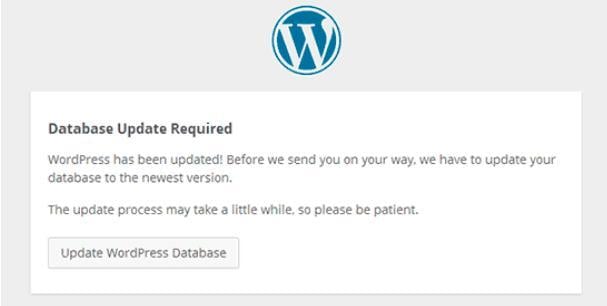
If you come across this notice, just press the ‘Update WordPress Database’ button.
After this, login to your admin area – you should now see you have successfully updated to the latest version of WordPress.
It is important to carry out due diligence on your site after an update. Browse your site and make sure everything is in the right place and is working correctly. Most of the time, WordPress updates will not cause any issues if you are using the system correctly and carried out the update in the proper manner. However, if you are experiencing unpredictable behaviour, you can quickly restore your site to the older working version using your UpdraftPlus backup.
You can also save further time by automating the WordPress updates process using the Easy Update Manager plugin.
Manage automatic WordPress updates
The Easy Update Manager plugin is built by the same team that brings you UpdraftPlus. At the time of writing, Easy Updates Manager has 300K+ active installations. By using this plugin, you can automate WordPress, plugin and theme updates.
Users can also use a free version of the plugin with a limited set of features. However, it is suggested that you install the Premium version, as it contains many handy features that can make updating easier and quicker. These include:
- Safe Update – Block automatic updates if the update states a minimum PHP or WP version requirement that is not met by the site/server.
- Schedule Updates. Customize your update schedule to minimize any downtime.
- Auto-update protection. If something goes wrong during an auto-update, the plugin will alert you via email and then try to fix it automatically.
Upon installation, you can find the settings under the Dashboard->Updates options. On this page, you will see the different options to manage WordPress, plugin and theme updates. Under the ‘WordPress core updates’, press the ‘Auto update all releases’ button.
Add your email address under ‘Core notification emails’. You will now receive an email at this address when your site updates.

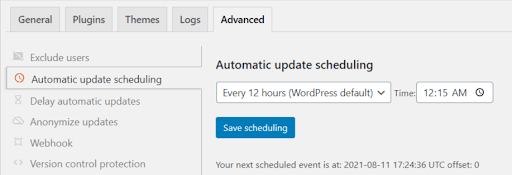
When using the premium version of the plugin, you can set your updates to suit your schedule. As previously discussed, if you wanted to update WordPress and pick a time when your site had less visitors, go to the ‘Advanced’ tab and set your preferred schedule time under ‘Automatic update scheduling’.
These are the basic settings required to automate your WordPress updates. Now you can just sit back and relax and let the plugin handle all the upgrading stuff for you.
Conclusion
We have run through both the automatic and manual processes for upgrading to the latest version of WordPress. The user can use either process in order to help keep your site safe from hackers. Remember to always take a backup before updating using UpdraftPlus!
The post How to update your site to the latest version of WordPress appeared first on UpdraftPlus. UpdraftPlus – Backup, restore and migration plugin for WordPress.